Home»Guides»Fire Emblem 1 Shadow Dragon and the Blade of Light Official English NES Switch Guide
Fire Emblem 1 – Shadow Dragon and the Blade of Light (Official NES English Translation Release on the Nintendo Switch) Walkthrough and Strategy Guide (Also called “Ankoku Ryu to Hikari no Tsurugi” in Japanese)
Walkthrough
General Tips Before We Begin…
Please consider making a contribution to me by using Paypal: https://paypal.me/BAIZEGAMING
Consider buying us a coffee for our efforts –
BTC – 33iDpHvVwwcMyxhrv83rL75TXpmgBd72Xv
These guides take a significant amount of time and effort to make, and anything that can be given is extremely appreciated. Even just a dollar from you can help, it adds up very quickly when many people contribute together.
- Fire Emblem 1 on the NES is a strange game to say the least, let’s explain some common nuisances of this game before we move onto the walkthrough. Though it’s a Fire Emblem game, many of the mainstays you’d find in the later games are not found in this game, I’d recommend you go through these (many) points before checking out the chapter guides…it’s a long list, but it’ll be really helpful for you.
- There is no weapon triangle or magic triangle, but you still have “effective damage” when using a certain weapon that beats a class. For instance, bows are still effective on pegasi and wyvern knights, and rapiers are effective against horse-riding knights/paladins and generals, hammers and armorslayers are effective on generals, ridersbane effective on horse-riding knights/paladins, wyrmslayers effective on manaketes, etc.
- No supports or support bonuses!
- All characters/enemies (except 1 character you automatically recruit in the final chapter) have 0 base Resistance, so magic is pretty powerful. There’s no Magic stat in this game either, the strength of magic characters depends on the magic tome used
- In this game, physical damage is basically Character Strength + Weapon Strength – Enemy Defense, physical damage includes any non-magic weapons including iron, steel, silver etc. bows, swords, axes, lances, etc, NOT including magic weapons such as Thunder Swords (herein called Levin Swords). There are no magic types of bows, axes, lances, etc, the only magical weapon not a spell is the Levin Sword.
- You can get “effective damage” which multiplies Weapon Strength by 3 (when you use a weapon powerful against a class, such as shooting a pegasi with a bow, see my earlier explanation), and critical attacks which multiply the end result damage you’d deal by 3 (critical attacks are determined by Luck and Skill, and Killer Weapons can increase this by 20%).
- Bowguns are a kind of bow that act like a Killer Bow, they increase critical chance by 20%. If you go elsewhere they might mistranslate “Armor Slayer” as “Armor Killer”, that context of killer is not the same as the killer weapons that increase your critical chance.
- Magical damage is Character Strength + Weapon Strength – Enemy Resistance, but in this game almost everyone has 0 Resistance. There’s a catch! Character Strength is only applied if you’re a mage character! If you’re not a mage character, such as Marth using a Levin Sword, then it’s Weapon Strength – Enemy Resistance without Character Strength taken into consideration.
- So if you see a bulky enemy with a lot of defense and don’t have an armorslayer or something effective, try a magic attack with your mages. Ballistae enemies have a lot of defense in this game and they can hurt your mages because they have ranged attacks, so try equipping your characters with magic weapons, then attack them, and finish them off with a mage.
- Speaking of ballistae enemies, they only have a 2 range in this game. It’s very odd, Fire Emblem 3 has a remake and continuation of Fire Emblem 1, and in that game they have large ranges, as well as in Fire Emblem: Shadow Dragon (DS) and Fire Emblem: New Mystery (DS) they also have large ranges. In all other games ballistae have long ranges as well.
- It makes me think, did they originally had that intention and not program them correctly in this game when it was originally released? Either way, the original game and this release they have only 2 range attack! As well, the Swarm spell in later Fire Emblem games is a “siege” tome, or in other words it has ~5-10 range in later games, but in this game it’s just a regular 2 range spell.
- To double an enemy, you only need a speed of over 1 more than the enemy. It’s Character Speed – Weapon Weight must be 1 or more than Enemy Speed – Enemy Weapon Weight. The catch here is that you can’t view your weapon weights in this game, blah. The speed in the menu is just your Character Speed so be careful, you need to subtract weapon weight from that.
- But in this game, Steel weighs the most, then Silver is less, then Iron is the least weight, that was not a mistake, in other games Silver weighs more, but not in this game. Speaking broadly, Swords are lighter than Lances, which are lighter than Axes when comparing those of the same materials. Bows are similar to Swords in weights.
- Spellbooks/tomes start off light like Swords, but gets heavier the fancier it is, except Excalibur is light weight at 3, Starlight is medium heavy at 5, Aura is really heavy at 7. Swarm is a very powerful tome, but it’s very heavy and I don’t bother with it. Dragonstones are generally very light, 3 for first manakete, 1 for second manakete. I know, information overload, but you can estimate if you can double an enemy easily or not with these rules so there are no surprises.
- Your hit rate is Skill + Weapon Hit Rate – Enemy Evade, where Enemy Evade is made up of Enemy Attack Speed, their Terrain bonuses, and their Luck. You’ll have to estimate this, but it’s usually high, it’s only low if you’re using axe characters because the Steel Axe has such a bad weapon hit rate of 70% and there’s no silver axes or legendary axe weapons…
- Remember how I said all characters have 0 Resistance? To increase resistance you need to use the “Pure Water” item, it temporarily increases your character’s resistance and your resistance will go down by 1 point each passing turn, I’ll try to warn you when you’re about to face many enemy mages and where you can buy these pure water items.
- You can also use a stat-boosting item called the Talisman to permanently increase Resistance on a character by 7, but those are rare in treasures or in a Secret Shop near the endgame.
- When you get a thief, try to always bring them on maps especially “indoor” maps, but I’ll warn you in advance if you really need them. You need them to unlock doors and grab treasure chests before enemy thieves get it. You cannot kill the thief to get them to drop items in this game, once they steal the item it’s gone forever! (The one exception is that there’s a thief that starts off carrying an item and the chest is open at the start of the chapter, he’ll drop the item.)
- Make sure you have plenty of master keys and Doorkeys and Bridge Keys as a backup. Masterkeys can be used on chests, doors, and bridges (but masterkeys can only be used by a thief), but door keys are only for doors, and bridge keys are only for bridges (door keys and bridge keys can be used by anybody). What’s the point of them? Doorkeys and Bridge Keys can be useful if you really don’t want to bring a thief, but they’ll take up more inventory space. Marth will get the ability to open chests himself after Chapter 6, but he can never open doors/bridges unless you have those keys.
- If you’re confused by “bridge keys”, two chapters (Chapters 14 and 20) have broken or drawbridges that are up, and the thief or anybody with a bridge key can use it to complete the bridge, you don’t see that in newer Fire Emblem’s anymore. I’d recommend just bringing a thief, each set of masterkeys had 40+ uses, you can use them the entire game without actually needing Door Keys or Bridge Keys.
- BUT, the final chapter in the game does have locked doors that spawn onto the map, it might be a good idea to keep a few Door Keys as a backup in case your thief is far away in that map, but there are other remedies such as the Warp Staff that can let you warp around locked doors.
- Because door keys and bridge keys are not stacked into 2 item (each door key or bridge key takes up 1 inventory slot), I usually throw them away because your convoy space is VERY limited in this game! This contradicts what I said earlier, but I really think it’s easier to use a thief with masterkeys instead of individual keys.
- Some items in villages are extremely useful, you need them to make unique spells and get legendary weapons, they’ll make the final boss much easier and I’d argue they’re almost necessary, I’ll warn you.
- Unique spells include Linde’s Aura spell and Merric’s Excalibur spell, useable by only them respectively. Starlight is a unique spell useable by mages. Unique weapons include the spear Gradivus, sword Mercurius, and bow Parthia. In this game you cannot use the Hammerne to repair legendary weapons, best to save these spells and weapons for bosses and the final boss.
- Also, only Marth can visit villages in this game! I’ll warn you if he needs to bring special items with him in advance as well! The small individual houses only provide tips and lore, I’ve never seen them give items.
- Healers don’t get experience from healing! I don’t recommend leveling healers, only level your mages that have attack spells, just use your healers to heal.
- You need to bring certain characters on a map to recruit certain characters, I’ll warn you at the beginning of each chapter! Interestingly, Caeda probably has more characters she has to talk to to recruit than Marth does, this is probably the only Fire Emblem where someone else recruits more characters than the main character. For that reason, I really recommend using Caeda throughout the entire game. Also, make sure Caeda doesn’t die, otherwise you’ll get a sad version of the ending.
- The items you can use to increase your character’s stats are REALLY good in the old Fire Emblem games. Most will increase that stat by 5+ or even more except Dracoshield which only increases your defense stat by 3. If you save your money and have the VIP Card and the Silver Card to decrease shop prices, there’s a “Secret Shop” near the end, where you can buy stat boosters and trivialize the game’s difficulty, I’ll let you know when and where.
- The VIP Card is needed to access Secret Shops in the game, I’ll tell you its location in the chapter it appears (Chapter 17), but if you miss it you’ll never be able to access Secret Shops in the game!
- You need individual class promotion items and you need to put the item onto the character and use it during a battle, use: Knight’s Proof (Called Paladin’s Proof in this) to promote horse-riding knights into paladins, Hero’s Crest for turning mercenaries into heroes, Orion’s Bolt to promote archers into snipers, Elysian Whip (it’s called Skydrake Whip in this new translated release) for pegasus riders into wyvern riders, and Bishop’s Ring for magicians or healers (don’t promote healers as I said because they don’t level easily).
- Unlike other games, pegasus knights promote into wyvern knights instead of them being two separate classes. Be careful because only certain classes can promote so read your character’s classes carefully, it’s not like Awakening where you can turn anybody into any class.
- As you can see, Marth, thieves, axe users such as Fights and Pirates, and manaketes cannot promote. One terrible oversight as well is that Armored Knights cannot promote into Generals, so if you use Draug he cannot promote, the only General you can get is Lorenz. It’s clear this was an oversight because in later games they can promote just fine with the Knight’s/Paladin’s Proof. If you can’t find them and miss them, you can buy them in a secret shop, I’ll let you know when.
- Enemy AI in the original Fire Emblem is “different”, but it’s nothing too weird. Enemies will only try to attack your characters if they know they can deal at least 1 point of damage to you, otherwise they will just stand next to your character. It is odd though, because sometimes I’ve seen enemies attack me for 0 damage. I think the enemy thieves AI panics if you take too long on a map. But otherwise, generally if your character has enough defense, the enemies will just surround that character without even attacking them or run away! To be honest it makes more sense, in contrast to Shadow Dragon on the DS where enemies will suicide rush you…
- Also, enemies prioritize attacking Marth over all other characters if he’s already in the attacking range. You can use this to your advantage though. For instance, they’ll prioritize attacking Marth instead of another character at 1 HP they could’ve killed. Interestingly I have seen exceptions to the enemies attacking someone else when Marth is in range, but it’s extremely rare. Kaga has programmed the most interesting AI…
- There are 4 total secret shops in the game, each sells good items, one sells promotion items for example, some sell stat boosting items, and one sells Physic, a long range healing spell as well as powerful tomes and Master Keys etc, I will let you know as we come across them, you need to access a special area of the game map to get to them, they are from chapter 17 onwards so most of them are from the middle to endgame. VIP Card item (from left enemy bishop healer in chapter 17) is needed to access the shop, and the Silver Card (chest in Chapter 14) item will reduce prices by 50%. Again I’ll warn you in advance.
- If you have the 3 pegasus sisters (Catria, Est, and Palla), you can surround an enemy in a triangle shape and automatically get a critical attack. Pretty fly for a pegasi.
- You can recruit many characters in the game, but only a small fraction of these characters are good. Different characters have different “growths” and base stats, you want a character with decent base stats for their point in the game and good growths, growths is basically the percentage chance of raising each type of stat on each level up, more is better of course. You’re free to use any characters you want if you’re looking for a challenge, however, we’ll recommend certain characters over others so that you have an easier time.
- Your character level resets back to 1 after promoting a character, but that’s fine because you get a lot of permanent stat bonuses. The issue is that there’s a big debate on if you should level up to level 20 before promoting. In this game, there’s no clear cut answer, it’s up to you, BUT unlike other Fire Emblem games, promotes don’t earn less experience than pre-promotes, so you can promote on the earlier side if you’d like.
- The game is 25 chapters long, so if you feel like you’re halfway, feel free to promote at level 10-15 even, pace yourself and if you’re having trouble with the enemies, promote your characters. BUT, make sure you don’t use stat-boosting items before promoting! Because the game’s programming is not good, for example, when you promote you gain more stats, so pretend you have a mercenary, and you use boots to increase their movement, then you promote, when you promote it increases your movement from only your base mercenary movement, it doesn’t add the movement from the boots increase. Since the programming is so shoddy I’m afraid, just be safe and use stat-boosters after promoting.
- Xane is an amazing character with a class you only see in this, Fire Emblem 3, and the DS remakes. He can copy another unit’s class and stats. It takes a turn to transform, but he’s extremely versatile. A disadvantage is he untransforms after a few turns, BUT, he only untransforms on your turn, so you can move your units ahead to protect him. But make sure he doesn’t untransform on weird terrain like the sky, otherwise you’ll need him to copy a flying unit for him to be able to move again. But his default form can actually walk on water. Need another healer? Use him! Want 2 Caeda’s? Use him! They need to bring this kind of class back again! The only thing is that you need to supply your own weapons to him in advance. He’s polarizing among players though, so feel free not to use him, I like him because he’s one-of-a-kind in this franchise.
- Manaketes have infinite use dragonstones, so no worries unlike Fire Emblem: Sacred Stones. There are 2 in this game, 1 for each manakete you can recruit, one is found in a village called the Firestone and I’ll warn you, and the other dragonstone, the Divinestone, comes with the manakete you recruit.
- Regular stats cap out at 20 on all characters, and resistance caps at 7. Same for enemies too.
- There are NO intermissions between chapters. So after beating the chapter boss and any reinforcements, organize your items and buy from the shops on the map! Your convoy is the tent on the map, and you have to keep trading items between characters. No convenience of life improvements I’m afraid. Only then should you proceed to the next chapter by putting Marth on the enemy throne. I actually spend a good half hour on just preparing for the next chapter, one of the inconveniences of this game I’m afraid, so look at the map of the next chapter to get an idea of what to expect.
- My YouTube Playlists with all Fire Emblem 1 walkthrough videos can be found here, I talked to all villages, all houses, all chests acquired, all characters obtained, as well as Falchion: https://www.youtube.com/playlist?list=PL-Hm3rGMVE2vzz3b27-IYT9v95xRPqptn
Chapter 1 – Marth Embarks

- New Recruit: Wrys joins by having Marth visit the village (left village)
- It’s a very reasonable tutorial level! Kill the thief before he reaches and destroys the village (takes him 2 turns), then visit it with Marth for money, which you can use at the nearby shop
- Marth is mandatory, but he’s also weak, so use him a little bit at a time, his rapier is effective against cavalry and generals, but save it for when you need it
- You pretty much need to fight the final boss with Marth, so be sure to use him!
- Great characters to keep using include Abel, Cain, Gordon, and especially Caeda. Caeda is used for most recruitments in the game, she uses lances, has great movement and flies, she has a promotion she can get later, etc. Make sure she doesn’t die, or you’ll get a sad version of the ending.
- Gordon’s a great bow-user, and Abel and Cain are great horse-riders, Abel and Cain only have okay growths, but since you’re using them from chapter 1 you’re going to be able to level them up a lot.
- By endgame, you’ll need to have 14 good units other than Marth, and there are way more characters than that in this game, so you’ll need to only use up to 14 and ignore the rest, you can use less characters if you want too, up to you
- Don’t use Jagen (and I know people are going to complain about me saying so), he “looks great now” but he has bad growth rate when leveling up, using your other units would be better.
- Use Jagen only to pick off an enemy or two if you want or for emergencies, I think it’s better to grow those characters I listed instead. Give Jagen’s weapons to your other characters, Caeda can use the silver spear immediately, and Caeda is a little weak early so feel free to use it up to get her some levels easily.
- Defeat bosses with your regular characters, bosses give a nice experience boost too, don’t waste them on Jagen.
- There’s a store next to the village, you can do this after defeating all the enemies, I recommend buying 3-4 javelins, they’re spears that can be used from 2 squares away, you don’t see them for quite a few chapters, they’re very useful for counterattacking ranged enemies, also buy a bowgun, and maybe a few other weapons if needed
- The other houses will have tutorials and optional information if you check them out, it’s not needed if you don’t want to
- Continue through the map, use the forests to increase your evasion, enemy pirates will have a poor hit rate especially with axes in this game that already have a low hit rate
- Recruit Wrys from left village, he’s not so good as a healer, use him until you get better characters
- Otherwise you can’t really mess up in this chapter, just keep Caeda away from the bow-user
- Defeat the boss, Gazzak, you get bonus experience for defeating bosses, remember there are no intermissions between chapters so finish your shopping, equipping characters by having them trade with each other, then have Marth move to the next chapter, and make sure to do this in all chapters from now on
Chapter 2 – Pirates of Galder
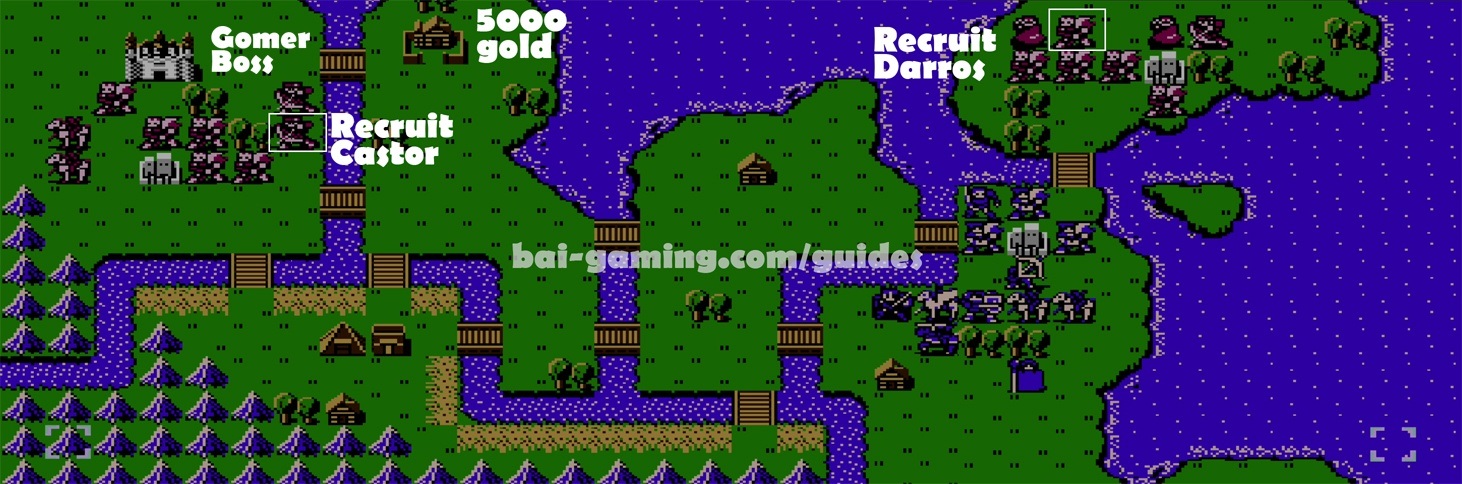
- New Recruits: Darros (talk to him with Marth, he’s a unique pirate in the north) and Castor (talk to him with Caeda, he’s a unique bowman in the west)
- You get other recruits automatically in this chapter, Ogma is really good and you should keep using him.
- Use Wrys as a healer for now until you get better healers later. I use Barts permanently as my only axe and hammer wielder, he’s really amazing and most of the bosses in this game are armored knights/generals, but you don’t have to.
- Block the bridge in the north and the 2 western bridges with characters, the pirates can walk over water, but this will hold them off for a little bit
- You can heal slowly over time by standing on the forts
- Just be careful, although the pirates have a poor hit rate, their axes are powerful and they can hit like trucks
- Keep Marth around the north, and talk to Darros, the pirate with a unique name, to recruit him, he won’t attack you, so you can let him approach Marth with no punishment, make sure to examine the enemies because they all have the same sprites but you’ll see one has a unique name.
- Keep defeating the enemies, then move to the west and defeat those enemies, but watch out for Castor because he will attack you, talk to him with Caeda to recruit him, but be careful she’s not shot at with a bow
- I noticed on the beach/shore kind of areas (the edges of the islands) the pirates gain extra evasion, be careful
- Darros and Castor are generally NOT good…
- Continue mopping up the rest of the enemies, the boss, Gomer, is another pirate, this time with a hand axe so he has very low accuracy, but if you use a ranged attacker he’ll counterattack
- The tent is your convoy, if enemies drop a weapon and your inventory is full you have to discard something from your inventory, and if your inventory is full at a shop they will never deliver purchases to the convoy, giving items to each other will take a bit of time, so it’s best to do it at the end of each chapter, this is the worst part of the original Fire Emblem
- For shopping, hammers are good for your axe users (hammer is effective against armored units such as generals, and most of this game’s bosses are generals), hand axes are useful because they’re like axe-versions of javelins, they hit from 2 range but have very low accuracy. 2-3 hammers can last the game assuming you only use them on armored bosses.
- Then buy anything else you may be running low on. Talk to houses for more information if you’re interested, prepare your units, then to the next chapter!
Chapter 3 – The Ghouls Teeth
- New Recruits: Navarre – Talk to him with Caeda (unique mercenary in the northern area on the square above a fort, forgot to mark it on the map)
- Make sure to move Julian and Rena away from the enemies and towards your group. Julian will be your thief to open locked doors and get treasures from chests, a must-have, and Lena is a better healer than Wrys, she gets unique staves later on such as the Hammerne staff, which repairs weapon durability except for legendary weapons
- When Julian and Rena reach your group, try to block off the north and slowly pick them off. Talk to Navarre with Caeda to recruit him!
- I don’t use Navarre, but if you want another mercenary/hero like Ogma, use him! Heroes are not a bad class in this game.Julian is your go-to thief, and Lena will replace Wrys as your healer.
- Save Lena’s teleportation staff for tougher chapters, this is the first of 3 Warp Staves you get in the game, each has 7 uses so there’s actually a lot of warping you can do…you can also use Hammerne on your Warp Staves to repair them, so just don’t “break” your Warp Staves, if you really use them keep at least 1 charge left and put it away in the convoy so you can repair it later.
- Make a wall to hold off the enemies from the west as well
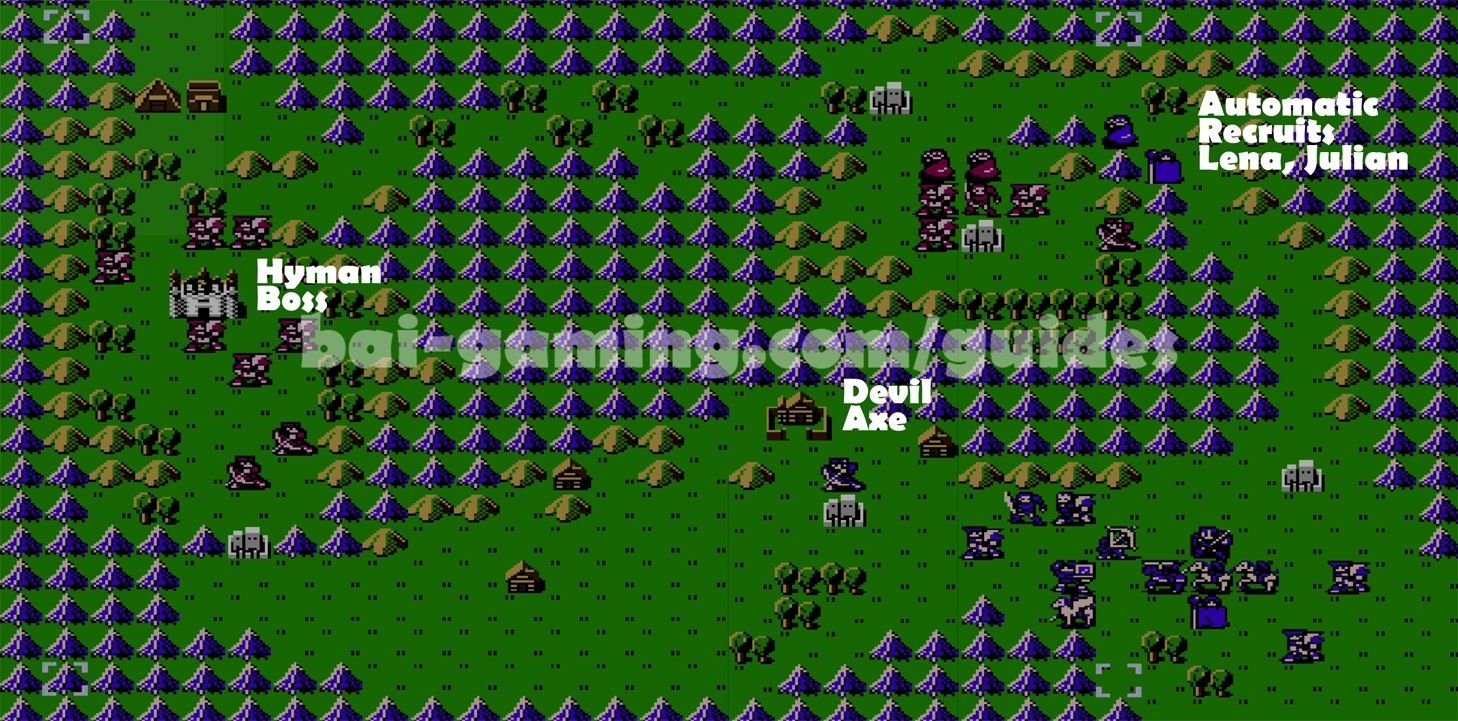
- The village has a devil axe, with devil weapons they’re powerful, but depending on your character’s luck they have a chance to deal damage to you instead of the enemy! Since your characters have low luck, you have a high chance of it dealing damage to yourself, so save them for much later if at all, but if you want you can always savescum and use them, I don’t use devil weapons at all, I throw them out
- Go to the houses for information, it’s optional
- Clear out the enemies and defeat the boss, Hyman, the boss is another axe-user, but is a fighter, not a pirate.
- Shop is similar to the last chapter’s shop, see previous chapter, organize your characters, if you’re not using Navarre give his killer weapon to someone else, and continue. Remember that you actually need to deploy a character to remove their equipment in this game, so if you know you’re not using a character put their equipment into the convoy now, there is no menu between chapters!
Chapter 4 – Battle in the Lea
- You can choose which characters to use from now on
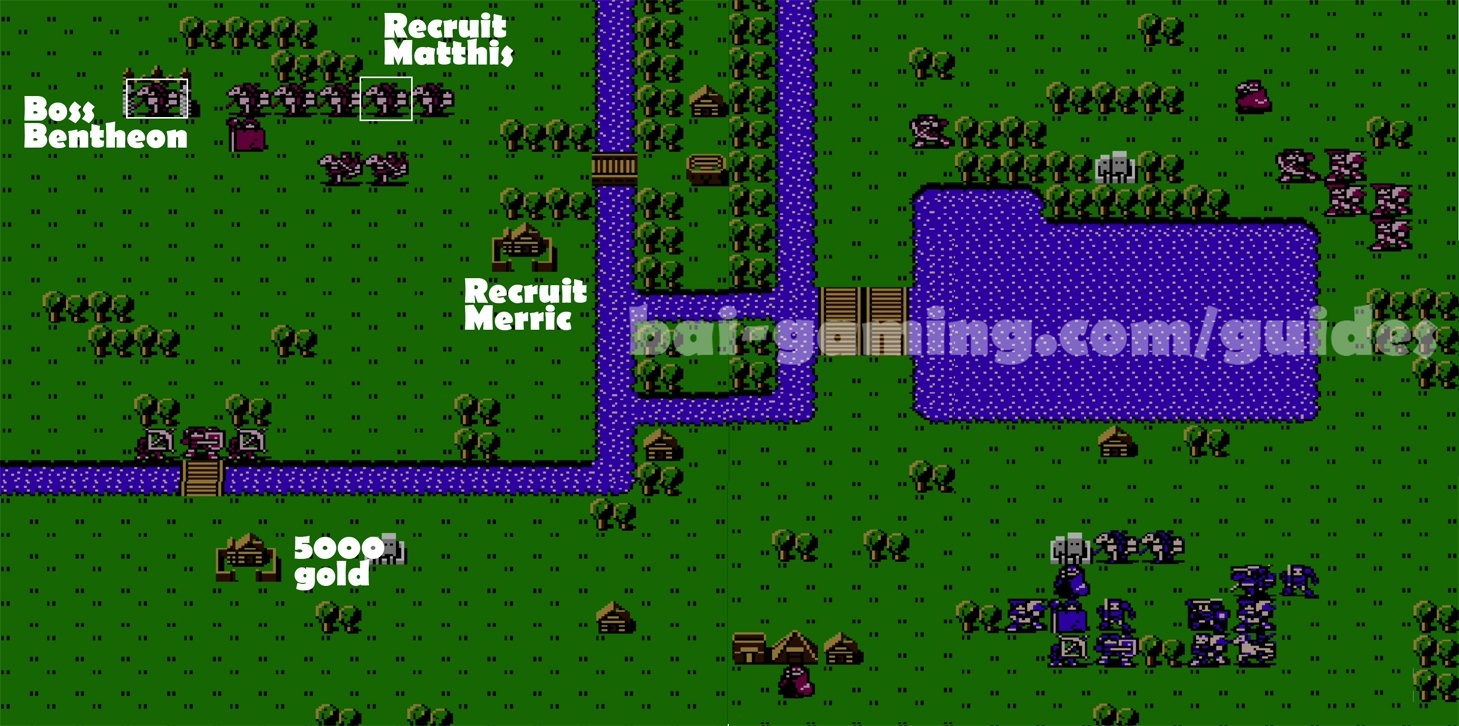
- New Recruits: Bring Lena, she needs to talk to Matthis to recruit (Matthis is a unique horserider in the north), and Merric (Visit northern village with Marth)
- We have 2 villages and 2 thieves on the map, so make two groups to quickly kill them before they destroy the villages, southern village has money, northern village has Merric, who is an amazing mage you need to use from now on.
- If a thief destroys that village, please restart the chapter, Merric is extremely useful and comes with the unique Excalibur tome, save that for difficult enemies though (it cannot be repaired with Hammerne!) and use his regular magic Blizzard for now
- The horseriders will reach you quickly, I usually build a wall with my units and put weaker units farther away. Matthis is no good to use in the long-run…he will approach and attack you, I quickly killed off the other horseriders, trapped him, and quickly ran Lena over to him. If you have trouble, use Jagen as bait and discard all his weapons so he doesn’t somehow accidentally kill Matthis.
- Once the thieves are killed, you can relax a bit and slowly work your way through the enemies, one horserider has an armorslayer, and the horserider boss Bentheon has a ridersbane, so be careful which units you’re using
- Since the boss, Bentheon, is a cavalry, you can use Marth’s rapier, or alternatively regular magic with Merric since he has 0 magic resistance. Rapiers are actually plentiful in this game later on, so don’t be afraid of using them once in a while.
- Shop is similar to previous chapters, buy whatever weapons are close to being used up, optionally visit houses for more information if you’re interested
- An arena is in this chapter, use it to train your units and get gold, BUT, you cannot leave during a fight, so make saves beforehand, otherwise you may end up dying. I don’t like using them myself. One trick is to keep going in and out the arena menu, notice that the amount of gold you win each time is different, so if you find a fight you cannot win, try going in and out of the menus a few times, in general the less gold that is bet the higher the chance of victory.
- Also, make sure your weapon has durability when you enter arenas because if your weapon breaks, your character will do nothing and die!
- Once done preparing, to the next chapter
Chapter 5 – Champions of Aurelis

- New Recruits: Wendell (Talk with Marth or Merric, he’s in the northeastern area, he’s a unique mage), and many automatic recruits
- This is the first chapter with reinforcements! Be careful in this game because enemy reinforcements spawn AND attack on the same move! They’re marked on the map above, they’re the northern forts
- Enemies spawn from the northwestern and middle northern forts. To block reinforcements, simply have a character sit on top of the fort. In this game, reinforcements can be plentiful and brutal, but you can use them to train units more too, this chapter’s not so bad
- Another trick is that if the enemy stays on the fort, that also won’t spawn new enemies, but that’s not likely to happen unless you block an enemy in with your units
- We get many automatic recruits in this chapter, which is Hardin and his group in the west. Have them move into the forests and wait for the enemy to come to you, this buys you more time to save them.
- Make sure to save the village in the north, it has a firestone for a manakete recruit later on, without this dragonstone that character is basically un-useable. It makes finishing that future chapter a bit easier with that new manakete. I’ll warn you when you need to have it in your inventory but make sure you get it in the village.
- Make two groups, one to save Hardin’s group to the west, and Marth and other characters to save the northern village and recruit Wendell.
- Wendell will approach you if you don’t go towards him, don’t worry, he won’t attack
- Wendell is another amazing magic user you need to add to your team, magic users are great in this game, he comes with Barrier, which is a spell you can use to increase your character’s magic resistance, but save that spell for chapters where you need to fight armies of mages. This is the only Barrier tome you get for free, you can also buy them in Chapter 17’s Secret Shop, and that’s all the locations you can find them in this game.
- After 11 turns or so, the two northern forts will spawn enemies, defeat them, block their forts if you want, and work your way through the map mopping up any enemies left, use your bow on the pegasi if possible, you have a ridersbane if you’re having trouble, etc
- The boss, Merach, is a knight, you can use a rapier, hammer, or an armorslayer weapon for effective damage, or magic will kill him easily
- Visit houses optionally if you want information, the shop has more of the same as before but also has javelins again if you’re running low on those
- In the long run, Wendell is a great add to your team, Hardin is also great, some like Roshea but I don’t, other new characters are not so good
- Finish up, prepare your team, and move to the next chapter. Next chapter you have to rush through enemies to get many treasure chests, so it may be a good time to bring Julian (you need Julian for a character recruit too), and equip your hammers, armorslayer, rapier and ridersbane weapons
Chapter 6 – Fire Emblem

- Bring Julian, many locked doors and treasure chests! Marth gets the ability to unlock chests after this chapter is done, but that’s only after so bring Julian now.
- New Recruit: Rickard, talk to him with Julian, use Julian to unlock the nearby door and recruit him. You can also just unlock the door with Julian and talk to him with Marth to recruit him.
- Rickard is another thief, if there are hectic chapters where you need to use 2 thieves, then use him, otherwise I just go for Julian
- You will WANT to recruit Rickard because he comes with master keys, even if you never use Rickard, recruit him anyways and take his master keys
- Split your group and rush through the map, the most useful include a chest to the west has physic (long range healing spell, very useful) and the chest between the two walls has an angelic robe (stat boosting item), but I recommend you try to get them all, it is difficult to get all chests if your characters spawned in a weird way, so feel free to use a warp or two
- There’s an easy trick in old Fire Emblems, simply put a unit on top of the chest, even if they can’t open it, and thieves will not be able to steal the chest’s items! If you can’t rescue the chests in time, consider using Rena’s teleportation staff for the important treasures or to teleport next to the thieves to kill them immediately consider even using Jagen
- Be careful, the eastern horseriders have silver weapons as well as the boss.
- The boss, Emereus, is a general, so use a rapier, armorslayer or hammer for effective damage, or use magic because he has no magic resistance
- The shop has some steel weapons, and javelins, bowguns and hammers, restock, organize your team, and head out, BUT, make sure Marth has the firestone you found earlier in his inventory when you move to the next chapter, just run to the convoy to fix your inventories, then run to the throne to finish the chapter. After this chapter, Marth has the ability to unlock chests, but he cannot open doors or bridge without a Door Key or Bridge Key, respectively.
Chapter 7 – Lefcandith Gauntlet
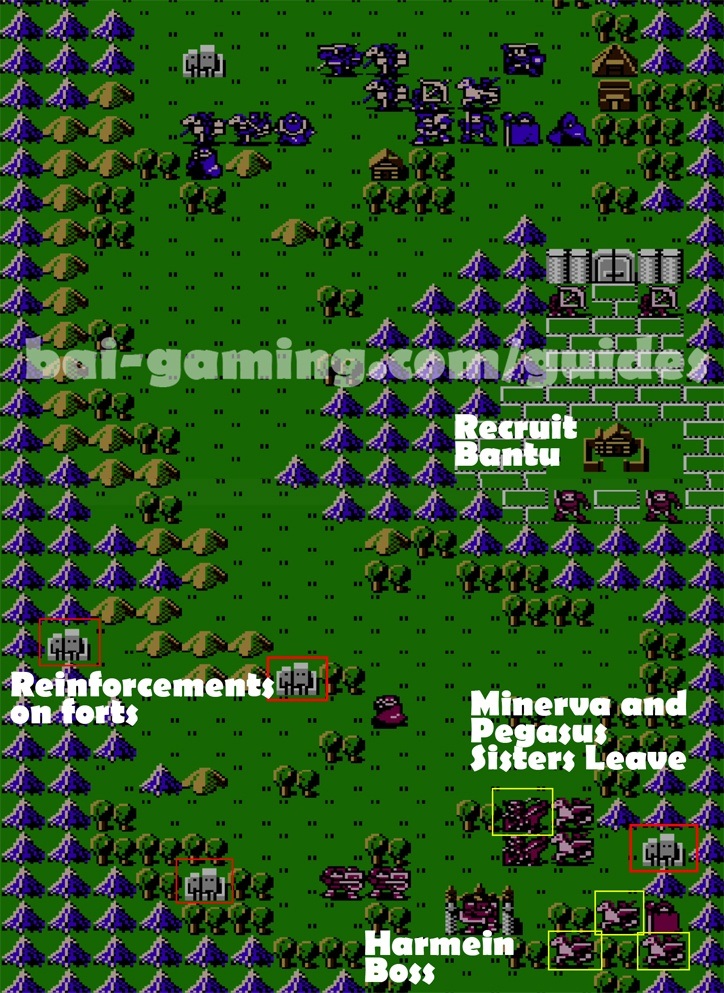
- New Recruit: Bantu, he is a manakete, to recruit him talk to him in the village with Marth, I recommended last chapter for you to bring the firestone, and give it to him right now so that he can deal some damage and defend your weaker units
- You’ll need to bring a thief such as Julian to unlock a door, or alternatively have a character with a Door Key, and have Marth make his way there before the thief destroys the village
- I believe the thief actually drops a door key in case you didn’t bring a thief, but I find it less risky and faster to just bring a thief
- Minerva will fly off after a turn, so don’t worry about her
- You still do have wyvern knights and pegasus knights that will reach you very quickly, they have very high movement speeds, build a wall of powerful units in the western road so that the flying enemies don’t pick off your weaker units, or just keep weak units far on top.
- If you put your allies in forests, you may get lucky and evade their blows as well. Your archer can get a lot of easy experience shooting down the flying enemies. Remember that wyvern knights actually are promoted enemies, so be careful.
- Bantu is great for helping defend us in this chapter, but I don’t use him later because we can get a much better manakete unit later on. He’s not bad though, you can use him and buy stat boosters for him if you want to use him endgame.
- Make your way down, but keep a wall up, on turn 13 the four forts in the map each spawn an enemy, one has a ridersbane so move your mounted horse units back!
- You might be surrounding the boss, then all of a sudden those enemies spawn around you, so I recommend just passing some turns to be prepared for those reinforcements, only after they stop, then proceed to the boss
- Or, you can quickly rush your characters on top of the forts to stop enemy spawns as I do in the video
- The boss of this chapter, Harmein, is another general, so use a rapier, armorslayer, hammer for effective damage, or just use magic since he has 0 resistance to magic
- Very similar shop to previous chapter’s shops, prepare your units and head out, there are a lot of horse-mounted and armored units coming up if you want to use those special weapons, buy regular weapons too because the next chapter has a lot of reinforcements
Chapter 8 – Port Warren

- New Recruit: Roger, talk to him with Caeda, he is a knight in the northern area (not marked on map, he’s on the eastern side of the split, below the archers)
- The shops are unique, they have healing items, door keys, and magic for sale, try to buy some magic quickly because you’re probably running out since we didn’t have magic shops earlier, you can visit them again after you deal with the enemies
- Automatic recruits: Radd is good, Caesar is okay, I don’t use either
- In this map, you have enemies that respawn from the five forts, from turn 13 all the way to turn 30, meaning a lot of enemies.
- There are two strategies, either rush the enemy to get on top of those forts before they massively spawn enemies, or just wait at the chokepoints and wait for the enemy to come to you.
- Another trick is to make a wall close to the forts, so that the enemies stay on top of the forts, the forts heal them, but it won’t spawn more enemies if they’re already sitting on top of a fort
- If you want to play it safe, defend from a chokepoint, it’s great experience for your characters, just defeat all the enemies, and make sure beforehand that you have a lot of weapons so you don’t run out of uses, put bow users and mages behind your wall, and just keep defending yourself against the enemy until the waves stop
- In my video, I block the forts before there are reinforcements
- After the waves stop, head back to the shops and resupply, a few door keys are useful to keep in storage as well as more magic if you used it up from all those enemies. I strongly recommend getting magic and keeping it for later, mages are extremely useful in this game. There’s an arena as well for grinding levels.
- The boss, Kannival, is an armored knight, so use a rapier or armorslayer, or even just magic, return to shop if you need to, prepare your characters and move on
Chapter 9 – Pyrathi Dragon

- New Recruit: Jeorge, visit the village with Marth
- Bring a thief since there are doors and treasure chests
- The village can easily be destroyed by a thief, so be careful, go to the village with Marth to recruit Jeorge, consider using a Warp staff, he’s a sniper who’s not bad if you want more archers, I don’t use him in my playthrough, but you should consider it
- The trick to this chapter is that a door nearby can be opened to get treasures easily, but enemies will come to you from there. If you’re confident, open the door and use your powerful characters to defend, but be careful because there’s one pirate with a Devil Axe, it’s very powerful, but it has a chance of backfiring on the user. Well, in this game it never backfires for the enemy AI.
- The southern forts will all spawn pirates from turns 10-17, some only spawn from turns 12-16, one pirate spawns with a hammer, be careful, also don’t forget that pirates can walk on water, albeit slowly
- The forts aren’t easily reachable, so I recommend you defend yourself and wait it out, make use of the forests and have the strong units protect the weaker ones
- I ended up maxing Marth’s level because of all the reinforcements =\
- Get the treasure to the southeast especially, it has a wyrmslayer that is effective on manaketes, the boss is also a manakete class so use it!
- I recommend you use it only on manaketes, but not wyvern knights unless it’s an emergency or unless you have the Hammerne staff to restore weapon uses/durability
- I say this because the final chapters must have 30+ manaketes and you only get 3 wyrmslayers throughout the whole game (and another one in the final chapter), they are not purchasable, not even in secret shops, only in Mystery and in the DS remakes are they buyable in shops
- Also, there are manakete enemies later in the game that are actually immune to magic damage, so using wyrmslayers with physical attackers is the best way to go.
- In short, use your wyrmslayers only if necessary, and if you do, don’t let them break, leave them at 1 durability and repair them!
- After all is done, visit any houses for optional information, clean up any remaining enemies, and restock at the shop (has regular physical weapons we’ve seen before, you can get more javelins, hammers, steel weapons, etc.), also, this is your last chance to buy javelins, you’ll never see them in shops again! I’d say we’re a little more than 1/3 into the game and it’s your last chance to get them, it’s a very strange oversight.
- They’re not strong nor accurate, but it’s nice being able to have your horseriders able to counter mages and other javelin-users with their own javelins.
- For the manakete boss, Mannu, make use of your new wyrmslayer or use a magic attack. The manakete’s dragon stone adds 12 defense onto its 4 base defense for a total of 16, which is tough to beat normally. The wyrmslayer will do effective damage and multiply your might by 3, or use a magic attack because they have 0 magic resistance
Chapter 10 – Princess Minerva

- New Recruits: Maria (talk to her with Marth, she’s in the center of the castle), and Minerva (after recruiting Maria, talk to her with Marth)
- Bring a thief because there are treasure and locked doors
- You can buy more rapiers in this chapter, so feel free to use your rapier up in this chapter!
- Keep an eye out on your starting zone, a total of 8 enemies spawn just a little north of your starting zone on turn 16, so watch your back if you have healers and weak units, keep a few strong units to watch your back, it’s best to rush into the castle and defend there
- Minerva rushes towards Marth, but she’ll never attack you, so don’t do anything stupid and attack her, don’t attack Maria either of course
- Rush downwards, and kill the thief, then grab the treasures (Mend and Levin Sword), and defend yourself in the castle, waiting for the enemy to attack you. Pegasus knights and wyvern knights from the north, and the spawned enemies from where you started
- Talk to Maria with Marth to recruit her, she’s a healer, but we have better healers, I don’t use her
- Keep defeating the enemies as they come to you, then kill any remaining enemies, you can recruit Minerva by talking to her with Marth after recruiting Maria. She can’t be recruited unless you recruited Maria first, she’ll just keep standing next to Marth otherwise.
- You get a Hero Crest promotion item for promoting mercenaries as a drop from the Hero enemy to the north of the castle
- There are a few shops, make sure to buy many Pure Water items, they increase your magical resistance and will be extremely handy when fighting many mage enemies, and you barely find them in shops so that’s your first priority, in Chapter 15 you will fight an entire army of mages, if you want an easier time I’m saying buy 10 or even more pure waters right now, consider even selling useless items to buy more pure water, the next time you see them in shops is Chapter 17, which is too late
- I ended up beating most chapters only using maybe 3 pure waters tops, if you buy many healing items you can get through, but if you’re a new player struggling buy them up!
- Other great finds in the shops include healing items, door and bridge keys, rapiers, silver lances, steel bows, etc, and replenish any other regular weapons you need. Door keys are good to keep in your convoy for the final chapter in the game because that level spawns closes passages with locked doors if you take too long. Bridge keys are okay if you don’t want to use a thief, but there’s only 2 drawbridges in the entire game so don’t buy more than that
- If you got Rickard’s Master Keys, then you can just use Master Keys for the rest of the game on all doors and bridges, and you’ll never run out.
- If you didn’t read the tips I listed at the beginning, the Levin Sword lets you use physical attackers to deal magical damage. The drawback is that it doesn’t include the attacker’s strength, it only includes weapon power – enemy resistance, where enemy resistance is 0.
- It can be a nice way to do damage enemies with high physical defense if you don’t have any effective weapons to use against them
- The boss, Zharov, is a general, use a rapier, armorslayer, or hammer for effective damage, or use a mage or thundersword to defeat him with magic damage.
- In the long run, I don’t really use Minerva or Maria, use Minerva if you want an extra flyer
- Organize your party, finish any shopping, talk to houses for extra information if you want, and when ready proceed to the next chapter, bring a wyrmslayer on someone because the boss next chapter is a manakete
Chapter 11 – Knorda Market

- New Recruits: Linde (Visit the village with Marth), Jake (Talk to with Caeda, Jake is a ballistician in the northwest)
- No reinforcements
- Start by going to the village to the southeast, kill the enemies, talk in the houses if you’re interested, but most importantly go to the village to recruit Linde, be certain to beat the thief to the village!
- Watch out for flying pegasi, build walls around your weak units!
- You should definitely keep using Linde, she is a great mage and comes with her own unique spell, Aura. Use only her weak magic spells for now, save Aura for when you need it (Aura can NOT be repairing from Hammerne)!
- Many shops with previous chapter’s items, but good finds include Mend, Thunder, Blizzard, Silver Lance, Rapier, etc.
- Then make your way to the northwest, kill bow-users and speak to Jake with Caeda to recruit him
- Ballistae are tricky because they have high defense, try using your Magic Sword and make your way into the northwest region, keep picking off enemies, you can use up your Magic Sword if you want because you can buy them in the next chapter
- Jake is a ballistician, in this game they only have 2 range, I don’t really like using them because they’re slow, but it’s up to you. If you want, use him, and then you can give him the boots item later on to increase his movement to normal.
- This chapter really makes me think ballisticians having only 2 range was a programming bug/oversight they never bothered fixing in the original, it looks as if you were supposed to be running around ballistae firing at you and it makes more sense in 3 and the DS remakes where they have like 10-15 range…so strange…
- The boss, Khozen, will immediately move once you’re in range unlike most of the bosses. He is a manakete, with 4 + 12 = 16 defense, use your wyrmslayer or magic
- Organize, go back to shop more if you need to, then proceed to the next chapter, there’s a manakete so bring a wyrmslayer, there are powerful mages so bring pure waters, and there are armored and horse-riding enemies too.
Chapter 12 – Ageless Palace
- Automatic new recruits, and no reinforcements
- You’ll need a thief for treasure chests and doors, consider bringing 2 thieves for a faster chapter
- This chapter is very similar to Chapter 5 with Hardin and many automatic recruits. They’re locked up in the northwest cell, you need to move the armored knights towards the archers, and move your mages towards the enemy mages. This will ensure you take less damage and allow them to survive a little longer
- The two safe spots in the cell are the first row, middle area, so if anyone is close to dying, put them there, also consider using a Physic to heal anyone who is close to dying
- Rush towards the west, split the group so that one group heads north to save the allies, and another group towards the south but head towards the chests, the north has a mage so consider using a pure water
- You don’t really need to rush too much, just block the door entrance with all the treasure chests and the enemy thieves will only stand and watch, the enemy thieves eventually suicide-rushed into me after turn 20-30 or so
- The manakete to the south will not attack unless approached
- There are 5 chests with many goodies including a promotional items for an archer and the warp staff! Anyways, unlock that door, and take care of the archer and armored enemy and get those chests
- Afterwards, go around, use a wyrmslayer weapon to kill the manakete (16 defense) or use magic. Then continue in the south, there are powerful mages so use pure water to increase your magic resistance. Bring your thief as well because there’s a final chest in the southeastern area
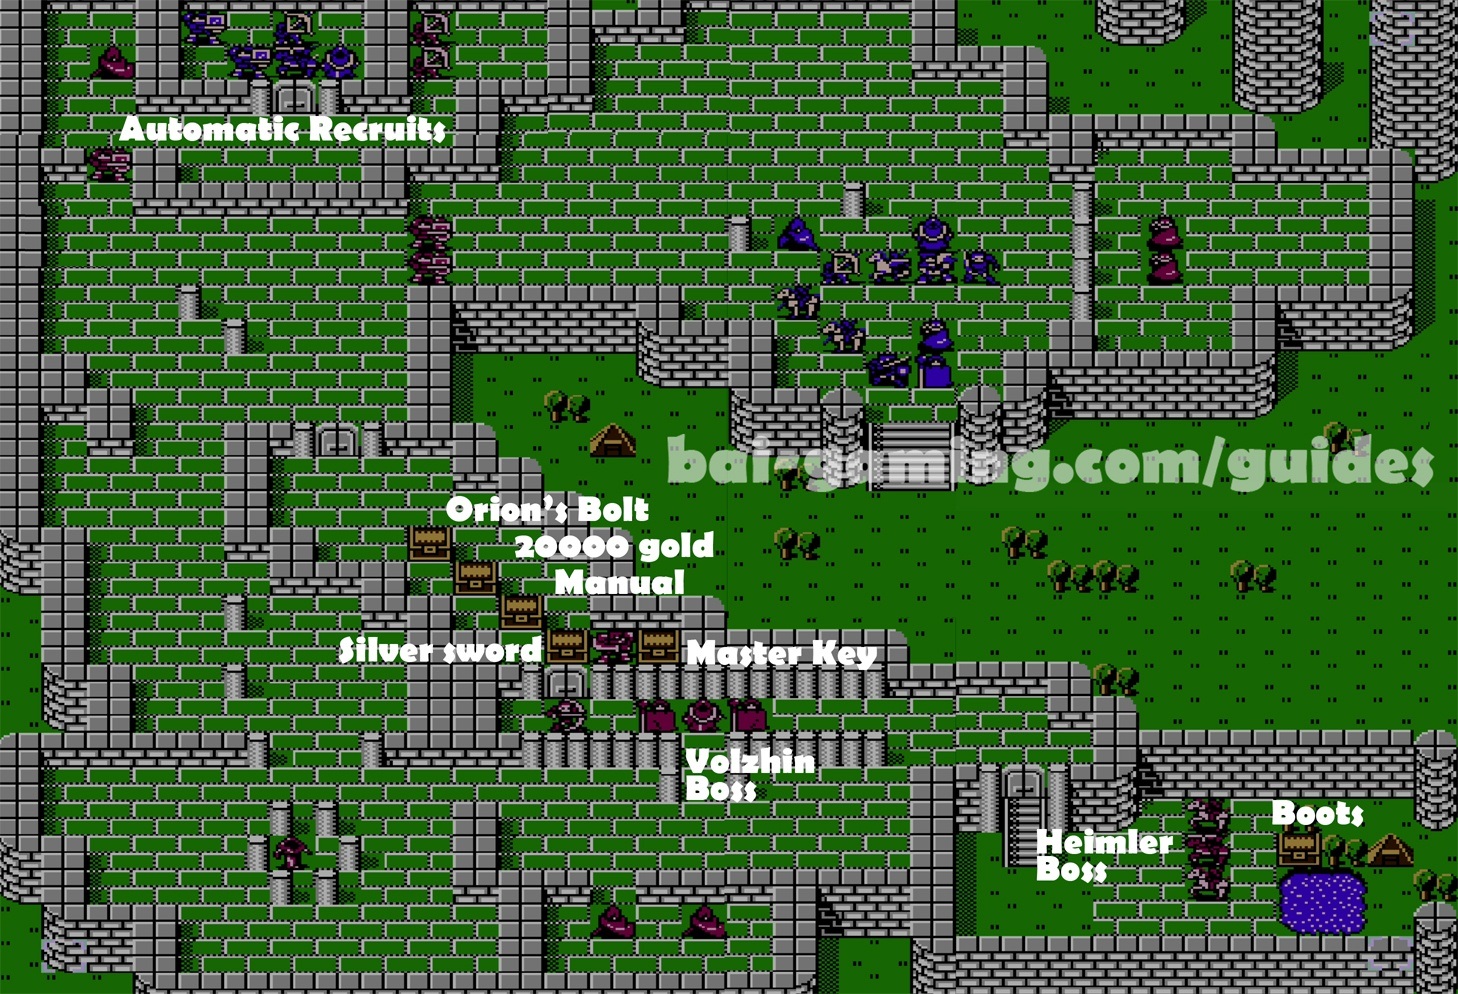
- The chapter actually has two bosses. Near the middle-southern area you have a powerful mage boss, Volzhin, so use pure water
- Head to the southeast for the second boss, a paladin, Heimler, he will move at you once you unlock the door. Use a rapier or ridersbane weapon, then grab the chest for Boots, which permanently increase a unit’s movement speed. This makes the ballistician unit useable, you get another ballistician next chapter so you can wait, or you can just use the boots on anybody you want, your choice
- The paladin boss was on top of a shop, you can buy more armorslayers, rapiers, killer swords, Levin Swords, silver lances, etc. I recommend buying Levin Swords for anybody who uses swords, the next chapter has only ballistician enemies with bulky defenses and they can counter mages and kill them easily, so you should use physical attackers with Levin Swords to do magic damage to them
- Organize your units and head out!
Chapter 13 – Wooden Cavalry

- New Recruits: Astram (he’s the hero unit, talk to him with Midia) and Beck (have Marth visit the village)
- This is the strangest chapter with only enemy ballistae units, but remember in the original release they only have 2 range each so it’s not bad to deal with
- I said in the previous chapter that these ballistae units have high defense, so use attackers with magic swords. You can use mages to attack them, but be careful of getting countered by them!
- Make your way to the west, try to get a Levin Sword user on each of the paths and push your way through. Have Marth go to the village quickly to recruit Beck (consider teleporting Marth), Beck is a ballistician user who has a unique weapon that deals effective damage to other ballistae, if you didn’t pick up Levin Sword, use him up because you can always use the Hammerne staff later on to restore weapon uses, as long as the weapon doesn’t break
- It’s possible for units to move through mountains, but they have very high movement costs. For that reason, Beck will get stuck within the mountains, but it’s okay, move him to the west and have him help pick off the enemies. If you really want to, you can give him boots to increase his movement, but I’d rather give the boots and weapons to Jake.
- Otherwise, it’s only a gimmicky map, have Midia recruit Astram, and work your way through, finishing the enemies.
- Talk to houses if you want more information, go to the shop if you want, it has more of the same old physical weapons we’ve seen.
- Prepare your units for the next chapter and move on. If you’re not using Astram in the future, make him give his wyrmslayer to someone else. In this game, you can’t take any items off of a character unless you deploy them in the map!
Chapter 14 – Land of Sorrow

- New Recruits: Catria and Palla, just talk to them with Marth, they’re the pegasus knight sisters in the southwest, but you needed to have recruited Minerva earlier
- Catria and Palla will spawn in the red squares shown above, they’ll automatically move towards Marth and won’t attack
- Bring your thief, there are doors, chests, and bridges!
- Unlock the bridge with your thief or someone using a Bridge Key, then use a Levin Sword user or Beck to kill the ballistician on the other side of the bridge
- Have Marth run to the west to visit the village with a ranged attacker, pick off those units from the other side of the wall, at the village you will talk to Camus, and you get Thoron for a mage, a very powerful and light tome
- On Turn 5 Catria and Palla spawn, talk to them with Marth, on Turns 8-15 pegasus knights will spawn from the location Catria and Palla had spawned, so have your archers ready, or quickly move your newly recruited flyers on top of that map square to block the reinforcements
- You’ll need to split your units, your thief and some muscle need to go southeast, archers to the west, and there’s some enemies in the northern part of the castle too
- Be sure to get the southeast chests! One has the amazing silver card, have your shopper carry this to reduce all shop prices by half!
- Be prepared for the pegasus knights spawn, or block the two spaces they spawn with your own pegasi, then head for the boss
- The boss of this chapter, Jiol, is a general, so use rapier, armorslayer, hammer for effective damage, or use magic attacks, etc.
- Shop is the same old, but has regular magic tomes you can get, talk to houses if you want, prepare, and go to the next chapter
- If you’re not using Palla, make her give her wyrmslayer weapon to someone else, also, next chapter has many mages so equip pure waters. I say this because you can’t grab items from a character unless you deploy them in a chapter, so if you know you don’t want to use Palla in the future, just grab her item now and never deploy her.
Chapter 15 – Oasis of Magic

- No new recruits, bring a thief
- Desert chapter has movement penalties, but it’s the worst for horse-riders, so don’t use those
- A lot of mages who can kill your characters easily, equip and use pure water to increase magic resistance
- Near the chests to the southeast there’s a unique boss, Gharnef, do NOT approach him, he cannot be defeated yet, wait for him to leave and do not get to close to him!
- He leaves on Turn 8, reinforcements come from near him, but just wait until he leaves, then have your thief take the chests for stat boosting items
- Overall, it’s mostly just mages and wyvern knights, so have your characters and archers use pure water and make your way through the desert, if you didn’t buy pure water like I told you you’ll have an annoying time
- In the north on the throne there’s a promoted mage boss who uses Swarm, it’s very powerful so drink that holy water or use the Barrier spell and defeat him, the boss of this chapter has a generic name like all the other enemies
- When things calm down check out the shops, there is an amazing stock of items including stronger magic tomes, all silver physical weapons except axes because silver axes don’t exist in this, rapiers, armorslayers, ridersbanes, killer swords, etc. and you can make use of the Silver Card you picked up for half prices!
- Next chapter has plenty of horses and generals, equip those, prepare your characters, and move out
Chapter 16 – Battle for Altea

- Two recruits: Visit ONE of the villages with Marth for either Aran (left village) or Samson (right village), (the other village closes after one is visited), and another recruit is Xane (talk to with Marth)
- Bring a thief
- There are reinforcements on the northwest forts on turns 10-11
- The thief is close to the villages, might be good to just teleport Marth directly to the village, or have a horserider quickly kill the thief
- For which village to visit, I don’t really use either of the characters, it’s your choice, I chose right, basically left village gives a paladin, and right village gives a hero, use whichever you’d like more
- Xane is one of my favorite units, but he’s polarizing, basically he can spend a turn to mimic another character completely, and eventually after a few turns it runs out, recruit him with Marth when you’re able to, but the enemies near him have a magic sword and another has a silver sword, be careful
- Give Xane the weapons he needs if you plan on using him, I usually have him mimic my paladin so I give him silver lances and ridersbanes
- There are reinforcements in the northwest forts, have a few strong units to block the bridges to wait it out, again be careful, one group of them will have silver weapons
- After, make your way to the central island with all the enemies. You need to be careful though, enemies scattered about have ridersbanes and armorslayers, so try to kill those ones off first if possible, or try to bait them out at the chokepoint
- The boss, Hollstadt, is another general, BUT, be a bit careful, he does have a killer sword that can crit you if you’re unlucky. Standard techniques such as rapier, armorslayer, hammer, or magic attacks
- After, when things cool down, go shopping, there are plenty of shops like last time with a bit of everything, silver weapons, many tomes, armorslayers, ridersbanes, rapiers, etc.
- Prepare and head to the next chapter, have a wyrmslayer ready because it’s a manakete boss next chapter. Chapter 18 is all cavalry, it’s worth it to invest in ridersbanes!
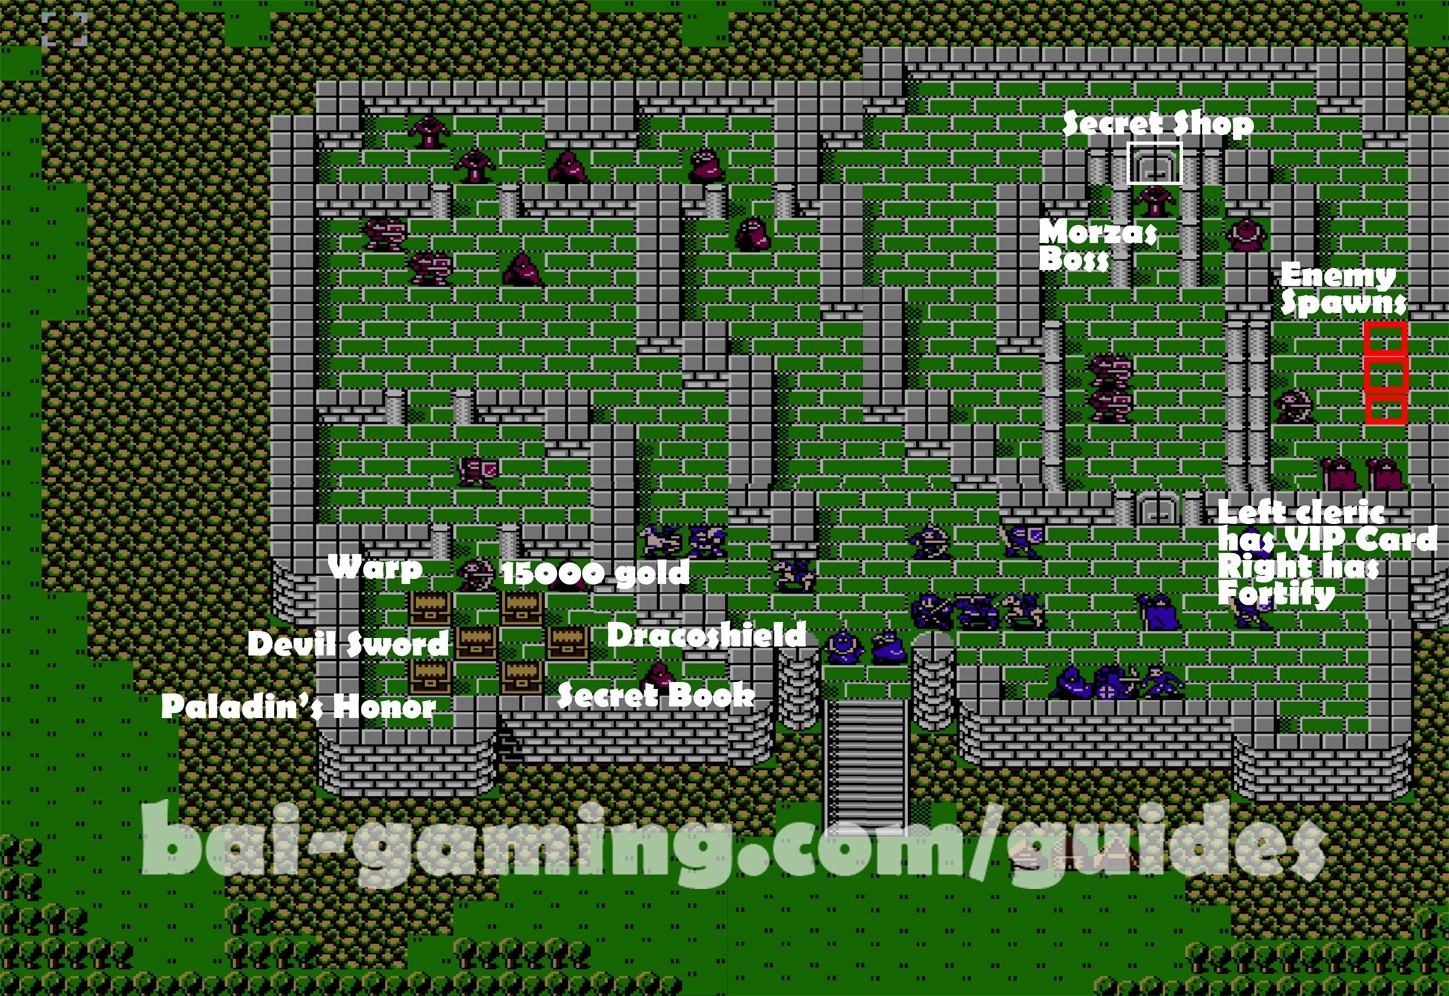
Chapter 17 – Star and Savior
- No recruitment
- Enemies respawn in the northeast from turns 9 to almost indefinitely, you’ll want to finish this chapter quickly before they start spamming respawning enemies OR block where they spawn with 3 of your own characters
- Bring a thief, perhaps even 2
- Split a group, one heads west and quickly defeats enemies and enemy thieves, while another group unlocks the door and heads north
- It’s possible to stop the enemy respawns if you have 3 units move to the northeastern loop
- Western area has many mages, so use up your holy water
- The first Secret Shop is in this game, the trick is you need to kill the two priests hanging around in the northeast, you can use ranged weapons, teleport someone, etc, but it’s important because they drop a Member Card (herein called VIP Card), which is required for entering the Secret Shop! Make sure that character has a Silver Card for good deals!
- Have a free inventory slot when you kill them, otherwise you’ll have to run to the convoy and back
- Fortify lets your staff-user heal all allies on the map by 10 HP, extremely useful and the only one you get until the final chapter of the game
- The boss, Morzas, is a manakete, but he has a “magestone”, this is something you need to keep an eye out for when fighting manaketes in the future, the magestone means he’s a type of manakete that’s completely immune to magic attacks, so you pretty much have to equip melee attackers with wyrmslayers, or otherwise try to use your strongest units with their other best weapon
- The Secret Shop is the door behind the manakete boss, Morzas, so have someone with a drgonslayer defeat the boss, then have a thief unlock the door. You’ll need to do this fast because respawns will start soon, OR put units to block the reinforcements
- At the same time, units moving to the west will kill enemies, and you can pick up those chests for a lot of good items, there are manaketes to the west as well, one of the chests has another amazing warp staff!
- The Secret Shop has more master keys and powerful tomes, including Physic, a ranged healing spell, and Barrier, which is a spell-version of Pure Water a staff-user can use, as well as Thoron and Swarm
- I tried my best to give a mage a speed ring, but Swarm, although powerful, is very heavy and my mages were never able to double, I think you should just buy Thoron tomes and ignore Swarm tomes, buy many Physics, and maybe 1 Barrier
- Regular shop has bridge keys, door keys, and pure waters, very useful, I guarantee you’ll need more bridge keys that will make certain chapters much easier, make sure to buy many pure waters again, there’s another chapter with an all mage army!
- When ready, proceed, you may not have time to organize if you didn’t block the reinforcements, equip ridersbanes because next chapter is almost all cavalry
Chapter 18 – Sable Order

- New Recruit: Est, a pegasus knight in the southwest, talk to her with Marth to recruit
- She will approach Marth, but will not hurt him so don’t worry
- From turns approximately 8-16 most of the forts will spawn enemies, if you go past the first bridge, be sure to have someone stand on top of that fort (not the top one, no reinforcements spawn from the top northern fort)
- Past the first bridge, defeat the eastern enemies, block the nearby fort, and make a wall by the end of the next bridge.
- Wait for reinforcements and hunker down, defeating all enemies and recruiting Est when she gets close to you. The eastern enemies in the middle of the map have armorslayers, so be wary
- Southern enemies have ridersbanes, but not armorslayers. Just keep drawing them out, but be careful, they have javelins and can attack characters behind your wall!
- One has a killer sword that easily crits, and another has a Levin Sword that does magic damage.
- Otherwise, just keep waiting it out until the reinforcements end, then proceed to the boss, Sternlin.
- It’s a paladin boss, use a rapier, ridersbane, or magic.
- Finish shopping, there are good tomes and physical weapons that we’ve seen before, then head out
Chapter 19 – Manakete Princess

- New Recruit: Tiki, the boss, talk to her with Bantu
- Bring Bantu, and bring a thief or two
- No reinforcements
- This chapter is rushing through to get all the chests, get to the north quickly and defeat the thieves, then go back and defeat all the enemies and get all the treasure chests
- Make use of your new Barrier Staff or use Pure Water before fighting enemy mages
- 2 important items are the Starsphere and Lightsphere, 1 is in a treasure chest, while another is held by a thief who has the devil sword! You need these two orbs to make a spell to defeat a boss later, which leads to you getting the best weapon in the game for Marth! You will have a HARD time beating the final boss without that best weapon!
- Are you confused? Well, if you see the map, notice that one of the chests is already opened, this is the only time in the game where the thief drops an item, so make sure you defeat the thief with the devil sword, and he will drop the Lightsphere. He’s the one on the left, and be careful, he hits like a truck and as far as I know, the devil sword never hits him. At the same time, thieves don’t “run off” in this game, but make sure you get the Lightsphere from him.
- The Starsphere will be in one of the chests, you need this too. The Earthsphere is also in another chest, but isn’t as important as the other two spheres.
- These spheres are amazing items! The Starsphere prevents the holder’s weapons from wearing out! So even though the Hammerne staff can’t repair legendary items, you can hold this item with your legendary weapon and your durability will never decrease!
- The Lightsphere ignores the terrain of the enemy! So use this when attacking the boss of a chapter since the boss’s throne always give big bonuses!
- Unfortunately you’ll eventually need to give up the Starsphere and Lightsphere in a few chapters, but use them while you can!
- There are many promotion items in the chests as well
- Once the enemies are mostly gone, have Bantu talk to Tiki, the manakete boss, to recruit her. Tiki’s a much better manakete than Bantu, you should keep using her in the future, her dragonstone has unlimited uses and is powerful.
- She can easily grow to become the most powerful and useful character in the game. Her dragonstone is an effective weapon against all manaketes in the game except for the final boss. Train her because there’s a level coming up later that has nearly all enemies being manaketes, put the work into it and it will be worth it
- Prepare for the next chapter, many cavalry and armored units.
Chapter 20 – Camus the Sable

- New Recruit: Lorenz, talk to him with Caeda to recruit him (he’s a general in the northwest), I don’t use him but he’s not bad if you still have open spots in your army, he’s the only recruitable general you can get
- Start by not repairing the bridge, instead go to the middle of the map and clear those enemies out, otherwise enemies will rush from both sides…
- On turns 7-10, there are reinforcements from the southwestern forts, wait in the forests and defeat them and also defeat the thief before he visits the village.
- If you get Marth to the village, you get Hammerne (need Lena to use it), which can repair weapon’s uses, and in this game it can be used 7 times instead of other games where it’s only useable 3 times!
- Downsides? You can’t repair Excalibur, Aura, Gradivus, Mercurius, or Parthia using the Hammerne…(But then again, you can just use these with the Starsphere in that character’s inventory and they won’t be used up.)
- When the southern reinforcements stop, use the bridge key and defeat the enemies, making your way to the northwest, remember to talk to Lorenz with Caeda when possible
- I actually rushed and blocked all the reinforcements
- We have a unique boss, Camus, who invented the Camus-archetype in Fire Emblem, you may remember him giving you a thoron earlier in the game. He’s a Paladin with a legendary spear and he’s tough, that spear is one of the best weapons in the game and it can hit at either 1-2 range.
- Using a mage on their own will result in you getting countered and killed.
- Instead, try using someone strong with a rapier or ridersbane to weaken him, then use a mage to finish him off. You can use powerful magic such as Aura or Excalibur, he really can be a difficult boss.
- I actually used a sniper with the legendary bow Parthia, with Starsphere and Lightsphere and he wasn’t bad at all, have your attacker have the Lightsphere so that Camus’ terrain bonuses are removed, makes it much easier
- Shops have magic and physical weapons we’ve seen before, though we see hammers for the first time in a while. Prepare and head out, next chapter has a secret shop so have a flyer with a VIP Card and Silver Card, or you can always get those from the convoy…
Chapter 21 – Clash in Macedon
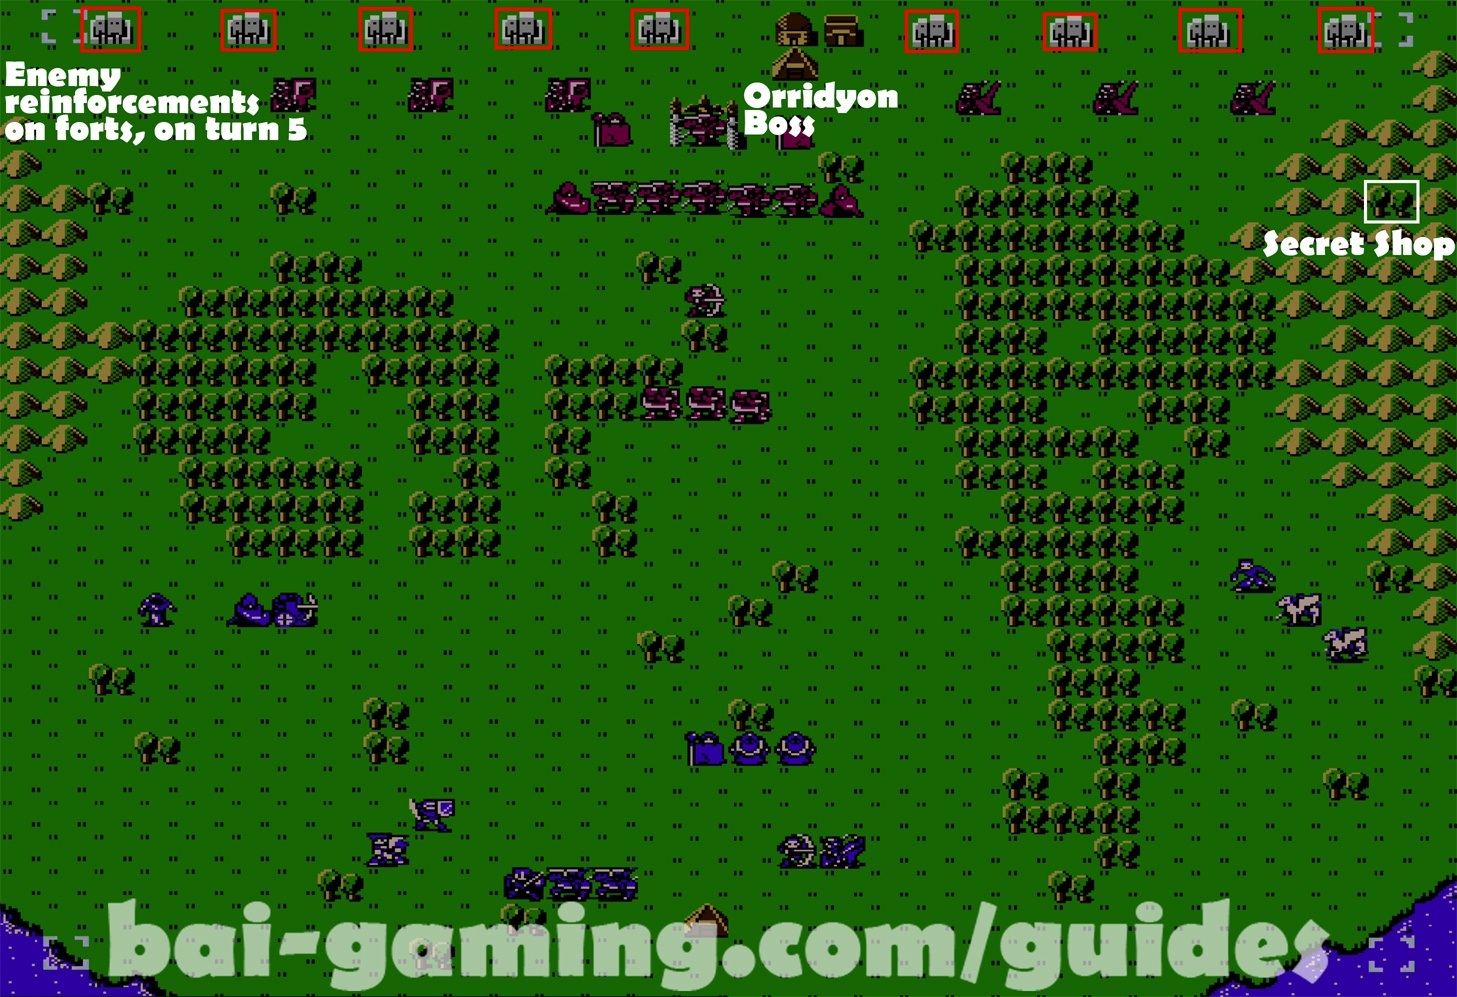
- No recruitment, Turn 5 has one turn of spawning enemies from the forts in the north
- Put a VIP Card and Silver Card onto a flyer to access the Secret Shop after
- Give Marth the two orbs in his inventory for the next chapter! You can do this after you defeat all the enemies, there’s a convoy next to the throne
- There’s a little bit of all enemies in this chapter, have effective weapons, and keep weak units back, the wyvern knights have a lot of range as well as javelins to strike behind your walled characters
- Consider teleporting away your weak units, those wyvern knights have incredible range and hit hard, and you need to beat them quickly because reinforcements will occur on Turn 5
- Thankfully reinforcements are only for one time
- Don’t approach those armored units directly, I found it easier to split into the left and right forests, draw the armored units in, they’re very slow and even slower going into forests, kill the wyvern knights quickly, then deal with armored units and reinforcements as they approach
- If you hide your units in forests, the enemy will miss a lot
- Many enemies also have effective weapons, so keep an eye out
- Use the forest to increase your evasion, try not to fight all the enemies at once or get surrounded by them!
- If you’re really struggling, you can use your wyrmslayer weapons on the wyvern knights, but remember to try to save them because Chapter 24 is mostly manakete enemies
- Tiki is really great to use, level her up if you can!
- Enemy boss, Orridyon, is a paladin, use a rapier, ridersbane, magic, etc, he’s not hard
- Before continuing, go to the Secret Shop, it’s the single tile forest on the mountains to the east, use a flyer with VIP Card to get there, buy as many stat boosters as you want, you can break the game if you want
- If you don’t agree with using stat boosters, consider just using them on Marth because Marth has to be the one to defeat the final boss
- Restock at the regular shop as well, organize your party, then proceed, make sure Marth has the two orbs (Lightsphere and Starsphere) in his inventory! Earthsphere is not required and can be left alone in the convoy if you don’t want to use it.
Chapter 22 – Knight-Filled Sky

- No recruitment, reinforcements from the forts in the middle castle until Turn 15
- Make sure Marth has the orbs in his inventory and go to the village to get Starlight tome, it’s needed to defeat a boss!
- I really hope you got these items like I told you to! Make sure the thief doesn’t destroy the village! Use the warp staff to teleport someone near the village to protect it if you have to!
- I usually equip Starlight onto my strongest mage, I choose Linde
- If your mage’s weapon skill isn’t high enough to equip it, you can try using a Manual to increase it
- Use the northeast path, and make your characters stick right next to the mountains to build a wall to protect your weaker units, if they get past your wall you’re going to have a hard time, and more and more flyers will keep respawning. Many of the enemy flyers have javelins so be careful.
- Otherwise, keep defending and slowly move upwards when it’s safe, or wait for the reinforcements to end
- I rushed through the map and was actually able to block the reinforcements
- There are two bosses: Michalis and the throne boss (throne boss has generic enemy name). Michalis will move as soon as you’re in range or if you kill all reinforcements, while the other boss stays on the throne. For the bosses, use a bow or your most powerful weapons, I used Gordin with the Parthia legendary bow and was one-shooting both bosses
- Visit shops after, if you use ballisticians this is the only chapter you can buy their weapons! Otherwise restock, organize, and head out! Next chapter is many mages again, so have pure waters and someone with the Barrier Staff
- Secret chapter is in the next chapter, so have someone with the VIP Card and Silver Card on-hand
Chapter 23 – Dark Pontifex

- No character recruitment
- Bring a thief for chests
- Reinforcement on Turn 7, enemies spawn from the top of the map, one-time only
- A lot of mages in this chapter, use pure waters or the Barrier staff to increase magic resistance
- Send a thief to the northwest for chests
- Split your forces into east and north, defeat the east enemies first, then continue moving north
- You’ll encounter many Gharnefs, but they are just copies of the real Gharnef. Hang around the top, kill the reinforcements, then look for the real Gharnef, he’s NOT the one on the throne!
- The real Gharnef uses the Imhullu spell and has the Falchion weapon. For the real Gharnef, you need to use the Starlight spell you obtained to damage him, be careful of him countering your attack, for the copies of Gharnef kill them in any way you like
- Killing the actual Gharnef doesn’t actually kill his clones
- The Falchion is Marth’s best weapon, it has unlimited uses, is strong against manaketes, and is needed for the final boss, equip it, BUT, I found it wasn’t as powerful as other weapons such as silver swords or Mercurius, so keep backup weapons on-hand and just use Falchion against manaketes and the final boss
- Don’t finish the chapter, in the square to the north of the throne there’s another Secret Shop. It sells all promotional items, so buy any you need, promote the rest of your character except your healer if you want, organize your characters, then proceed to the second-last chapter.
- The next chapter is almost all manakete enemies with respawning enemies for 50 turns, so Hammerne your wyrmslayers if you’re running out of uses, bring Tiki, use the Falchion, have many magic users, etc.
- Another Secret Shop in the next chapter, so put the VIP Card and Silver Card onto a flyer
Chapter 24 – Dragonkin Realm

- Only an automatic recruit
- Bring a thief
- All forts on the map spawn enemies from turns 8 to 50. You can try to rush through the chapter to put some units on top of the forts to help stop so many reinforcements
- Make use of your wyrmslayer, Tiki, Falchion, and magic users
- The Falchion is amazing against manaketes and actually negates their attacks, have Marth go wild on them, though my Marth was a bit weak, I really just used Tiki
- You can have flyers go south, through the gap in the white mountains, but be careful not to get overwhelmed
- If you’re really struggling with this chapter, use the warp staff to teleport to the boss, and kill him with the wyrmslayer and then conquer the chapter quickly, the boss is not hard, but the chapter’s reinforcements can get terrible, get your characters on top of the forts if you can
- The treasure chest has an staff that can be used by a character you recruit in the story, the staff lets you revive a character, but you need to kill the thief or beat him there
- The Secret Shop is to the southwest, in the tile that is a plains in the middle of all the mountains, you can buy amazing stat boosters including boots, you can break the game doing this, but I recommend just picking up some of them for Marth, only Marth with the Falchion fights the final boss so pump him full of stat boosters
- Regular shop has Recover, a magic staff that lets you heal a character’s entire health bar, otherwise it’s just usual items in the shops
- Otherwise, if you want to grind, then build a wall and wait 50 turns. I did that on my first playthrough and it was literally a day just doing this chapter. I recommend just rushing a pegasus to the Secret Shop, teleport Marth to kill the boss, and just end it, or consider warping some characters to the forts and using Hammerne to be able to use more teleports.
- The chest is only a Devil Sword, I threw it away because I don’t use devil weaponry
- If you have any door keys, put one of some of your characters because the final map will spawn locked doors if you take too long, also equip Warp staves and Physics or Fortify
Chapter 25 – Chosen By Fate

- Final chapter, just warp Marth to the final boss and defeat him with the Falchion
- Bring a thief
- The map starts off fine, but it spawns in “locked doors” as you take more and more turns, in each of the entrances from the rooms between the pillars (see blue squares, starting from Turn 3 one locked door will be placed on a blue square, with one each turn)
- To overcome this, use Warp staves and a thief, or regular characters with door keys
- The Stairs will also spawn reinforcements from Turns 6 to 50, try to get this chapter done with quickly…
- Have Marth keep attacking the final boss, and have healers keep using Physic on him or Fortify
- Make sure Caeda is alive, otherwise you’ll get a bad ending
- If you trained Tiki, use her to take down manaketes because her Divinestone is effective against them except the final boss, the final boss is not affected by effective weaponry except the Falchion
- Enjoy the ending!