Gales of Nayeli Walkthrough (All Collectibles & Recruits, Updated for the Latest Patch!)
General Tips Foreword
- This guide has been updated for the latest patch! This is a generally spoiler-free guide! I will only mention the bare minimum of information required, such as characters you can recruit during each chapter and I might spoil the boss of the current chapter you’re on. Click the images to see them in full resolution.
- The guide is based off of the normal difficulty. The collectibles in the villages and shop inventories should generally be the same regardless of difficulty. The main difference with harder difficulties is that there will likely be more enemies on the map, more enemy reinforcements, and sometimes the boss will move instead of being stationary. I’ll still provide gameplay tips that can still be applicable to higher difficulties. The inventories in shops can change when the developer adds new items so I’ve played on the latest patch checking all the shops again.
- If you enjoy games like this, check out Vestaria Saga as well, another fun SRPG Studio game made by the creator of Fire Emblem (Shouzou Kaga) with a great cast of characters and excellent map design.
Chapter 1 – A Timely Arrival

- (This map’s enemy types and placements vary based on your protagonist’s starting class. This map is for the Adventurer class.)
- New recruits: Avatar, Nayeli, Daisie (all automatic)
- Flower: Oasis Tonic
- Enemies: Smoke Bomb (only if you chose Rogue class for avatar)
- Use Daisie (the fairy) to collect from flower icons, other characters right now cannot get rewards from flowers. When you recruit characters in the future certain characters may have a passive that allows them to collect flowers as well.
- Nayeli is the protagonist and you also have a playable avatar character (default name Ollie) that is a class of your choosing.
- Classes include Adventurer, Spellcaster, Strider or Rogue. You can also choose a boon, which increases two kinds of stats of your choice.
- Adventurer is what we chose, has Short Sword, Close Shield & Healing Herbs. Has a powerful War Cry command that inflicts Fear on all enemies up to 3 range. Has Precise Slash combat art, a stronger and more precise attack. This class is very simple to use!
- Spellcaster has Ember, Gust, Magic Ring & Healing Herbs. A unique skill is Focus, allowing you to empower your next attack up to 3 times in a row and Air Slash (increase range of Gust).
- Strider has Wooden Bow, Watchman Rope & Healing Herbs. It has passives such as Sight Beacon increase accuracy by 15% for allies within 2 tiles, Talented Archer increases experience gain by 20%, and Deep Breathing to gain +5% Hit/Crit until combat art Relentless Arrows is used (which forces a follow-up attack). Comes with many other combat skills as well.
- Rogue has Daggers, Throw Knives, Avoid Ring, Smoke Bomb & Healing Herbs. Has a lot of passives to increase avoid, open chests and doors without keys, get an extra action every turn with -3 movement, Hide in Shadows to increase Critical and move through enemies, and a lot more as well as combat arts on top of that.
- If either Nayeli or the player avatar die then it’s game over. Depending on your class you chose for the avatar player unit, this chapter may be easier or harder. Failing certain story objectives (such as letting an important NPC die) may cause a game over as well. Save often!
- In general any characters that aren’t the protagonists or important to a particular chapter can die without immediately causing a game over. They will be removed from the current map and will have a penalty applied to their stats (the Grievous Wound status condition) on the next map until a Bandage item is used. Bandages are plentiful as you progress through the game (you can collect more than a dozen through the campaign), so the game is pretty forgiving in this aspect.
- If a character dies a second time while having Grievous Wound then they are permanently dead. So don’t forget to cure the Grievous Wound with a Bandage when you get a chance.
- Two story chapters have permadeath so be careful on those maps, it will be labelled in the game when this occurs.
Just collect the flower and defeat the enemies, not too bad just don’t get surrounded. You may need to use the protagonist’s special ability for their class to make the map easier. For our Adventurer protagonist we had War Cry that debuffed nearby enemies.
Chapter 2 – Nagata’oh Valley
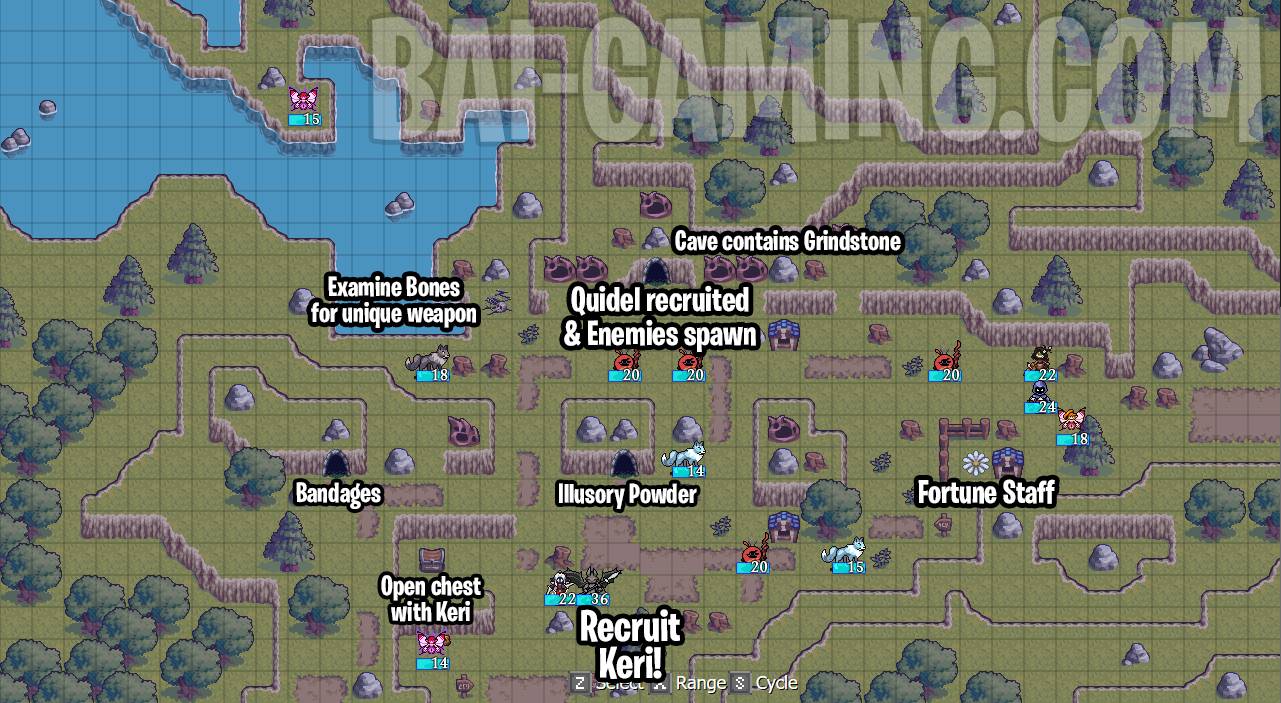
- New Recruits: Automatically recruit Quidel (Turn 3 he spawns on the northern cave), Recruit Keri by talking to her with Nayeli (Mandatory before she dies!)
- Powerful wolves in the north may spawn in the map after rescuing Keri, so try to have units moving to the south by then.
- Flower: Fortune Staff
- Caves: Grindstone, Illusory Powder, Bandages
- Bones: Examine the Bones in the northwest to make 1 Fishbone weapon of your choosing. This can be a unique Lance, Sword, Axe, Dagger, or Bow.
- Chest: Haste Capsule
- You need to move Nayeli to Keri as soon as possible (has to be Nayeli). If a monster reaches Keri it will attack and kill her instantly, though sometimes you can get lucky and she dodges. Once you talk to Keri she is healed fully.
- It looks like you have a lot of time at first, but the enemies can sneak up on her quickly (such as that fairy in the northwest and more wolves spawn to Keri’s west on harder difficulties).
- Anybody can visit the caves and bones, but only Daisie can examine the flower (for now).
- Blue houses are tutorials without item rewards but they do give experience for the first character to visit them (and they give gameplay tips). Anyone can visit the blue houses.
- If you’re mostly looking for collectibles, blue houses don’t give items or money, so it’s less of a priority but the experience can be helpful for weak units.
- On Turn 3 Quidel joins automatically in the northern cave, use him to destroy the enemies that spawn nearby. You can change his weapon to his handaxe to always counterattack the ranged enemy units that attack him.
- This map is generally easier than the first map. Inspect the enemies carefully because the stronger bugs will have Fire Sticks that deal magic damage at 1-2 range and most of your characters have low resistance.
- The northwestern-most fairy who moves also has a spell that always deals critical damage unless your ally has another ally adjacent to them.
- After recruiting Keri, use her to open the nearby chest (no key required for her, she will open doors and chests no problem, remember to use her often in the future).
- She’s somewhat like a thief from Fire Emblem but she can be useful in combat.
- Her resistance is high making her an ideal mage killer (she has a passive where her resistance increases more in dark conditions, so check her stats each map because it varies map to map).
- If you want an optional recruit later on train Keri so that she can defeat a boss.
- Powerful enemies spawn in from the north as you’re finishing the map, so get the northern collectibles out of the way quickly. You can try to take out a wolf or two if you want a challenge but otherwise have someone ready at the south to escape.
- When you’re finished, escape the map with Nayeli south of where Keri is.
Chapter 2 – Branch of Fate
After Chapter 2 there is a “Branch of Fate”. The choices are to have Nayeli talk to either Quidel or Keri.
We chose to have Nayeli talk to Keri. This acts as the first support conversation between Nayeli and Keri.
In the far future you will choose a partner for Nayeli, so consider using these in the meantime to build up a relationship with whomever you want to pair her up with in the future (you don’t need to though). In my opinion just have fun with the game and pick whoever you want.
Make sure to do the optional map (“EX” maps) because in this game optional maps have recruitable units, nice rewards and have enemies that will give experience for your characters too. If you proceed through the main story the optional maps will eventually disappear so always prioritize optional maps.
Chapter 3EX – Farmland Defense
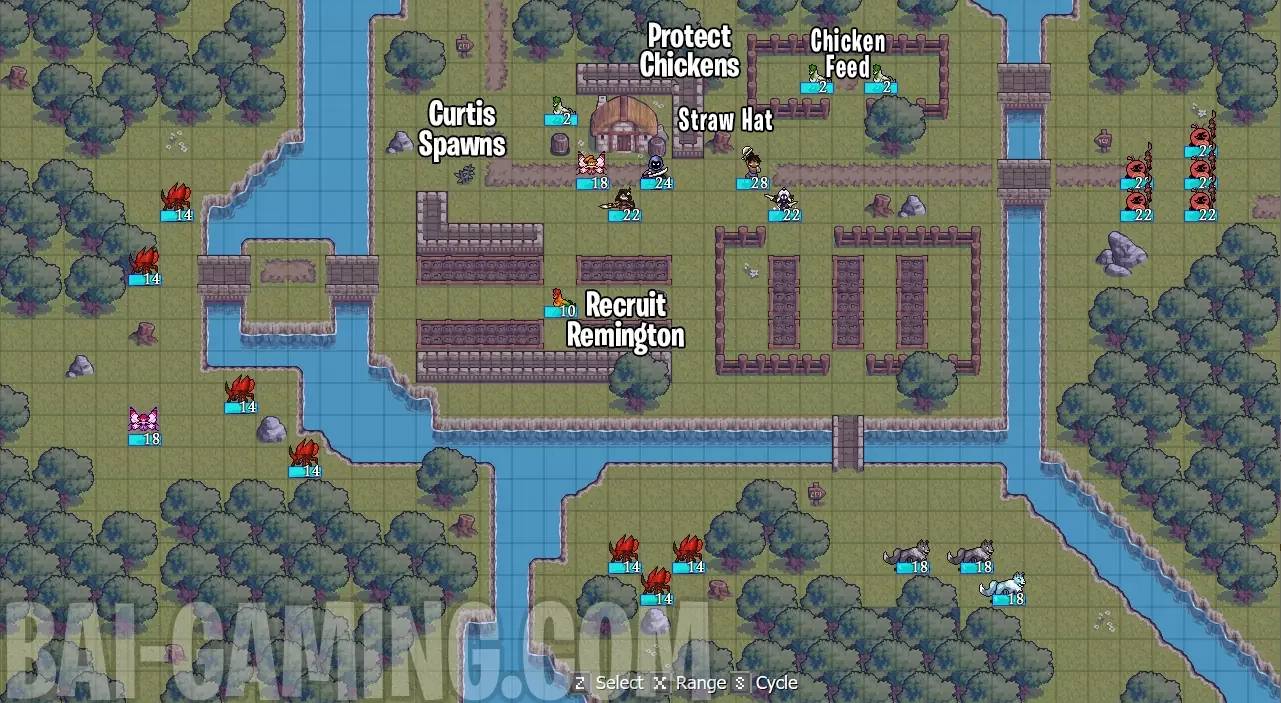
- New Recruits: Recruit Remington (the rooster) by talking to him with Nayeli, Curtis (spawns in after a few turns, make sure to tell him you want his help in the cutscene dialog after the map)
- Secret: Straw Hat (22,4)
- Item: Chicken Feed (26,2)
- Turn 3 has Curtis automatically join (make sure to answer a dialog correctly after the mission as well)
- You need to defend the 3 green chickens. If you save all the chickens you get more goodies as a bonus.
- Curtis, a bow user, will spawn to the left of the house on turn 3.
- He’s your first bow user and he’s useful for taking down flying enemies.
- There are many flying bugs, so use Curtis’s bow or Nayeli’s Wind Spear for easy bonus damage. Fire attacks such as Quidel’s Searing Swing also does bonus damage to bugs.
- Use Nayeli to recruit Remington.
- The reward for protecting all the chickens was: Deft Sword, Sawn Off Shotgun, Far Heal Staff and Silencer Daggers The reward will be reduced depending on which chickens are destroyed.
- The Deft Sword reward changes based on the avatar’s class. Other rewards include Web Grenade, Compound Bow or Pebble Spell.
- Make sure to choose “We need all the help we can get” to recruit Curtis after the battle.
- You need to pay gold, but you’ll have the required gold from completing the mission so you don’t need to save up in advance.
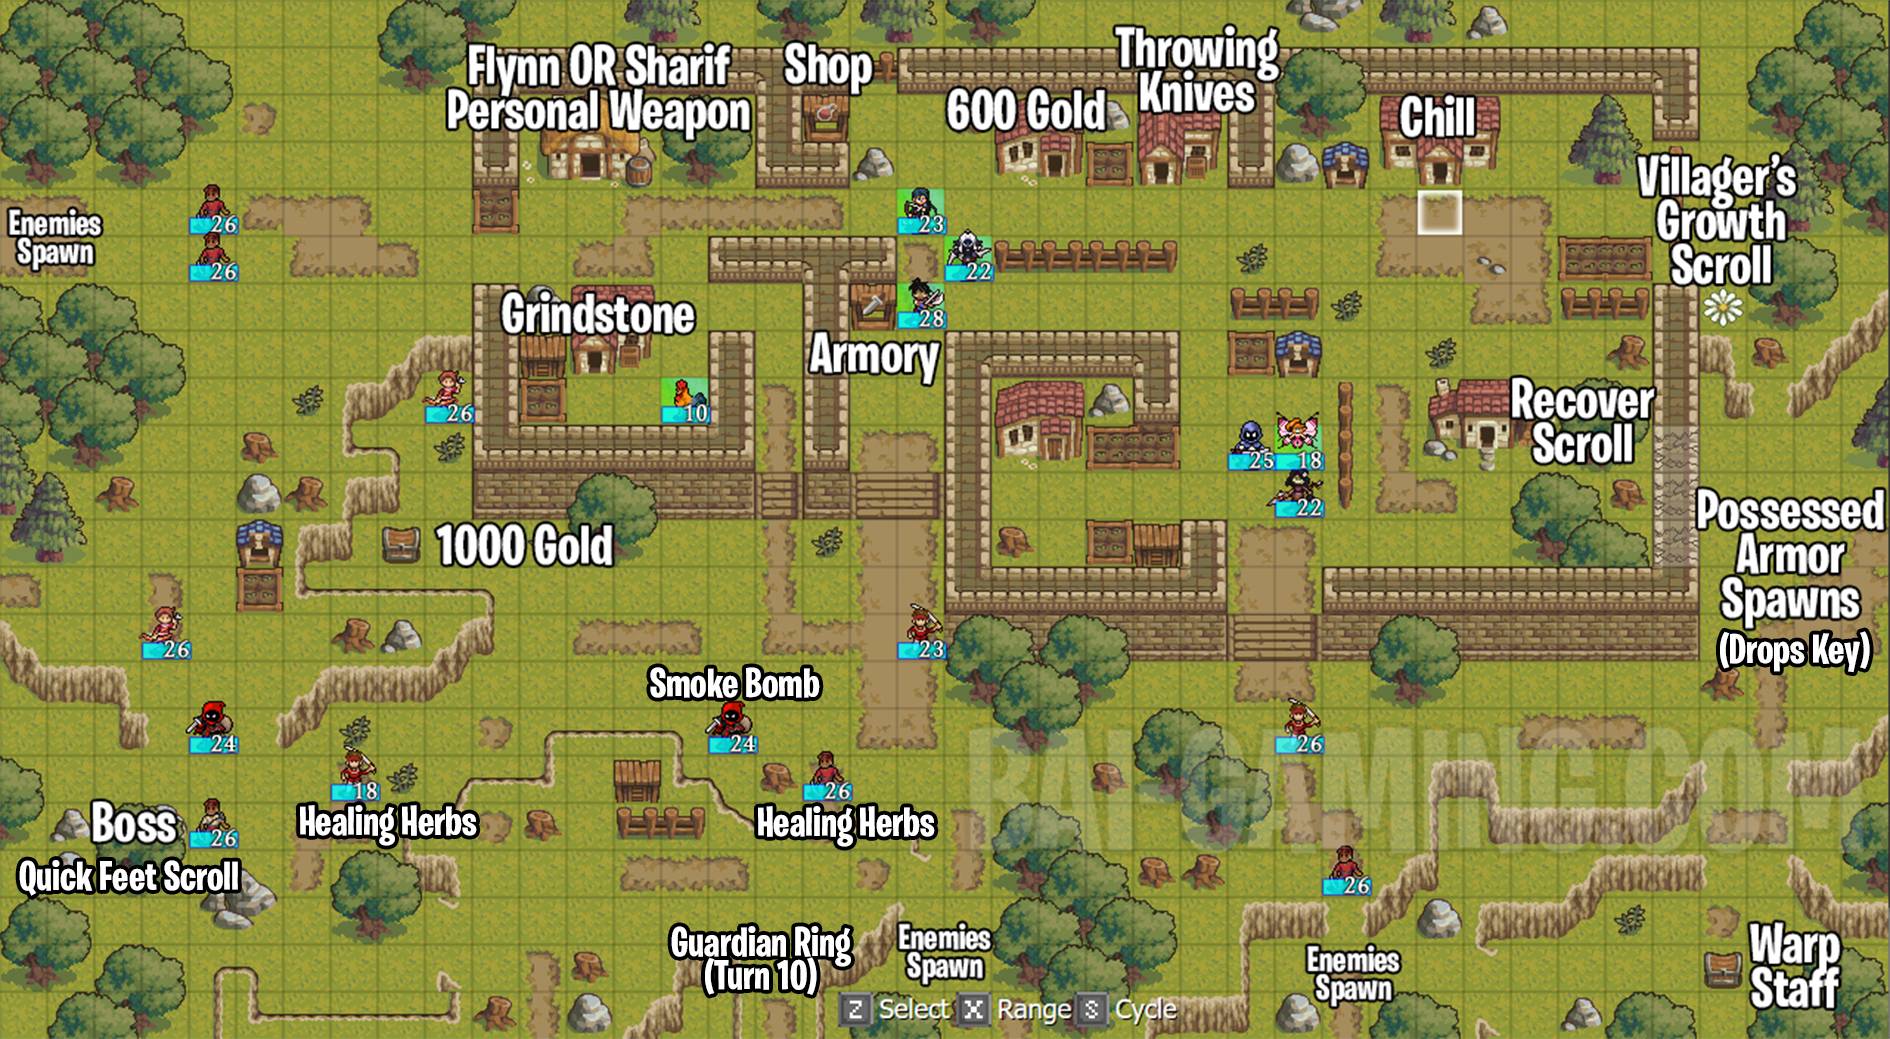
Chapter 3 – Trouble in Cherringham
- Automatically recruit Miles and Annabelle, who spawn near the top-right house.
- On Turn 2 automatically recruit Flynn and Sharif, who spawn near the top-left house.
- Enemies will automatically spawn from the left, south, and southeast every few turns. On harder difficulties there will be more enemies spawns such as harpy enemies from the north and northeast (not marked).
- On Turn 6 a Possessed Armor spawns next to the Breakable Wall on the east side. Have magic units ready because he has high defense but low resistance or use Miles to Enchant a weapon.
- He drops a key for opening the nearby chest.
- Every few turns the boss will give all enemy units extra movement (you’ll see this because he yells for his gang to move faster).
- Red Houses: Grindstone, Recover Scroll, 600 Gold, Throwing Knifes, Chill
- Top-left Yellow House: Reward depends on character, be careful, only one choice per playthrough. Either Flynn or Sharif get their personal weapon. Flynn gets Saltbreaker (Effective against Demons & Seawalkers), Sharif gets Desert Greatspear (neither user nor enemy get a follow-up attack), and all other units get Sweeping Sword (neither user nor enemy can counterattack).
- Flower: Villager’s Growth Scroll
- Chests: 1000 Gold, Warp Staff (Make sure to get the Warp Staff!)
- Enemies: Some enemies drop items (they have a pouch icon on the unit). 2 enemies with Healing Herbs, 1 enemy with Smoke Bomb, and 1 enemy that is a southern reinforcement on Turn 10 drops a Guardian Ring.
- The Guardian Ring only appears on the Thief if you don’t open any chests before Turn 10. If you open 1 of two chests before Turn 10, the Thief drops a Steward Ring instead.
- Shop: Healing Herbs, Grindstone, Smoke Bomb, Healing Staff
- Armory: Short Sword, Wooden Swpear, Javelin, Light Axe, Hand Axe, Daggers, Wooden Bow, Sparkle, Ember, Gust
- There are many collectibles to obtain from the houses! In this game any unit can visit any house, the dialog may be different but the reward is usually the same. One immediate exception to this rule is the top-left house in this chapter, who you choose to visit there determines which unique weapon you get, so be careful!
- This is a defense map and you have a 14 turn limit (or it ends early whenever you defeat the boss).
- Miles is a mage, but he can also Enchant an ally’s weapon.
- Enchantment turns that ally unit’s weapon into magical damage for one round of combat and is extremely useful. The enchantment also buffs the target’s magic attack stat too, so don’t worry about their attack scaling poorly from their magic stat if their magic stat is low it will still be worth it.
- He can use regular magic spells such as Ember and Chill as well.
- Annabelle is another healer.
- It’s useful to use Annabelle to heal while Daisie gets the flower (the flower is a bit out of the way in this chapter).
- Annabelle can also use Guns to deal damage to enemies from 1-2 range, useful if you need a little extra damage to finish off an enemy.
- Flynn is a sword user. He’s a bit weak right now, so be careful. Since he’s a bit weaker I got his personal weapon from the house (give the squeaky tire the oil). He can collect from flowers as well. He has passives to get stronger when he has lower HP.
- Sharif is very powerful, use him to help clear the left portion of the map and to defeat the boss. He has passives to get stronger when he has full HP.
- The two chests are very far apart, so I made Keri run to the left to open that chest. Then I had non-thief units on the right defeat the Possessed Armor who drops a key anyone can use to open the nearby right chest.
- Read the notes above, if you don’t open any chests before turn 10 a thief will have a Guardian Ring that drops. If you open 1 of the 2 chests then it’s instead a Steward Ring that drops.
- If you’re stressed about the collectibles and don’t know what to get, prioritize getting the Warp Staff from the right chest, it’s extremely useful!
- Buy items from both the shop and armory. I bought more healing items and grindstones. Gust is useful for a mage to deal with flying enemies. Get more regular weapons for your protagonist and Nayeli. I won’t mention regular shops on the maps and what to buy moving forward but I’ll list their inventory.
- Keep an eye out for leaves on the map, they can be useful. If a unit ends their turn on leaves, they will be able to get extra movement for their next turn. You can use it to your advantage if you need to traverse the map quickly. Enemies can use them too, be careful.
- I defeated as many enemy units as I could for the free experience, then I defeated the boss right on Turn 14 because he drops a Quick Feet Scroll, a scroll that gives 1 extra permanent movement to a character. Don’t worry about killing the boss, there’s no penalty for killing the boss.
During the intermission make sure to do all the support conversations after finishing the map! I won’t mention them again from now on.
Now that you know the basics of how this game’s maps work I won’t be going through all the baby steps moving forward 😉 I’ll mostly just list all the recruits and collectibles as they come along as well as map gimmicks.
Chapter 4 – Retaking Laramore
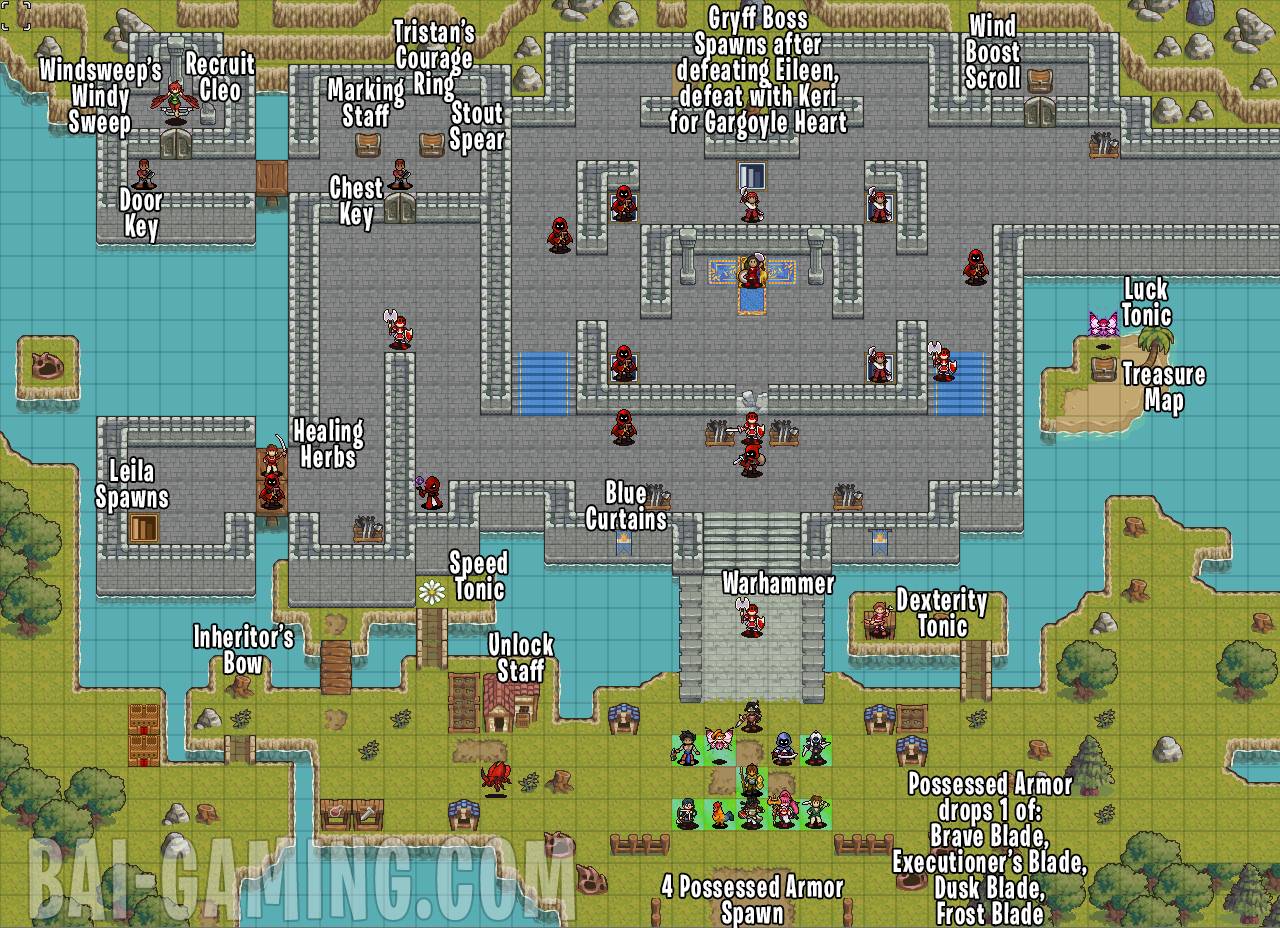
- New Recruits: Gallant, Leila (talk to her with Nayeli), Everlast, Cleo (to recruit Cleo unlock her door to recruit her), Gryff (defeat Gryff with Keri to get Gargoyle Heart, then take it to Chapter 18 coordinates 36,25)
- Red Houses: Unlock Staff
- Flower: Speed Tonic
- Secrets: Blue Curtains (19,15), Windsweep’s Windy Sweep (4,3), Inheritor’s Bow (7, 21), Tristan’s Courage Ring (12, 4)
- Chests: Treasure Map (make sure to “use it” like a consumable after collecting it, we’ll tell you in a few chapters where to find the treasure), Marking Staff, Stout Spear, Wind Boost Scroll
- To get the chest on the beach you can use Keri with the Smoke Bomb to teleport. Or use the Warp Staff.
- Enemies: Warhammer, Dexterity Tonic, Healing Herbs, Luck Tonic
- Reinforcement Enemies after throne: Frost Blade, Executioner’s Blade, Dusk Blade, Brave Blade (you can only obtain one of these, once one of them is defeated they’re all defeated due to being linked so you only get one drop)
- Shop: 3 Healing Herbs, 3 Grindstones, 3 Bandages, 1 Smoke Bomb, 1 Healing Staff, 1 Oranges, 1 Unpeeled Kiwi
- Armory: Training Sword, Steel Greatsword, Deft Sword, Training Spear, Iron Spear, Training Axe, Heavy Axe, Training Bow, Wooden Bow, Dazzle
Just make your way north defeating enemies. Leila and her companions will spawn in. Control them and make sure they survive. You can have Nayeli talk to Leila to recruit her. Leila is an Armored unit and can destroy walls that look weak, remember this gameplay mechanic for all future maps if you ever see a wall that looks somewhat crumbled.
Make sure to head to the northwest corner and unlock the door to recruit Cleo the harpy as well, she is very missable and she herself is also used to recruit later allies too! Consider training her up a bit too because she can recruit a flying enemy later but you need to need to be careful with positioning due to other enemies there.
Eileen is more of a secondary boss. When you defeat her 4 Possessed Armor spawn in from the south, so make sure your units are not lagging behind. If you can defeat them you can get a drop. You only need to defeat 1 to defeat them all automatically due to their linked passive, but this also means you can only get one drop from them so plan accordingly.
A new boss, Gryff, also spawns in the north after beating Eileen and he is the actual boss to defeat to win the chapter. If you want an optional recruit much later on defeat Gryff using Keri.
Chapter 5 – Escort in the Choke
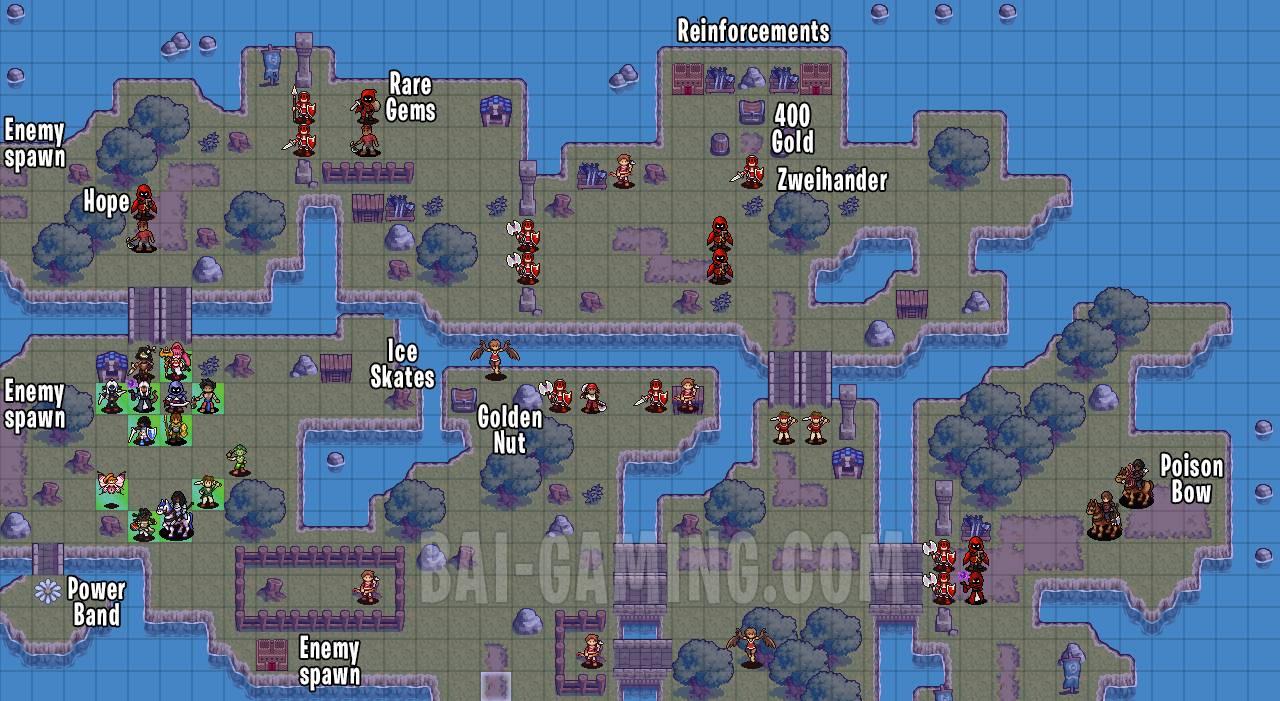
- Flower: Power Band
- Chests: 400 Gold, Golden Nut
- Secret: Ice Skates (12,12)
- Enemies: Hope, Rare Gems, Zweihander, Poison Bow
You only need to escort the merchant to the southern highlighted white tile. You can command the merchant by using any other unit and I recommend just choosing a specific location each time.
Be aware that enemy assassins spawn after a few turns to the west so be careful if you have weak units or if you left the caravan left behind. There are also enemy reinforcements from the forts. Be sure to always keep a lookout in the future if you see forts as it often means enemy reinforcements every few turns.
Defeat the minibosses to get their weapon drops especially the Poison Bow. Keep the Golden Nut safe in your inventory, as you can give it to a squirrel unit later on and it provides an extra sidequest map later on too.
Intermission 1 – San Comeraco
We have a shop at the base now! Check it every so often because the inventory will update frequently throughout the game.
- Alivar’s Shop: 5 Healing Herbs, 3 Bandages, 3 Grindstones, Steel Spear, Javelin, Daggers, Wooden Bow, Light Axe, Mend Staff, Verdict, Maul, Bonetooth, Gust
A new update added in Group Training 1 in the conversations. Using this you can have the avatar train with certain character to gain new skills.
There are several optional maps to do during the intermission. Do them right now if you want to do them, otherwise they’ll go away.
Some optional missions have recruitable units or may unlock recruits for main missions later, so be aware.
Chapter 6-1EX – Fleet of Foot
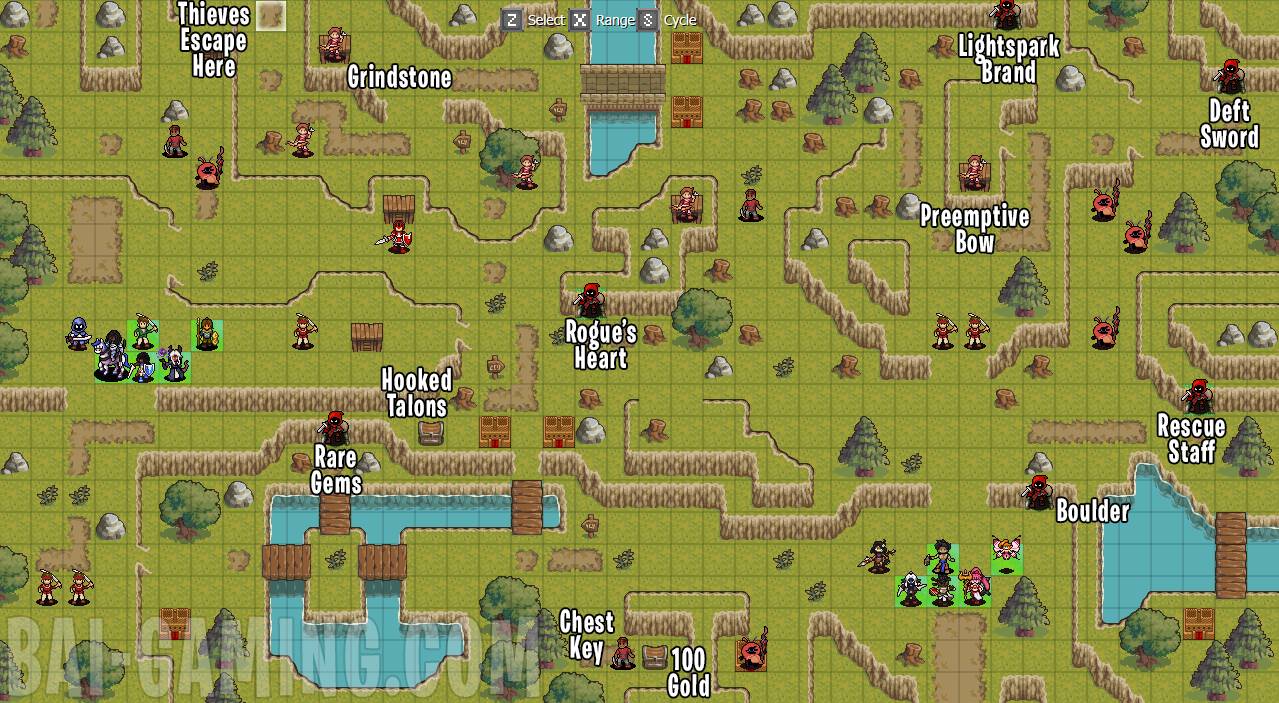
- New Recruits: Jinglesworth – Defeat an enemy to get Rogue’s Heart, then take it to Chapter 18 coordinates 36,25
- Chests: Hooked Talons, 100 Gold
- Enemies: Rare Gems, Grindstone, 2 Chest Key, Rogue’s Heart, Lightspark Brand, Preemptive Bow, Rescue Staff, Boulder, Deft Sword
The gimmick of this map is that all the thieves are trying to run to the northwest highlighted white square to escape. They have a lot of great items. Just be aware that this map has many paths all over, so plan a route to catch up to the thieves quickly, perhaps use the Warp Staff if necessary to block the thieves’ route if there’s a drop you really want. The caves on this particular map have no items but most other caves in the game will have secret items in them so be aware.
The Rescue Staff drop is extremely useful in general. Make sure to have a use of the Rescue Staff remaining, it’s needed for a recruit in many chapters from now! You can also get the Rogue’s Heart item for a new recruitable unit much later on.
Before going into 6-2EX make sure to have a unit carrying the Golden Nut. You will need to trade it to another unit in the next map to gain bonuses and an optional chapter later.
Chapter 6-2EX – Little Ones
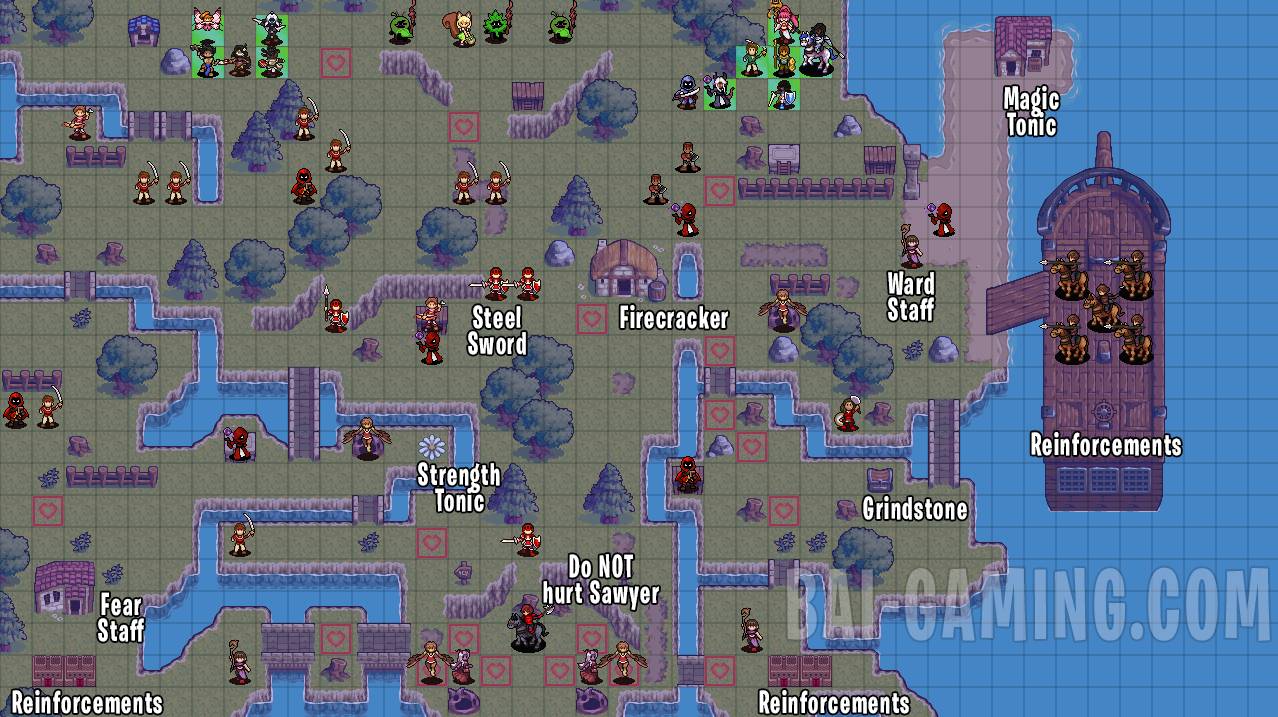
- New Recruits: Maple and Coco automatically recruited. Don’t hurt Sawyer because you can recruit him in a later chapter.
- Power Up: Trade the Golden Nut to Coco now to have her gain stats! This will also unlock an optional chapter much later on
- Red Houses: Fear Staff, Firecracker, Magic Tonic
- Flower: Strength Tonic
- Chests: Grindstone
- Enemies: Steel Sword, Ward Staff
Go through the map normally. Just be careful with the new recruit, Maple and Coco. They’re very squishy and enemies are nearby, try to help her quickly since there’s many enemies to the south that head towards her. Trade the Golden Nut item to Coco and she will gain stats, do it in this map preferably on the first turn. It unlocks an optional map later on as well. Get to the northeastern village quickly because there’s a pirate that will destroy it.
Go through the western and eastern paths as you head south so you can defeat the mini-bosses Bait and Lure. Do not attack Sawyer! Use the paths carefully, that way you won’t go into Sawyer’s aggro range. As soon as both Bait and Lure are defeated the map will end. Sawyer won’t join you right now though, but he’ll be recruitable in a later map as long as he’s alive.
Chapter 6-3EX – Earth Drake

- Caves: Boulder
- Drake: Drops Earthen Skin passive
Certain Drakes in the game will drop passive abilities to the unit who defeats them so bear that in mind when thinking of builds for your characters. I’ll add it on the map whenever a Drake drops a passive. Caves will now contain items so make sure to go in them at every opportunity to get free items.
Chapter 6-4EX – The Monster of Wyrm’s Grotto
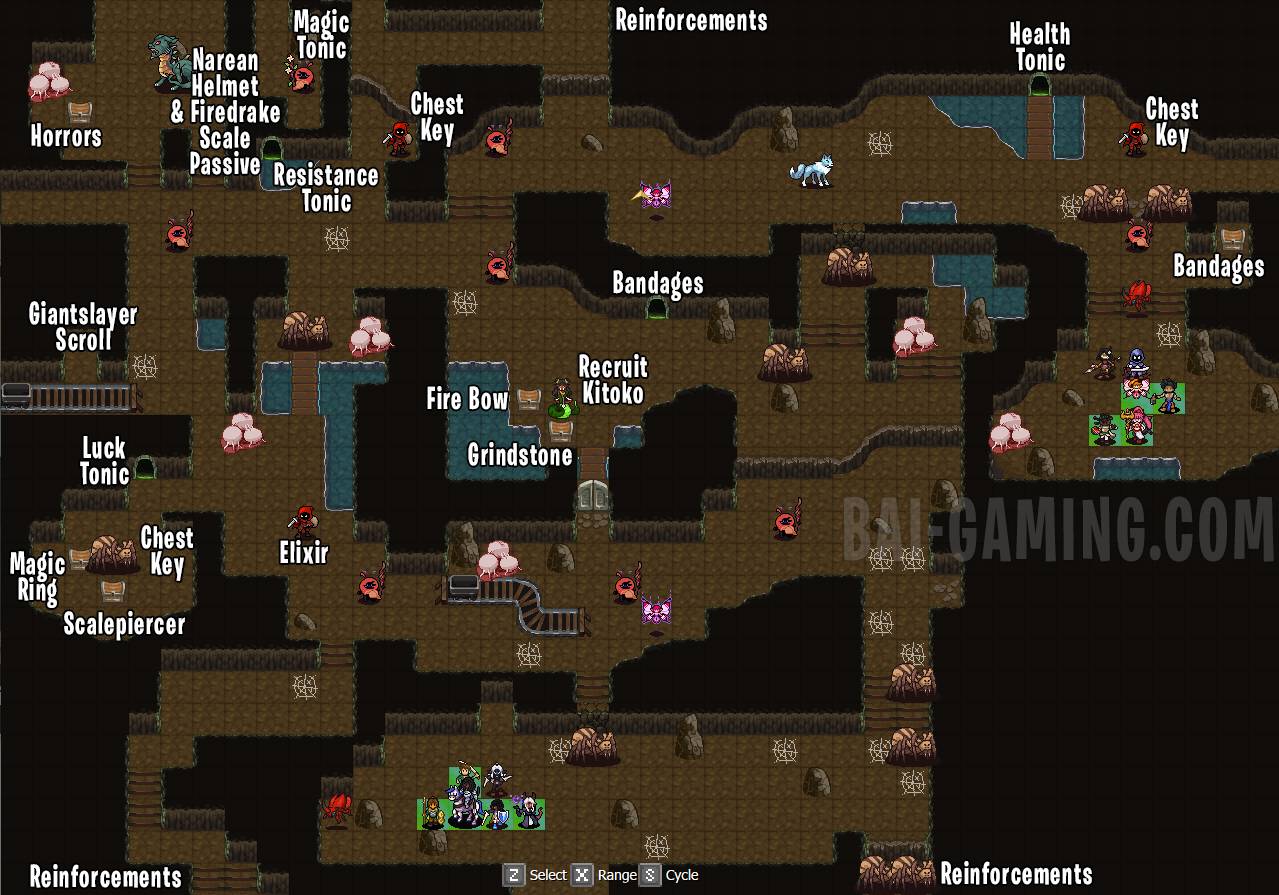
- New Recruits: Kitoko (Have Nayeli talk to Kitoko)
- Drake: Gives Firedrake Scale Passive
- Caves: Luck Tonic, Resistance Tonic, Bandages, Health Tonic
- Secret: Giantslayer Scroll (2,11)
- Chests: Magic Ring, Scalepiercer, Fire Bow, Grindstone, Horrors, Bandages
- Enemies: 2 Chest Key, Elixir, Narean Helmet & Firedrake Passive
Have your units move up and reinforcements will spawn from the southern tunnels eventually. Save Kitoko quickly! Check your units and use Armored units (such as Leila) to destroy breakable walls. The spiders will have an annoying move where they can make a unit immobile for one turn. Once Kitoko is saved explore the map thoroughly. Near the north tunnel more spiders will spawn.
New recruit: complete Cleo and Kitoko’s third support conversation at Chapter 19 for a new recruit so if you want that recruit make sure to use both units starting now and view all their supports in the base whenever they appear.
Alivar’s Emporium: Sharp Daggers, Judgement, Killer Sword, Restore Staff, Healing Staff
Chapter 6 – Crooks
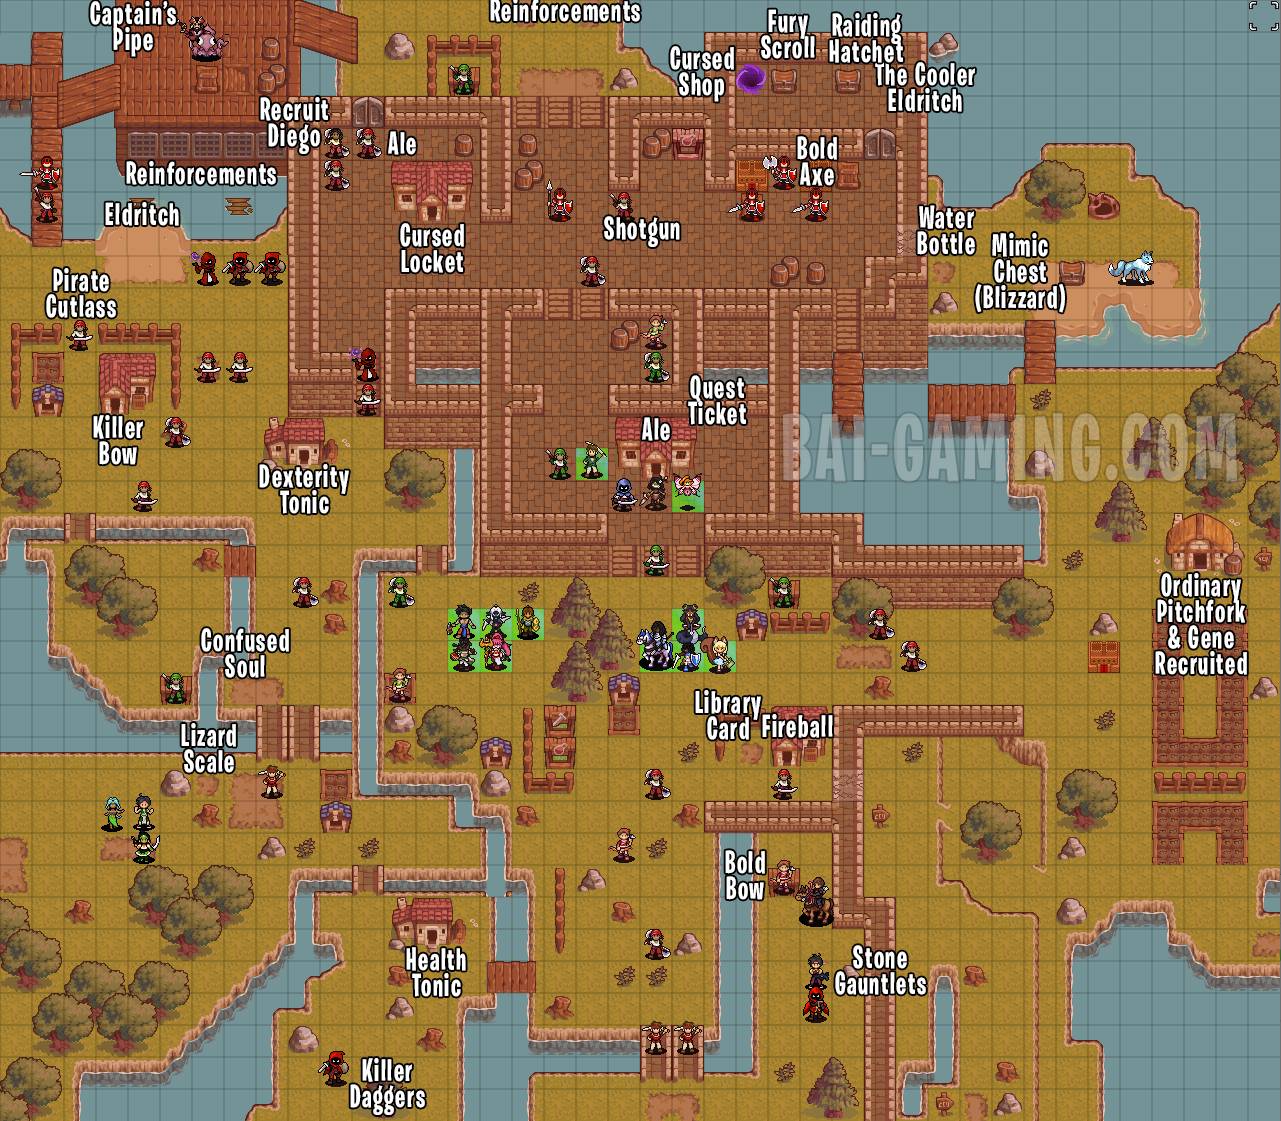
- New Recruits: Laetitia, Tomoe, Samira (automatic), Diego (talk to him with Flynn, Nayeli or Laetitia), Gene (visit the easternmost house with anyone). Bubbles (automatic after chapter)
- Houses: Health Tonic, Fireball, Ordinary Pitchfork & Gene recruited, Ale, Cursed Locket, Dexterity Tonic, Killer Bow
- Patches of dirt: Water Bottle (next to Mimic Chest), Library Card (23,23)
- Secret: Lizard Scale (6,24), Quest Ticket (22,13), Confused Soul (7, 21), Eldritch (4,6), The Cooler Eldritch (27, 2)
- Chests: Fury Scroll, Raiding Hatchet, Mimic Chest drops Blizzard
- Enemies: Door Key, Chest Key, Killer Daggers, Bolt Bow, Stone Gauntlets, Pirate Cutlass, Captain’s Pipe, Ale, Bold Axe, Shotgun
- Weapon Shop: Short Sword, Deft Sword, Sweeping Sword, War Pike, Javelin, Light Axe, Hand Axe, War Hammer, Daggers, Training Bow, Wooden Bow, Pocket Pistol, Sparkle, Gust, Chill, Iron Talons
- Item Shop: 3 Healing Herbs, 2 Grindstones, 2 Healing Staves, 1 Restore Staff
- North regular shop: 3 Smoke Bombs, 3 Haste Capsules, Firecracker, Illusory Powder, 3 Web Grenades
- Cursed Shop: Ring of the Fast Runner, Casual Ring, Fire Emblem, Full Assault Badge, Bronze Rune, Armor of the Colossus, Fancy Paintbrush, Graybeard Hat, Demonic Effigy, Broken Beaver Dam
Train up Laetitia, she needs to defeat a mini-boss fight in a few chapters for a recruitment!
The mini-bosses each drop a weapon. Make sure to visit the eastern house because it has a recruit (if you think that’s odd there’s a recruit from a treasure chest next chapter, yet it’s still not as weird as a recruit that pops out of a support conversation).
Work your way upwards and recruit Diego using Flynn or Laetitia. Explore thoroughly as there are many collectibles. This map has the first cursed shop, just interact with it like a normal shop but in particular they have many one-time accessories. Cursed shops are very rare in this game so plan carefully.
You may get more rewards if more green units survive.
Alivar’s Emporium: 3 Ale, 2 Grindstones, Bold Axe, Bearded Axe, Short Stick, Steel Talons, Respite, Haste Capsule, Executioner’s Blade
Chapter 7 – Tricky Interception
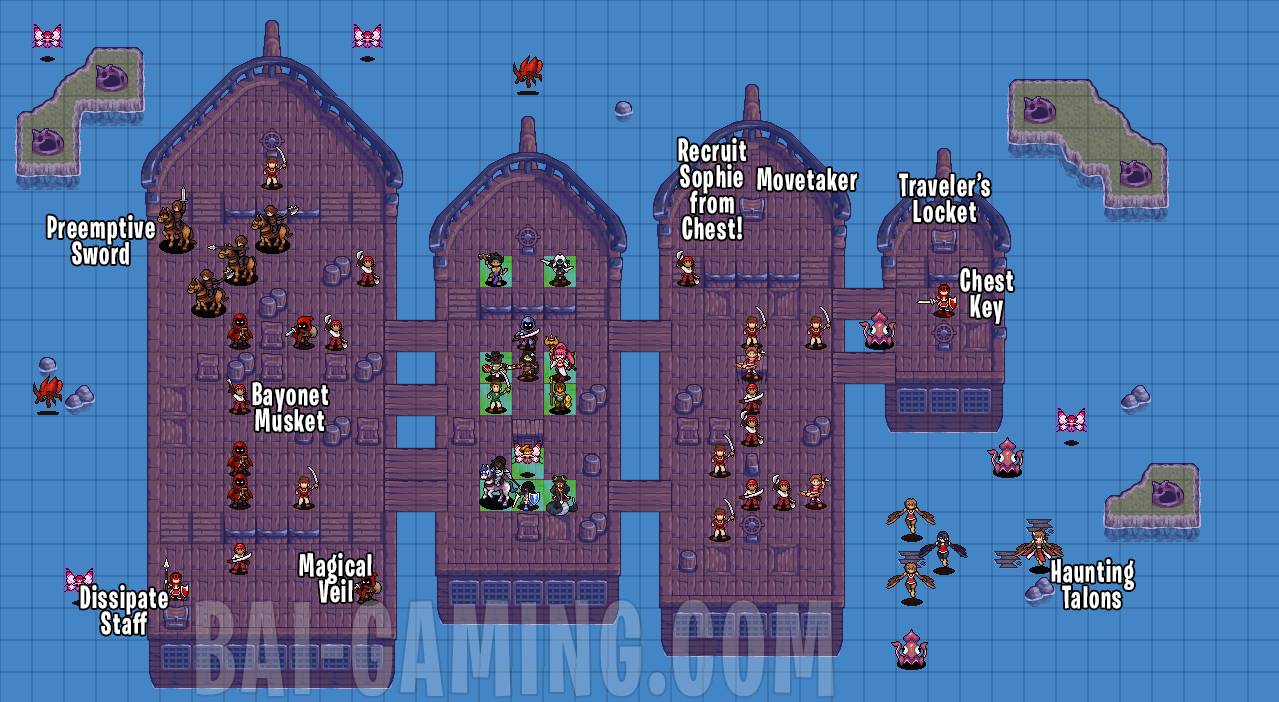
- New Recruits: Sophie (open the chest to the east of starting location), Millenia (talk to with Cleo)
- Secret: Movetaker (23, 5)
- Items: Magical Veil (11, 18)
- Chests: Sophie recruit, Traveler’s Locket, Dissipate Staff
- Enemies: Bayonet Musket, Chest Key, Preemptive Sword OR Haunting Talons (you can only defeat one miniboss then the map immediately ends). If you recruit Millenia then you have to defeat the boss that drops Preemptive Sword.
Make sure to bring Cleo on this map! Use her to talk to the harpy miniboss Millenia for her to join you!
Recruit Sophie by opening the chest to the east of your starting location. She’s a very interesting character with the lockpick passive. She also joins if you don’t open the chest so no worries.
You can defend both sides easily, but the map will end once you defeat either of the mini-bosses. If you recruit Millenia then you’ll have to defeat the other boss since the objective changed.
Alivar’s Emporium: Healing Staff
Chapter 8 – Sea of Troubles
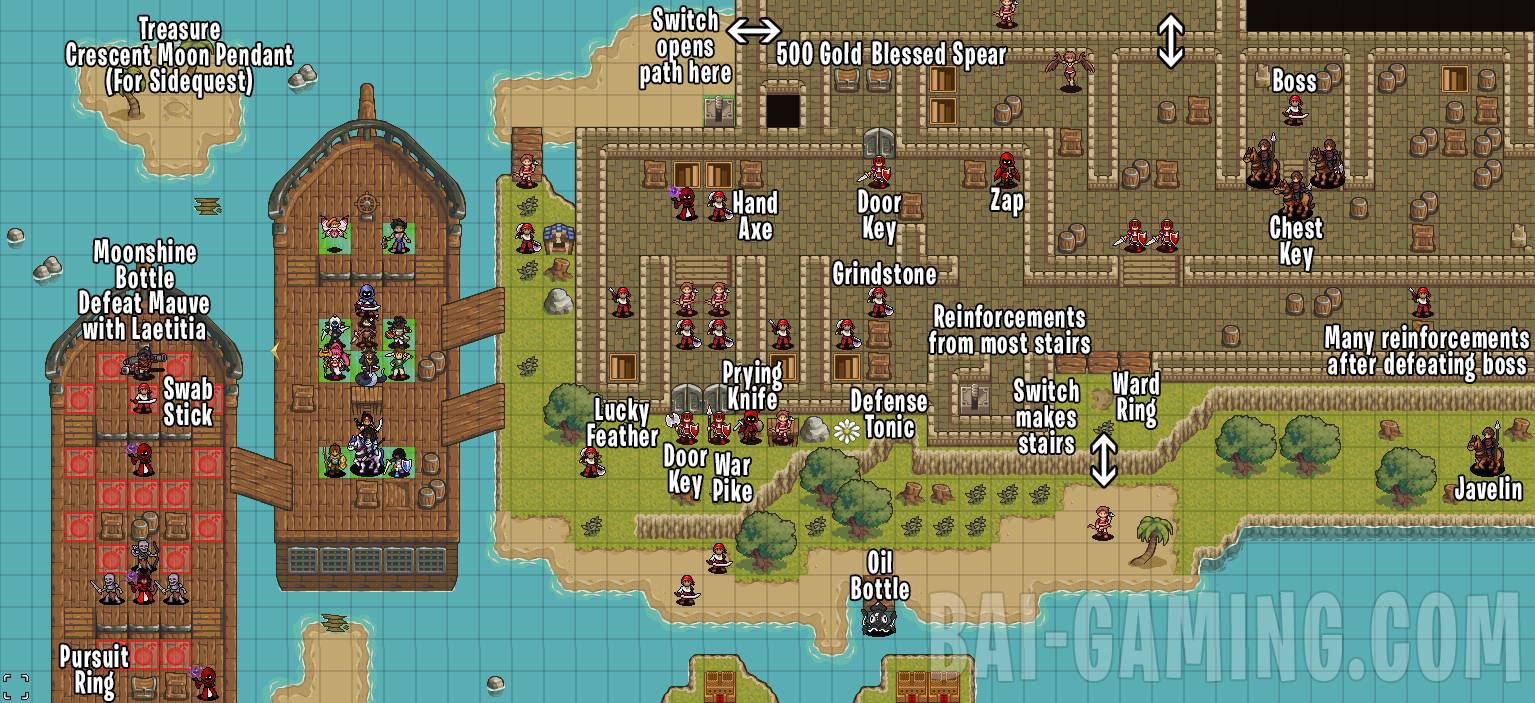
- New Recruits: Asahi (automatic), for a recruit later on defeat Mauve with Laetitia
- Treasure on the beach: (5,3) It’s the Crescent Moon Pendant, required to get a sidequest coming up that contains more recruits
- Secrets: Lucky Feather (19, 13), Ward Ring (34, 12), Moonshine Bottle (4, 11)
- Chests: 500 Gold, Blessed Spear, Pursuit Ring
- Flower: Defense Tonic
- Enemies: Hand Axe, Swab Stick, War Pike, Oil Bottle, Javelin, Prying Knife, Healing Herbs, Zap, Grindstone, 3 Door Key, Zap, Chest Key, Heavy Armor
- Switches: Opens a path shown by the nearest arrows.
Make sure to get the treasure on the northwest beach, it’s the Crescent Moon Pendant that gives access to a sidequest and new units. You need to also have Daisy get the flower because it’s on a cliff that is very awkwardly positioned.
We focused on the left ship first, then after we slowly advanced our units into the castle. Have Laetitia defeat Mauve, she will automatically spare her and she’ll be recruitable later.
For the fortress, you can split up and go into the castle. There’s a switch on the beach opening a path north into the castle. There’s also another switch inside the fortress giving access from the beach, that way you can have a unit or two defeat the beach enemies for collectibles and then travel into the castle.
Once you defeat the boss in the northeast many reinforcements spawn and you’ll need to carry the parts to the north part of your ship. You can make a line or “train” of your allies and keep trading the ship parts between your units to get it back faster. The reinforcements are a great opportunity to grind units.
Alivar’s Emporium: Flower Ring, Zweihander, War Pike, Tactical Axe, Aegis, Bandages
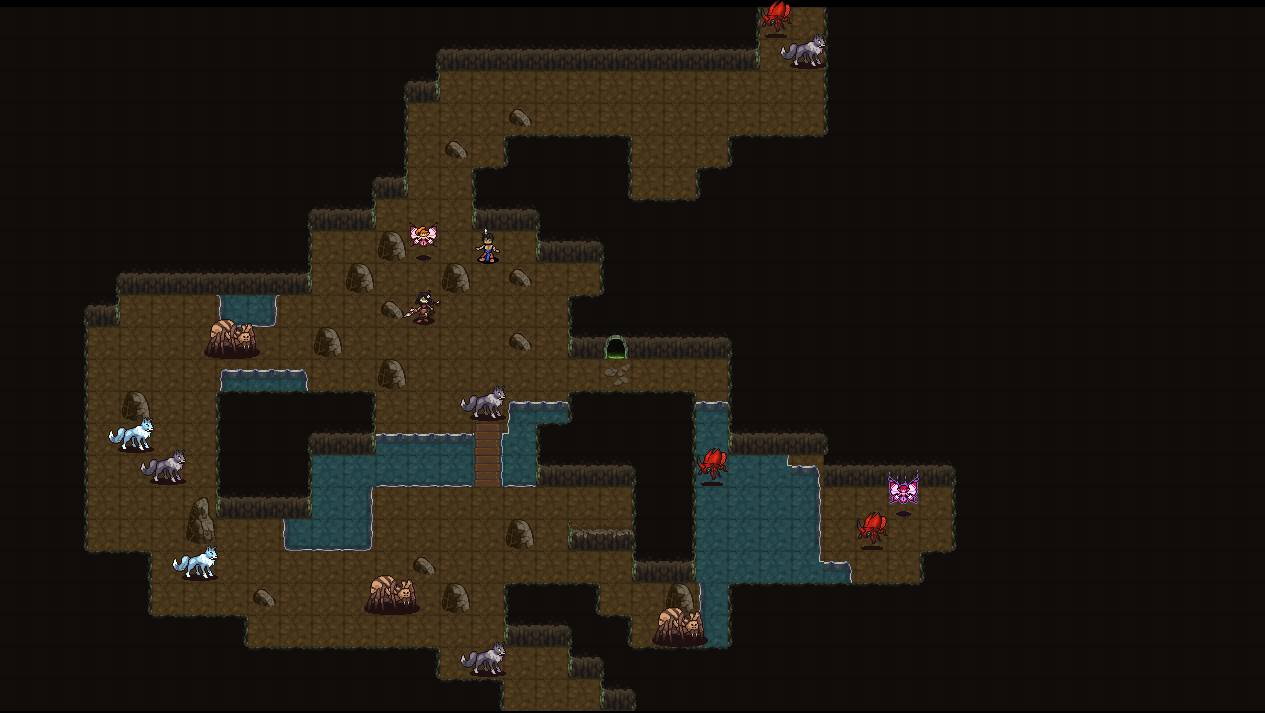
Chapter 9EX – White Wolf
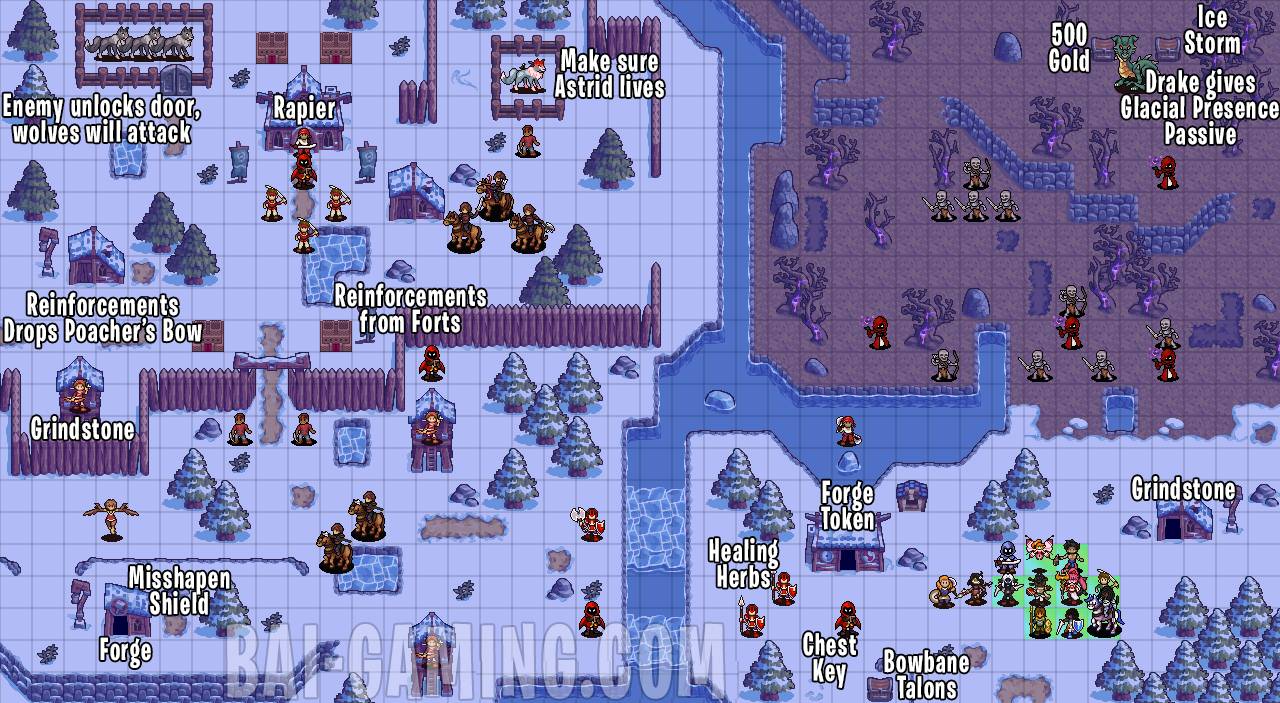
- New Recruits: Sigrunn (automatic), Astrid (make sure she survives, you don’t need to talk to her)
- Secret: Misshapen Shield (5, 19)
- Drake: Drops Glacial Presence passive
- Houses: Forge Token, Grindstone, another house is a Forge
- Chests: Bowbane Talons, 500 Gold, Ice Storm
- Enemies: Chest Key, Healing Herbs, Grindstone, Poacher’s Bow, Rapier
I split up my units, one group to defeat the Drake and another group to defend near the ice bridge. You need to protect Astrid but I didn’t notice enemies attacking her even after taking my time. The enemies will open a gate releasing wolves but they’re not too hard. You don’t need to talk to Astrid during the battle, she joins after the battle.
New Recruit: You will eventually need Quidel x Astrid’s second support level conversation for an optional recruit so use them together on all maps if you want that recruitment. I won’t mention this again until you get the recruit so if you want all recruitment make sure to use them and view all their supports whenever in the base.
Alivar’s Emporium: Flower Ring
Chapter 9 – Swamped
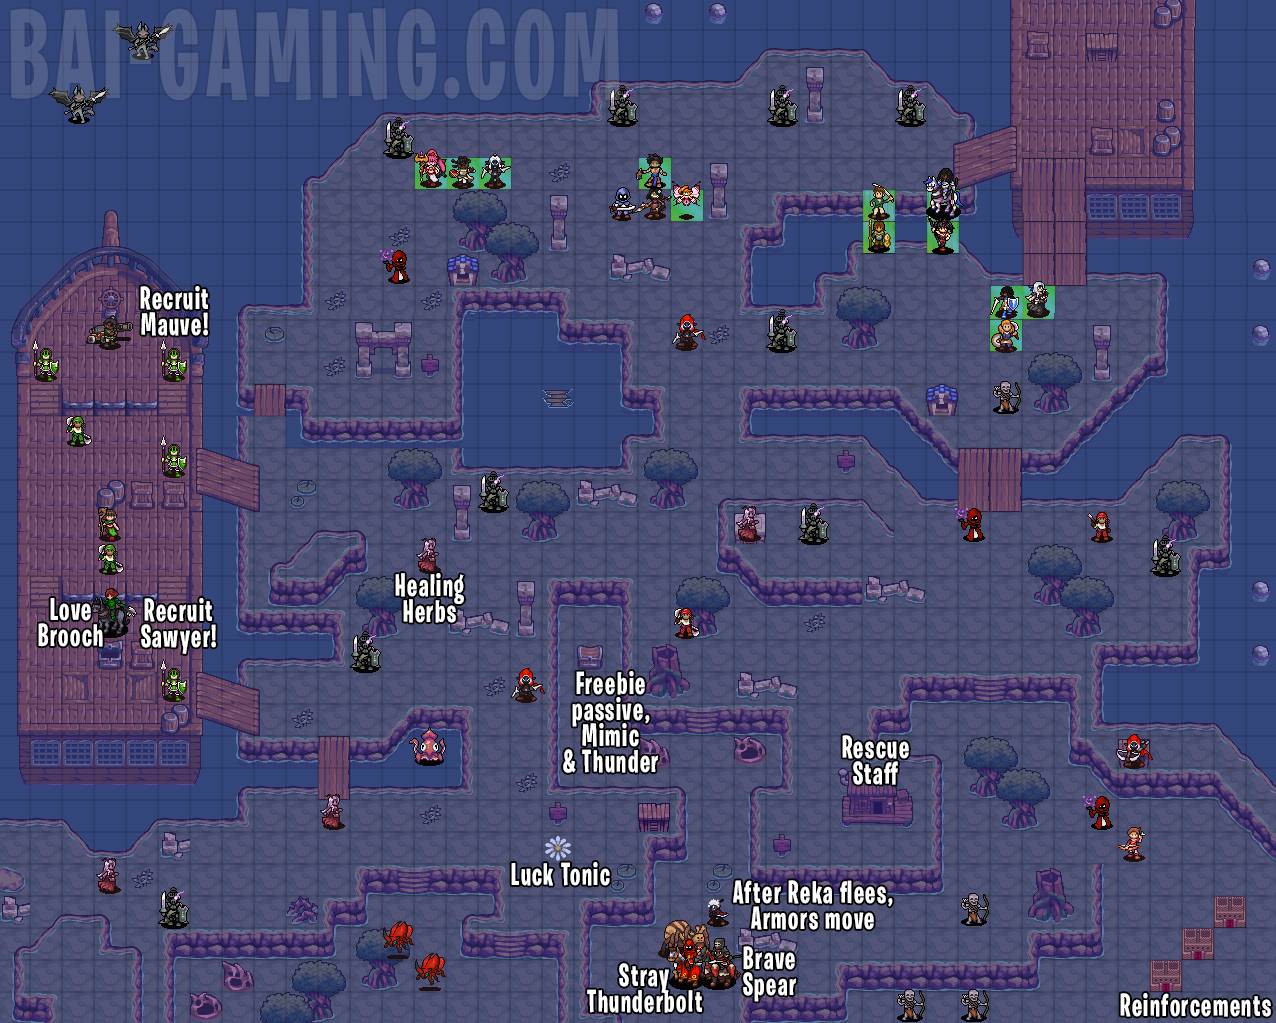
- New Recruits: Sawyer (talk to him with Nayeli), Mauve (talk to her with Laetitia)
- Houses: Rescue Staff (if you’ve been ignoring pickups make sure to get this, you need a Rescue Staff for a recruit coming up soon)
- Flower: Luck Tonic
- Secrets: Multi-LMNT Shooter & Adaptable Loader – Fire (35, 4), Kraken’s Loan (21, 0), Love Brooch (3, 19)
- Chests: Free Passive and it turns into a Mimic who also drops Thunder
- Enemies: Healing Herbs, Brave Spear, Killer Gauntlets
Make sure to recruit Mauve and Sawyer by talking to them with Laetitia and Nayeli, respectively! They’re very out of the way!
For the rest of your units head down as usual. The forts in the southeast will spawn many horserider enemies. Don’t worry about the Possessed Armors, they will only activate when you get into Reka’s range so make sure no units are left behind. 3 Bosses at once is tricky, so try to bait one out at a time or use a very tanky unit.
Reka will leave after he’s aggroed. He still returns later on no matter what so don’t worry about beating him.
The boss with the Brave Spear isn’t recruitable from what I can tell, just defeat as normal to get his spear.
Alivar’s Emporium: Heavy Axe, Iron Bow, Wooden Bow, Mancatcher
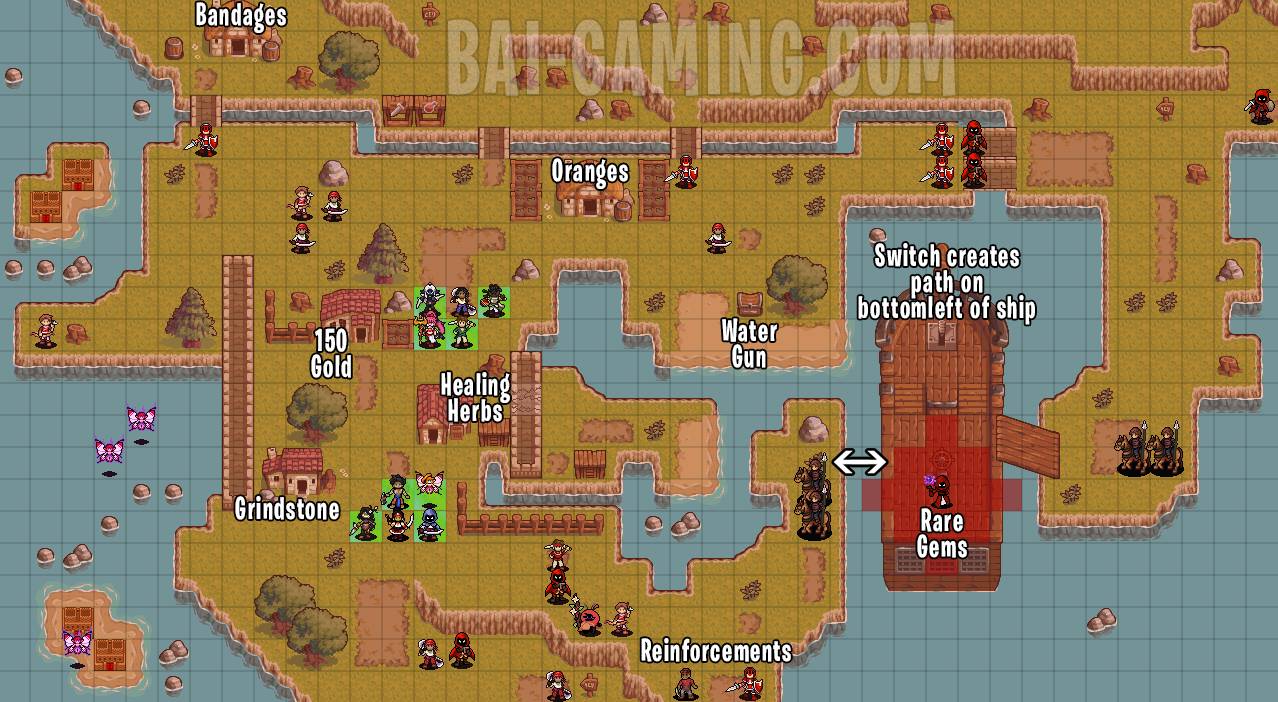
Chapter 10-1EX – Taking Charge
This is a sidequest unlocked from Laetitia x Diego Conversation 1.
- Houses: Grindstone, Healing Herbs, 150 Gold, Bandages, Oranges
- Chests: Water Gun
- Enemies: 2 Rare Gems
- Switches: Switch on ship unlocks a new plank connecting the cliff to the ship marked by the arrows
- Weapon Shop: War Hammer, Maul, Zap, Pebble, Heavy Cannon, Aura Gauntlets
- Item Shop: 3 Healing Herbs, Oranges, 2 Grindstones, 2 Healing Staves, Restore Staff, Ale, 2 Bandages
This map has a fun gimmick: your unit will be on either Team Laetitia or Team Diego depending on whether you place them on the northern or southern starting square. Kills will be tallied for each team and either Laetitia or Diego will get a reward after the battle.
For Diego winning we got: Diego’s Eyepatch. If Latetitia’s team wins she gets an item instead. If you try to tie the score I think it uses whichever team defeats the boss as a tiebreaker, it wasn’t possible to get both rewards from my testing.
There’s many reinforcements from the south and north but the enemies are easy and this map is a good grinding opportunity. You can actually have half your units hang back while another half go to the ship’s switch. The ship’s switch makes a path represented by arrows from the cliff onto the ship, making progression significantly easier. You can even cheese this map by having Daisy fly to hit the switch early on.
Chapter 10 – Reunion at Dusk

- New Recruits: Not a new recruit but defeat Monolith without defeating Erin
- Secret: Expert Belt (20,2)
- Flower: Health Tonic
- Chests: Summon Ring
- Enemies: Stray Thunderbolt, Silencer Daggers, Rare Gems, Flame Cutlass, Safeguard Shield, Zephyr, Furious Blood Vial, Earlybird Talons
Be careful because this is a defend map and sometimes a flying beetle will take you by surprise. Work your way through the map, the northeast enemies have good drops and it’s worth getting the Flame Cutlass.
Reka is in the southwest, he drops a Stray Thunderbolt if you defeat him. Watch out for many reinforcements from the south.
The main gimmick of this map is that the main boss, Monolith, travels with Erin. Even outside their range they started moving at about turn 7 so don’t take too long clearing the northern enemies. It’s tricky but try to bait Monolith and when he’s close enough have your units destroy him in one turn. Sometimes they do separate if you keep luring Monolith out. Beat Monolith and don’t hurt Erin!
Alivar’s Emporium: 3 Bandages, 3 Grindstones, Sharp Daggers, Mend Staff, Life Drain
As you enter Chapter 11 Asahi leaves.
The game added Group Training 2 in the base conversations, where your player avatar can train with one ally to gain a new skill. I was able to choose between Nashwa, Sophie, Gene Erick or Coco.
The EX chapters below are unlocked from supports. You might not have them or you might have extra if you used different characters. I’ll list the ones I obtained but don’t stress if you don’t get them or if you have different ones.
Blood-Soaked Sands and Reluctant Shopping don’t have recruits.
In Chapter 11-3EX (The Beach Episode) make sure to open a chest to obtain Scholar’s Heart for a recruit later on. This one was added in a new patch of the game and should be automatically unlocked.
Chapter 11-1EX Blood-Soaked Sands
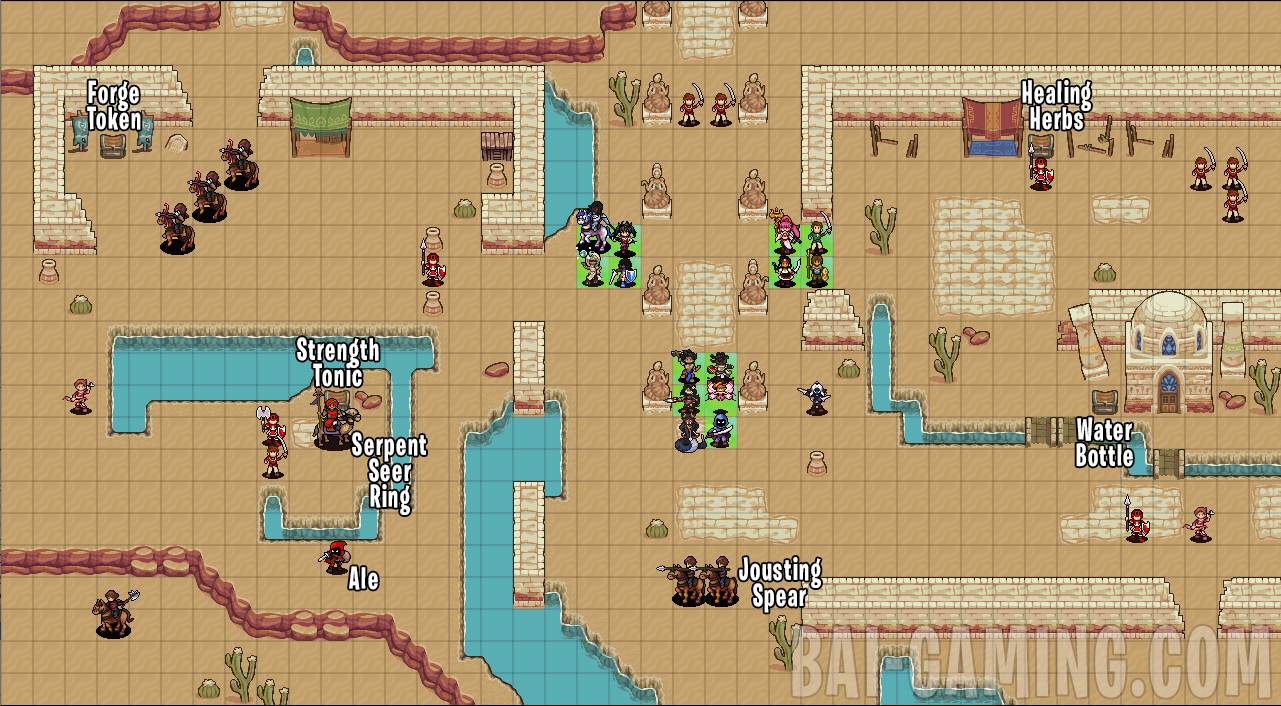
- This sidequest is unlocked from Keri x Kitoko Conversation 2
- Chests: Forge Token, Strength Tonic, Healing Herbs, Water Bottle
- Enemies: Serpent Seer Ring, Ale, Jousting Spear
It’s a rout map but the items are scattered all over the map. Most enemies will rush at you, including the boss so try to pick up everything before you accidentally defeat all the enemies too early.
Chapter 11-2EX Reluctant Shopping

- This sidequest is unlocked from Curtis x Daisy Conversation 1
- Chests: Mimic Chest drops Light Shard
- Houses: Forge Token, Resistance Token
- Enemies: Healing Herbs, Door Key, Rare Gems, Grindstone, Oil Bottle
- Weapon Shop: Compound Bow, Killer Bow, Axetinguisher, Sweeping Talons, Aegis, Tornado, Prey
- Item Shop: 2 Healing Herbs, 2 Grindstones, 2 Mend Staves
Chapter 11-3EX The Beach Episode
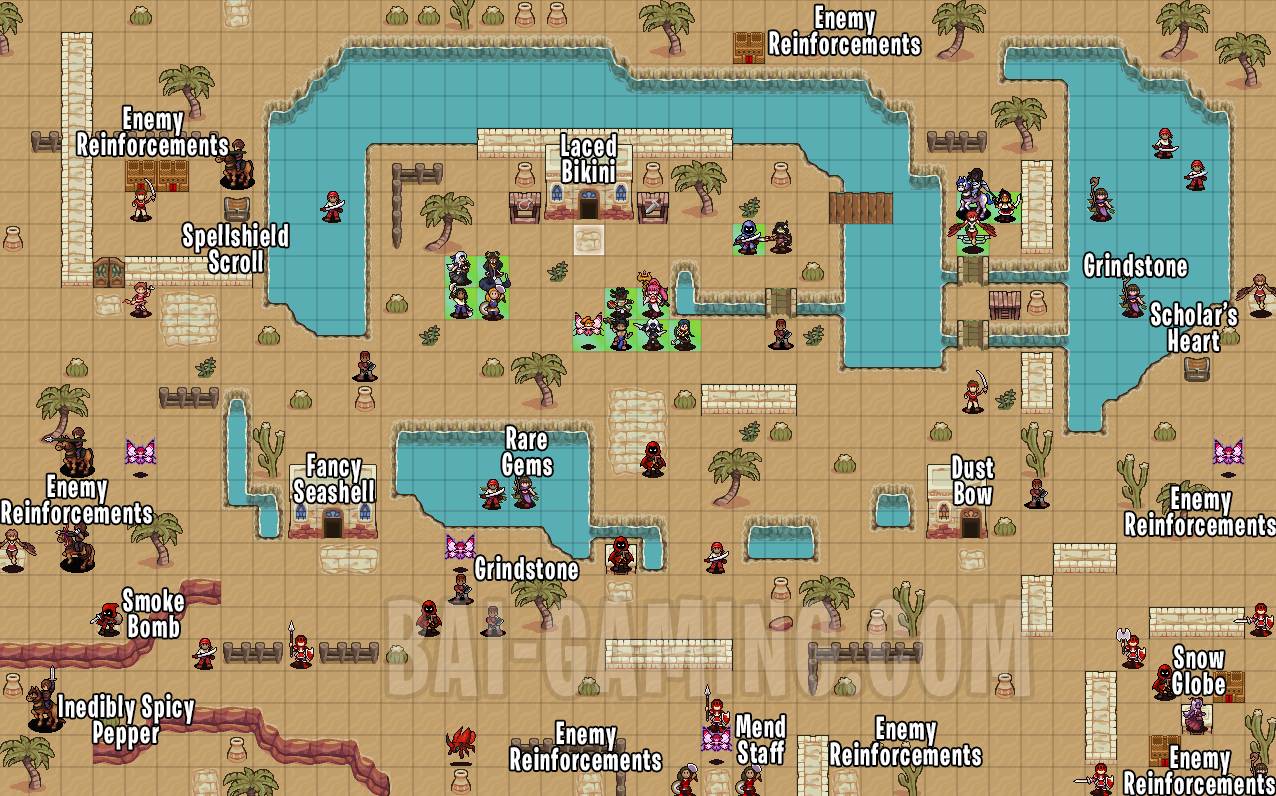
- This sidequest is unlocked automatically in the newer patches of the game
- New Recruits: Make sure to get the Scholar’s Heart, it is needed for a recruitment later on.
- Houses: Laced Bikini, Fancy Seashell, Dust Bow
- Chests: Spellshield Scroll, Scholar’s Heart
- Enemies: Grindstone, Rare Gems, Mend Staff, Smoke Bomb, Inedibly Spicy Pepper
- Enemy Reinforcements: From the all forts, as well as the road icons on the western and eastern parts of the map on various turns. Pretty much expect reinforcements every turn from most corners of the map and all of the forts.
Chapter 11 Yamal
Nashwa automatically joins in the base cutscenes.
You can choose a partner for Nayeli now! We chose Keri.
Alivar’s Emporium: Bolt Axe, Heavy Gauntlets
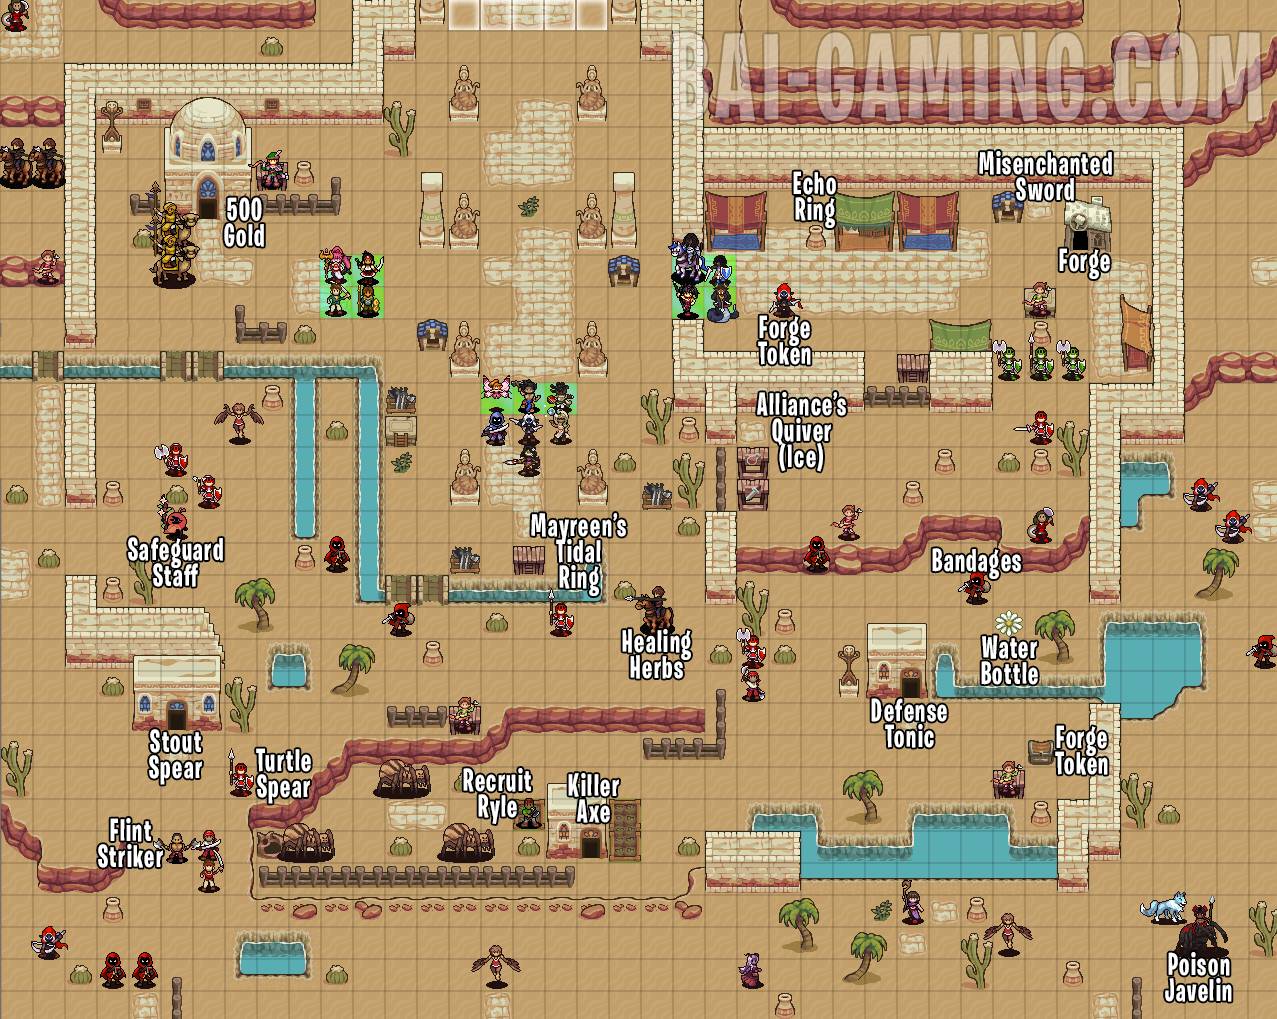
- New Recruit: Nashwa (automatic), Ryle (talk to with Nayeli), Yahya (automatic after a few turns)
- Houses: 500 Gold, Stout Spear, Defense Tonic, Killer Axe, one of the houses is a Forge
- Secrets: Echo Ring (25, 6), Alliance’s Quiver (Ice) (23, 13), Misenchanted Sword (32, 6), Mayreen’s Tidal Ring (17, 17)
- Flower: Water Bottle
- Chests: Forge Token
- Enemies: Safeguard Staff, Healing Herbs, Turtle Spear, Flint Strike, Bandages, Forge Token, Poison Javelin, Quickfeet Scroll
- Item Shop: 5 Healing Herbs, 4 Grindstones, Healing Staff, Shell Staff, 3 Smoke Bombs, Rogue’s Grasp, Chicken Feed, 3 Ale
- Weapon Shop: Scalepiercer, Brave Axe, Executioner’s Axe, Killer Daggers, Daylight, Fireball, Flame Maelstrom, Life Drain, Prey
This map has a gimmick, about half way into the defend map (turn 6 or so) the water will freeze, turning into ice you can walk on. If any green allies die they will be turned into enemies you need to defeat. For this reason it’s better to be aggressive even though it’s a defend map.
Enemies sometimes spawn in the northwest, but for those spawns they take a while to get to the white squares on the map since they have to go around the wall. It’s still good to leave a unit behind just to be safe in case any enemies sneak up on you.
Have Nayeli work her way to the south to talk to Ryle for recruitment, even if you defeated Ryle in earlier chapters he’s still recruitable now so no worries.
Collect the Forge Tokens and head to the forge to upgrade eligible weapons. Use them up because the next forge isn’t for quite a while…
Also be aware that there are rocky looking stairs present throughout, they look similar to the cliff rocks but they’re actually stairs (looks like 2 rocks stacked).
It’s easy to defeat the southwestern boss. The southeastern boss was a bit trickier to reach and was a tad stronger but it’s doable.
Alivar’s Emporium: Light Axe, Mancatcher, Ward Staff
Chapter 12 – Road to Ruin
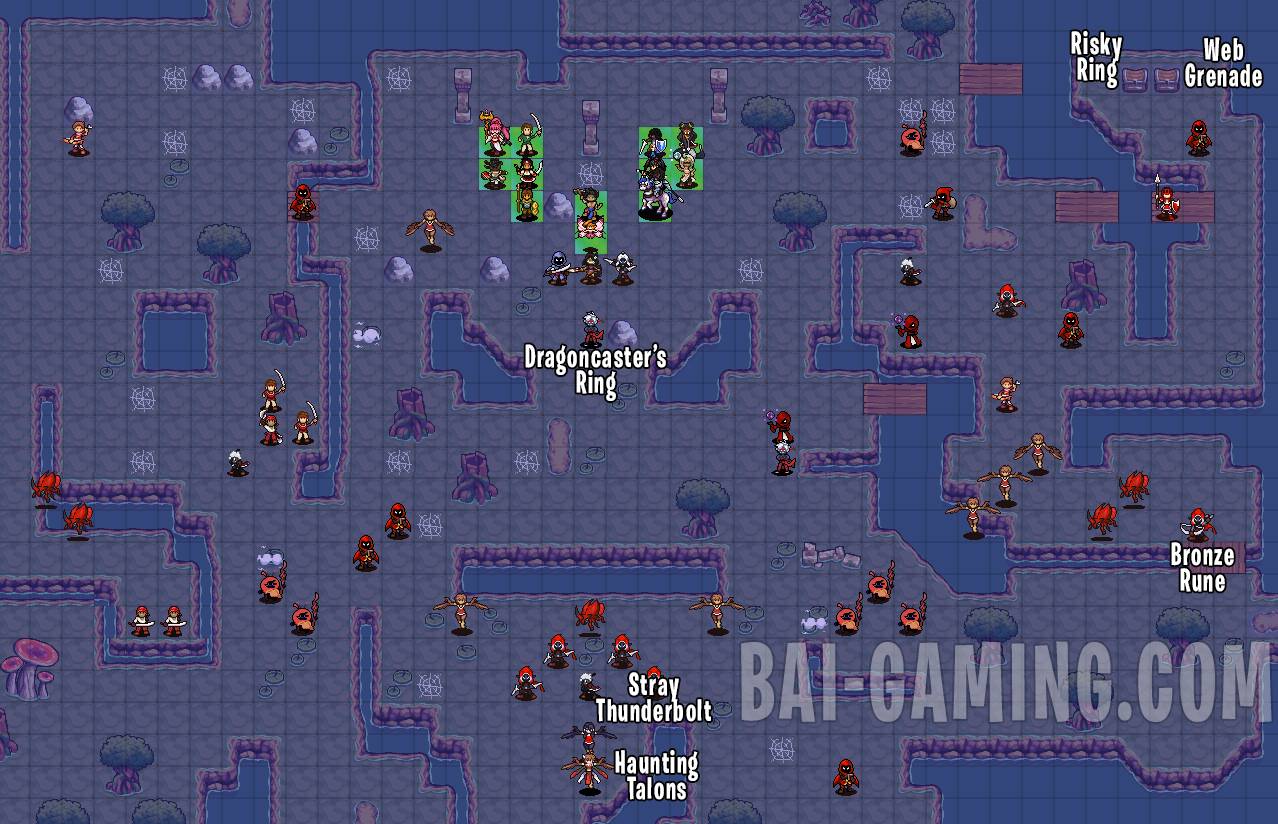
- Secret: Dragoncaster’s Ring (18, 10)
- Chests: Risky Ring, Web Grenade
- Enemies: Stray Thunderbolt, Haunting Talons, Bronze Rune
Pretty standard map, you can finally defeat Reka! Defeat the Reka clones first to weaken the main boss Reka.
This map changes a bit depending on what you did during Chapter 7. The boss you didn’t defeat there will appear alongside their enemies of their type.
In this older map screenshot we defeated Eirhardt (the horserider and not the harpy) so the harpies spawned as enemies and mini-bosses. Also if you didn’t recruit Millenia and left her alive in Chapter 7 then she appears as an enemy miniboss and it’s now too late to recruit her, she won’t talk to Cleo or anybody anymore, you had to have recruited her back in Chapter 7.
If you instead defeated the harpy boss in Chapter 7 then this map has Eirhardt as a mini-boss and horserider enemies instead of harpy enemies. The enemy drops might be different depending on your version of the map.
Chapter 13 – Unfulfilled Destiny
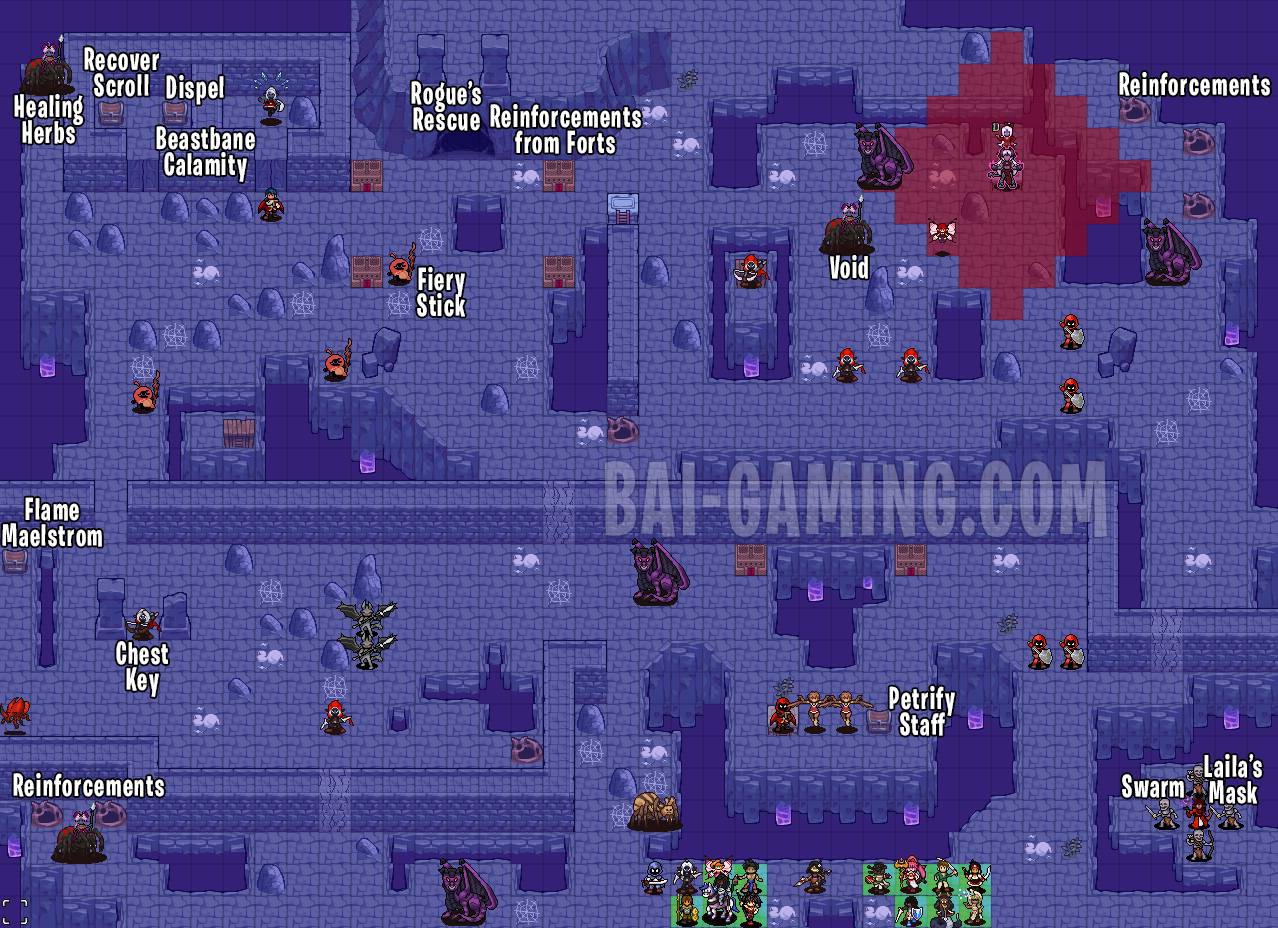
- New Recruits: Ayka (defeat using Keri OR just avoid her and then you can recruit her in the next map), Erin (talk to her with Keri), Ciara (bring Flynn, then use Rescue Staff on her, then talk to her with Flynn, more details below)
- Secrets: Beastbane Calamity (7,3), Laila’s Mask (37, 25), Rogue’s Rescue (14, 4)
- Chests: Flame Maelstrom, Petrify Staff, Recover Scroll, Dispel
- Enemies: Chest Key, Swarm, Fiery Stick, Void, Sweeping Bow, 2 Healing Herbs
You’ll choose a new passive for your avatar character. Friendship dialog means you get a passive to boost being around friends while choosing the tough option usually helps your character individually.
My favorite map in the whole game, in fact one of my favorite maps out of all tactical RPGs! This is Kaga-level map design, and I mean that in a positive way!
First off, make sure you have a staff-user who can use the Rescue Staff (likely Anabelle) and bring Flynn along too.
Asahi appears and gives Erin a key, then he leaves. It’s up to you if you want to use it soon or not, I did but I wish I didn’t because Erin is a glass cannon. In the left square of Erin’s cell is Beastbane Calamity, a weapon she can use. I recommend you to leave Erin where she is. A spider rider enemy will head towards her moving one square each turn but that’s still enough time to move your units up to have Keri talk to Erin. A flying beetle does approach Erin but you can use the Beastbane Calamity weapon to take it out easily.
The only part that’s somewhat time sensitive is saving Erin so focus on getting Keri to her. Make use of your Armored units to destroy walls. Spider riders will keep spawning in the southwest but they’re great for grinding levels.
On the way you’ll see Ayka as a miniboss. Defeat her using Keri and she will spare her in the battle, and she’ll appear in the next map as a recruitable unit. Alternatively just avoid Ayka entirely and she’ll still be recruitable in the next map.
As you head north be careful because reinforcements spawn from forts and they can easily move to defeat Erin if you chose to open her cell door. After saving Erin by talking to her with Keri and can focus on the collectibles.
After gathering everything you need it’s time for the boss but saving Ciara requires some steps too. You need to follow these steps carefully. If you try to defeat the boss normally she has a passive that sacrifices Ciara to heal herself and you don’t want that. Move Flynn towards Ciara and a conversation will occur. Then have your staff wielder use Rescue onto Ciara to save her. You’re not able to select Ciara using Rescue until Flynn has the conversation first. Then you can have Flynn talk to Ciara to recruit her. Now you can defeat the boss as normal.
It turns out there is a consumable item called Rogue’s Rescue in the northern cave. It’s a consumable item that can be used by rogue units to rescue distant units. So if you don’t have a Rescue staff user you can just have Keri use the Rogue’s Rescue on Ciara after Flynn has the conversation.
New Recruits: 641-Z after the battle.
Alivar’s Emporium: 2 Grindstones
Chapter 14 – Moonstone
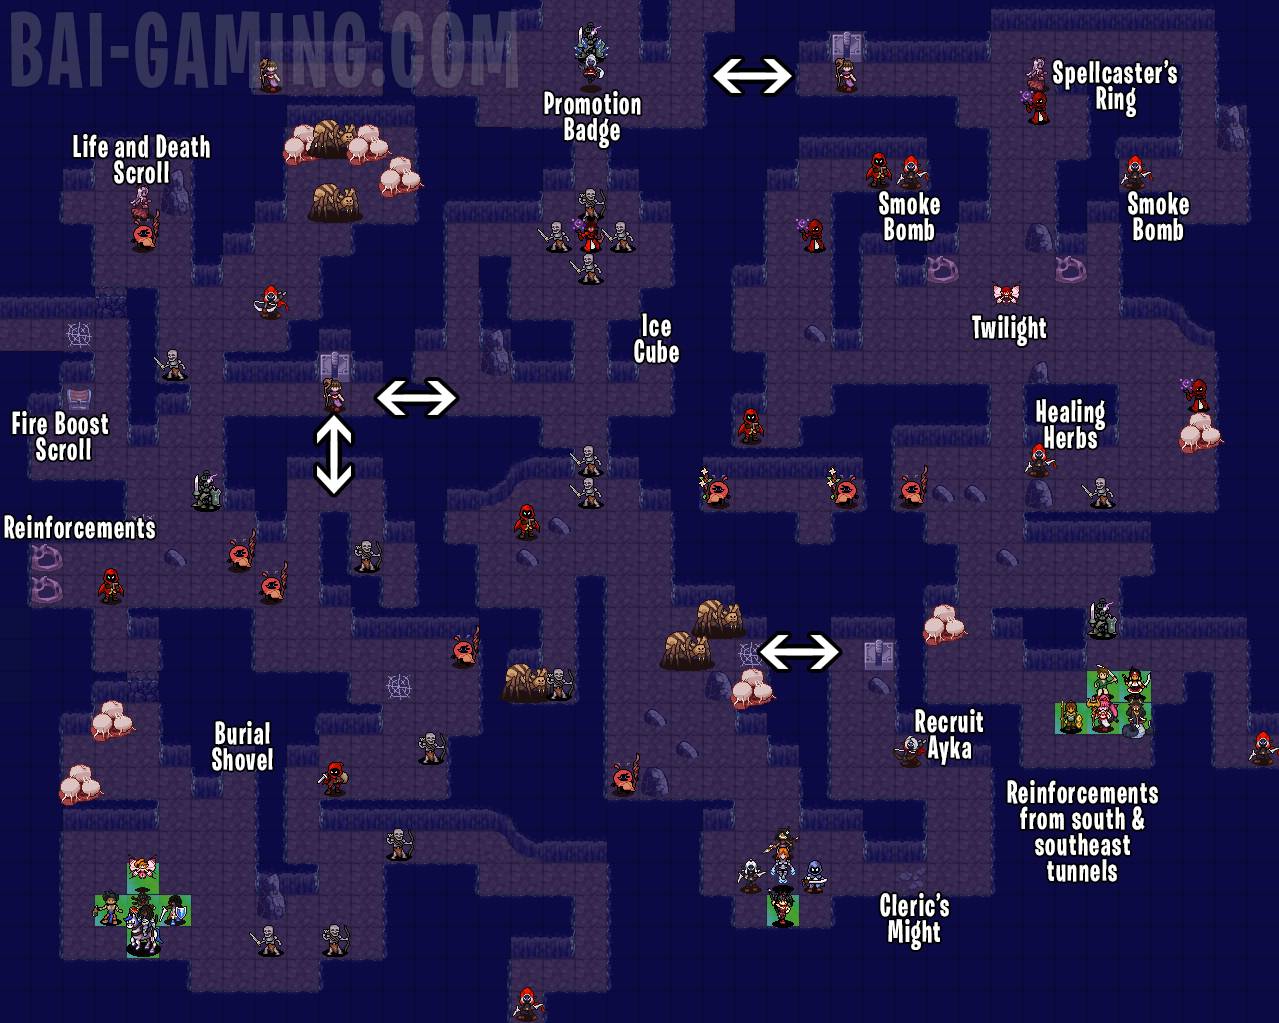
- New Recruits: Ayka (talk to her with Keri)
- Chests: Fire Boost Scroll
- Secrets: Cleric’s Might (28, 27), Ice Cube (20, 11), Burial Shovel (7, 24)
- Enemies: Life and Death Scroll, Promotion Badge, Spellcaster’s Ring, Smoke Bomb, Smoke Bomb, Twilight, Healing Herbs
- Switches: Opens the nearest path marked with arrows
Erin leaves unfortunately, there’s no way to prevent it. Your units are split into 3 groups initially so make sure they can each handle foes. The fairy carrying Twilight can pack a punch so be careful but otherwise a fun map. Use the switches so that you can move around easier.
The main boss drops a Promotion Badge, use it on an ally. Promotion doesn’t reset your character’s level, they will keep leveling up to level 40 which is the max level. Promotion Badges are useable for any promotable unit. Some support conversations give unique promotion badges for certain characters to unlock their secret classes. There’s not many Promotion Badges right now, but after a few more chapters you’ll start seeing plenty of them in maps.
New Recruits: Draco – After this chapter you’ll get more support conversations. Here I completed Quidel x Astrid support 2, which gives Quidel an Earth Drake Heart, needed for a later recruitment!
Chapter 15 – Lands Below
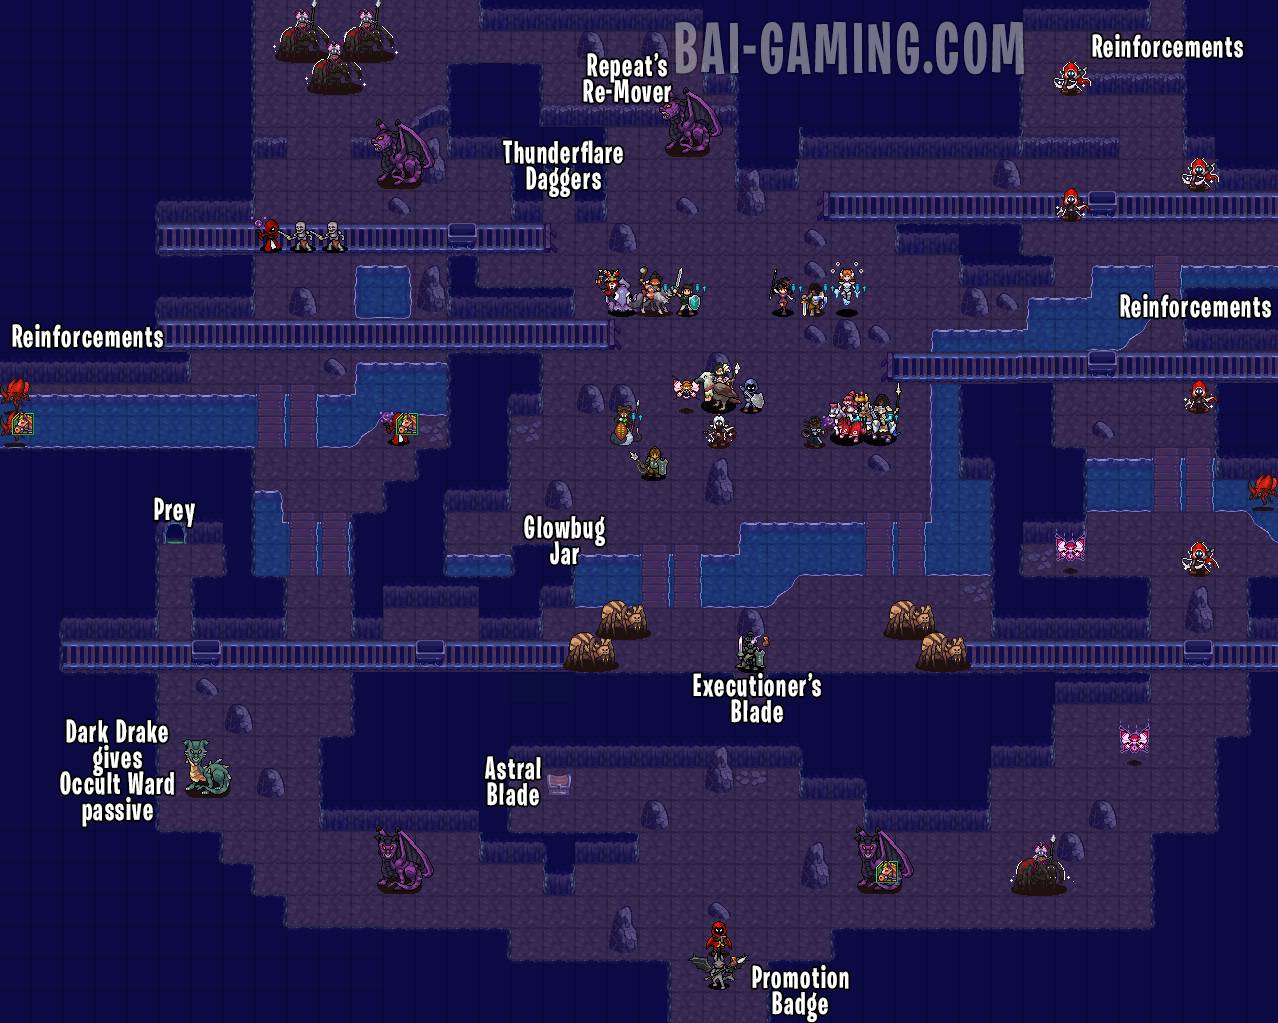
- New Recruits: Draco – Complete Quidel x Astrid’s second support conversation in the base before this chapter for an Earth Drake Heart and then take it to Chapter 18 coordinates 36,25
- Secrets: Thunderflare Daggers (17,6), Glowbug Jar (17,16), Repeat’s Re-Mover (19,1)
- Chests: Astral Blade (changes depending on your avatar’s class!)
- Caves: Prey
- Drakes: Dark Drake drops Occult Ward passive
- Enemies: Promotion Badge
- Enemies: Frost Blade, Executioner’s Blade, Dusk Blade, Brave Blade (can only obtain one of these)
Not too much to mention, just be careful with all the drakes. I used Flynn with a weapon effective against dragons.
Chapter 16 – Back to the Future
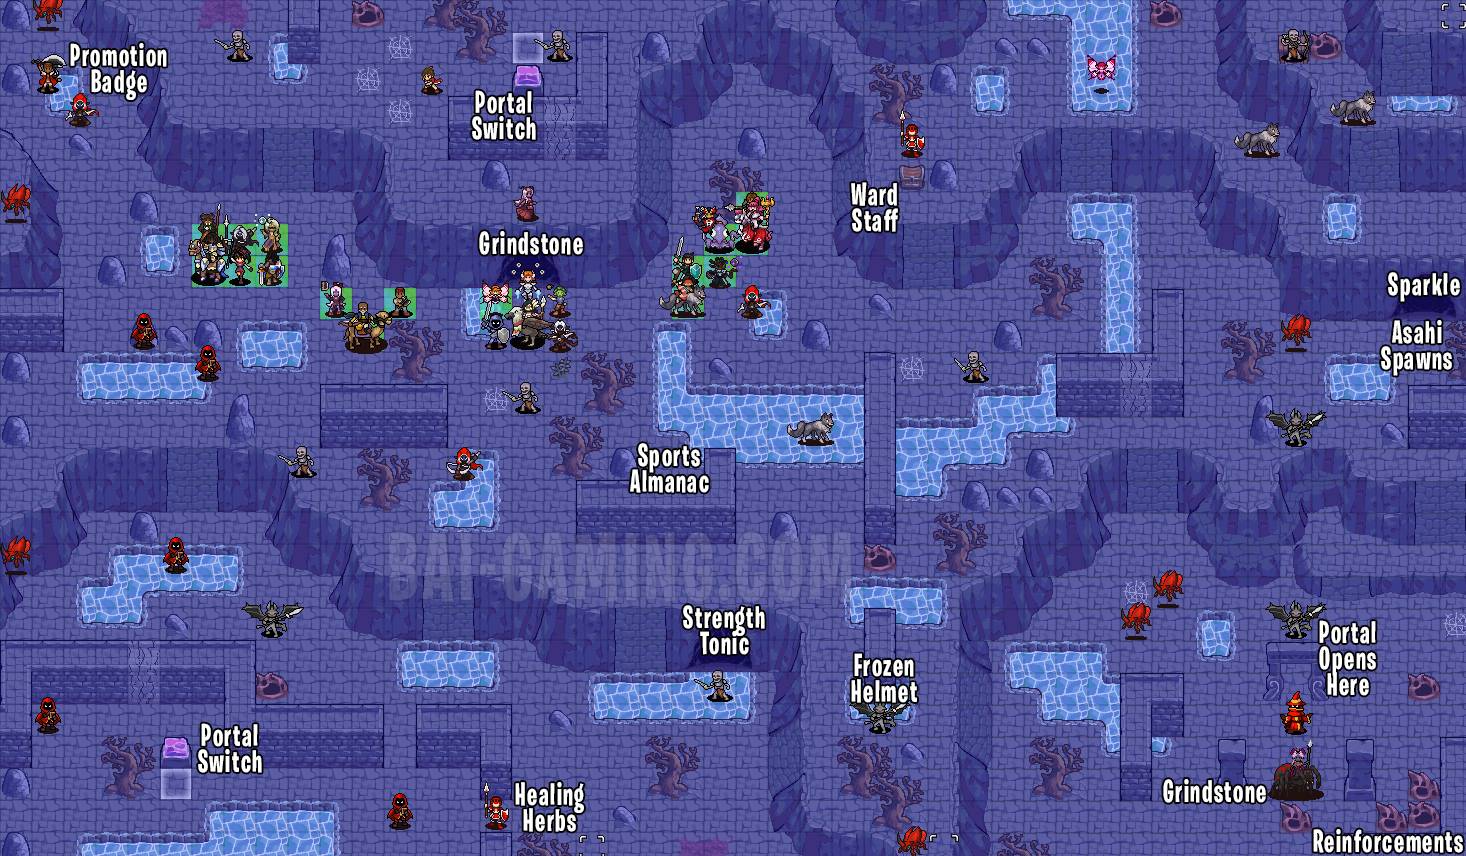
- This map has permadeath so be careful.
- New Recruits: Alivar (automatic), Asahi returns (automatic when you’re approaching the southeast portal)
- Chests: Ward Staff
- Secrets: Sports Almanac (20, 14), Frozen Helmet (27, 22)
- Caves: Grindstone, Sparkle, Strength Tonic
- Enemies: Promotion Badge, Healing Herbs, Grindstone
You need to use the 2 crystal portal switches in the northwest and southwest to open the portal to the southeast. The units don’t have to stay after activating the switches you can just flip them and move on.
There is a lot of winding terrain in this map. You need to also get all the characters in the portal first too before Nayeli, and then Nayeli goes in last. Units who do not enter the portal will be permanently dead (this map is like Thracia 776). Possessed Armors spawn to the west and northeast as you’re finishing the map so don’t keep units by those edges.
Chapter 17 will vary based on who you chose to be Nayeli’s partner. It’ll always be a flashback scene where you control a pre-made party with no optional collectibles so it won’t be too hard.
For my playthrough I did Nayeli x Keri and another playthrough with Nayeli x Quidel so I’ll show those.
You will get a Heroic Orb after beating Chapter 17.
Chapter 17EX – Between the Sands of Time (Keri)
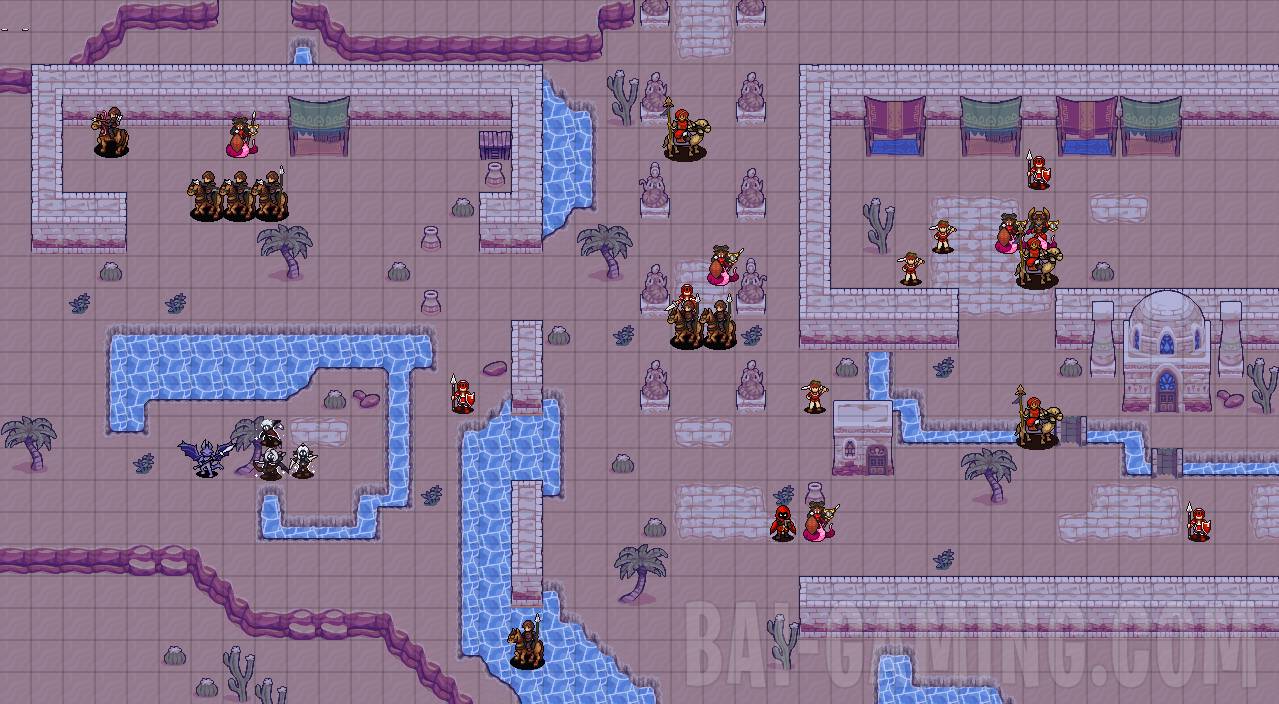
You will control a pre-made party so do the best with what you’re given. There’s no chests and enemies had no drops.
You’ll get a warning every few turns about a big attack called a “Storm Pulse”. It petrifies your units. One unit has a Restore Staff, but if you want to avoid it just stand in the tree or cactus tiles or any tile that increases avoid.
Chapter 17EX – Between the Sands of Time (Quidel)
You control a pre-made party. You either survive 6 turns or rout the enemy. You can even defeat the fairy miniboss as well. Chief Tusk will spawn in after the first turn so use him to easily beat all the enemies.
You get the Oshkigin after the chapter.
Chapter 18 – Under the Radar
You’ll get a familiar (pet) unit for your avatar. Pick whichever you like!
Check your units right now and make sure none of them are dead. You had to move all your characters into the portal back in Chapter 16 otherwise they die, check now if any units are dead so that you can reload your save and fix any mistakes.
Also, bring all the items with the name “Heart” into the map. They will let you recruit new units. If you’ve followed this guide closely you’ll have Earth Drake Heart, Gargoyle Heart, Scholar’s Heart and Rogue’s Heart, each of which will provide you with a new recruit.
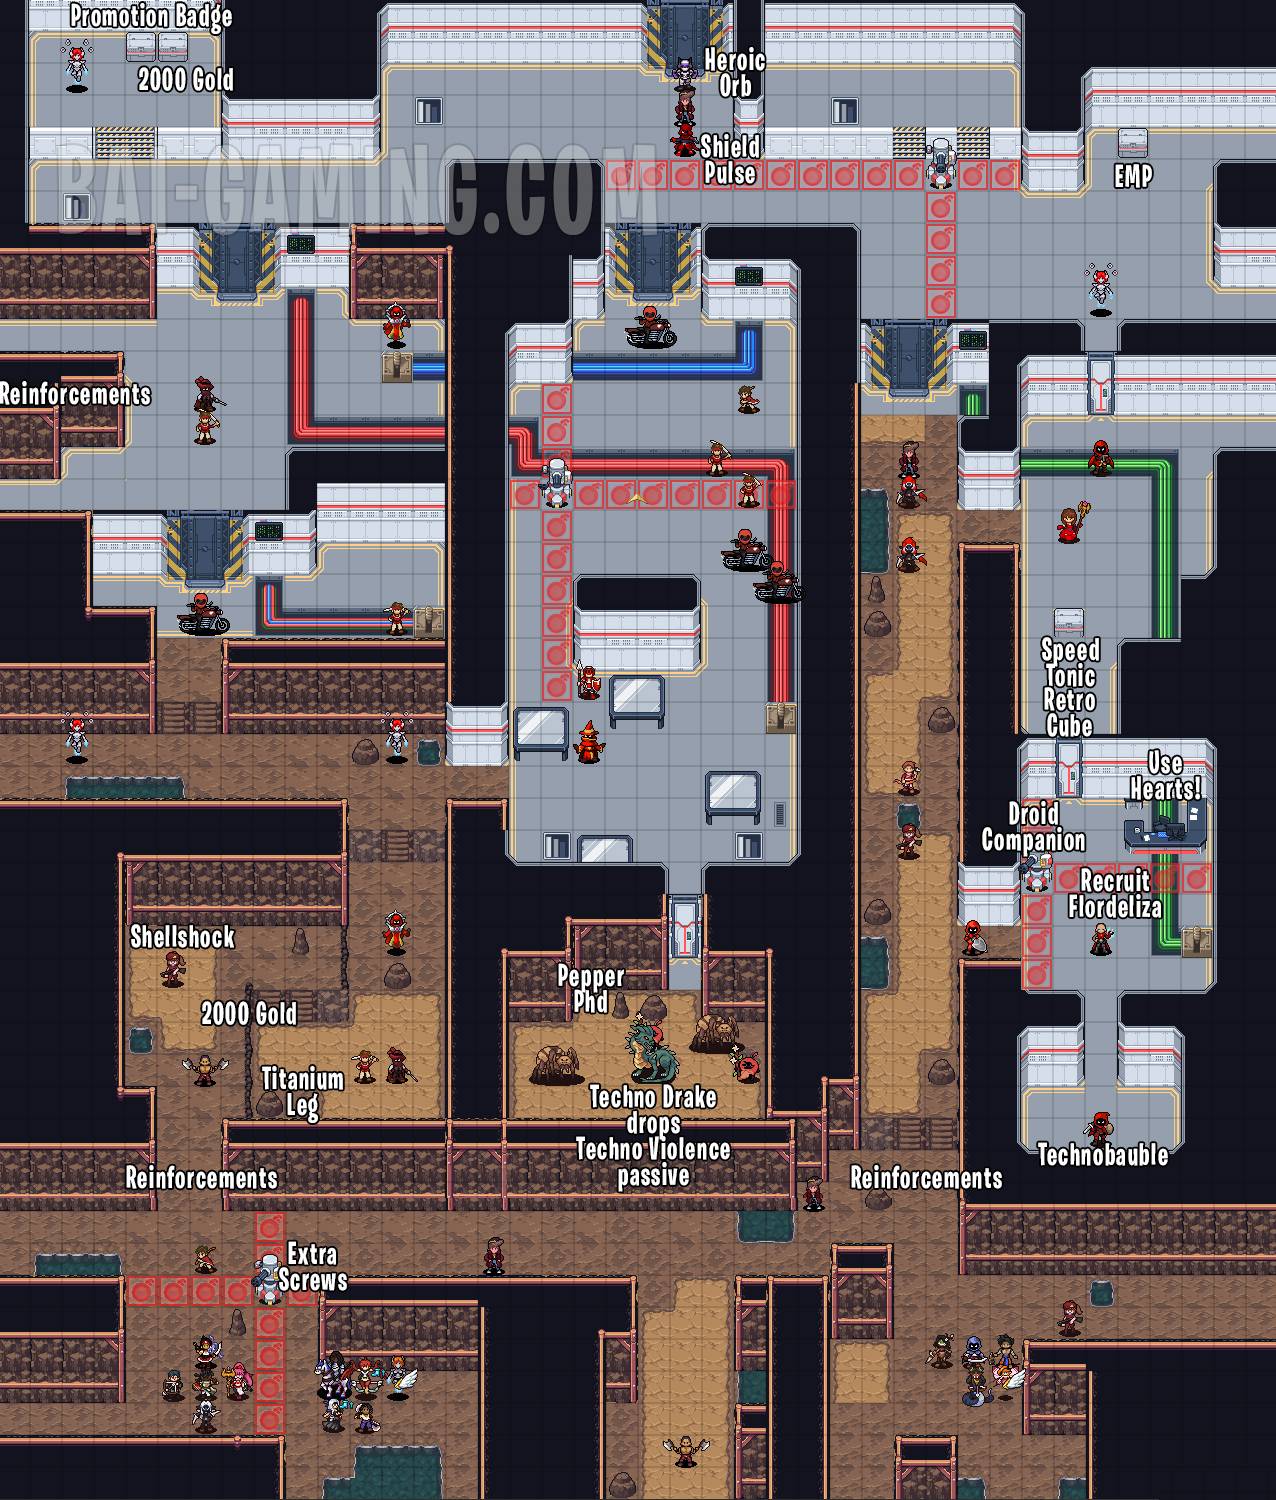
- New Recruit: Flordeliza (talk to her using Nayeli), make sure to bring Heart items into the map and at 36,25 use the Heart items you’ve collected throughout the game into the machine to get Gryff, Draco, Jinglesworth and Glimmerstalk
- Secrets: Pepper Phd (18, 31), Titanium Leg (9, 34), Technobauble (34, 35), Extra Screws (8, 40), Retro Cube (33, 20), Droid Companion (32, 27)
- Chests: Speed Tonic, EMP, Promotion Badge, 2000 Gold
- Drake: Techno Drake drops Techno Violence passive
- Enemies: Shellshock, Shield Pulse, Heroic Orb
- Switches: The switches open the big doors. Just follow the colored lines on the ground to see which switch corresponds to which door.
Use the switches to open the doors, make sure your teams can split up and survive. The small thin white doors can be unlocked with thieves.
Use the heart revival machine to gain new units. Use Earth Drake Heart to recruit Draco, use Gargoyle Heart to recruit Gryff, use Scholar’s Heart to recruit Glimmerstalk, and use Rogue’s Heart to recruit Jinglesworth. You can do this all on one playthrough!
Alivar’s Emporium: Mend Staff, Flower Ring, 1 Promotion Badge, 5 Grindstone, 2 Training Sword, 2 Training Spear, 2 Training Axe, 2 Daggers, 2 Iron Gauntlets, 2 Training Bow, 2 Pocket Pistol, 2 Energy Beam, 2 Twinkle, 2 Void, 2 Ember, 2 Healing Staves, Culling, Parrying Sword
You can trigger Cleo x Kitoko third support conversation to recruit Kinuani in the base before going into the Chapter 19 battle. Although I’ve played all Fire Emblems and Kaga’s games this is the strangest recruitment I’ve ever seen.
Chapter 19 – Bright Lights in the Everdark
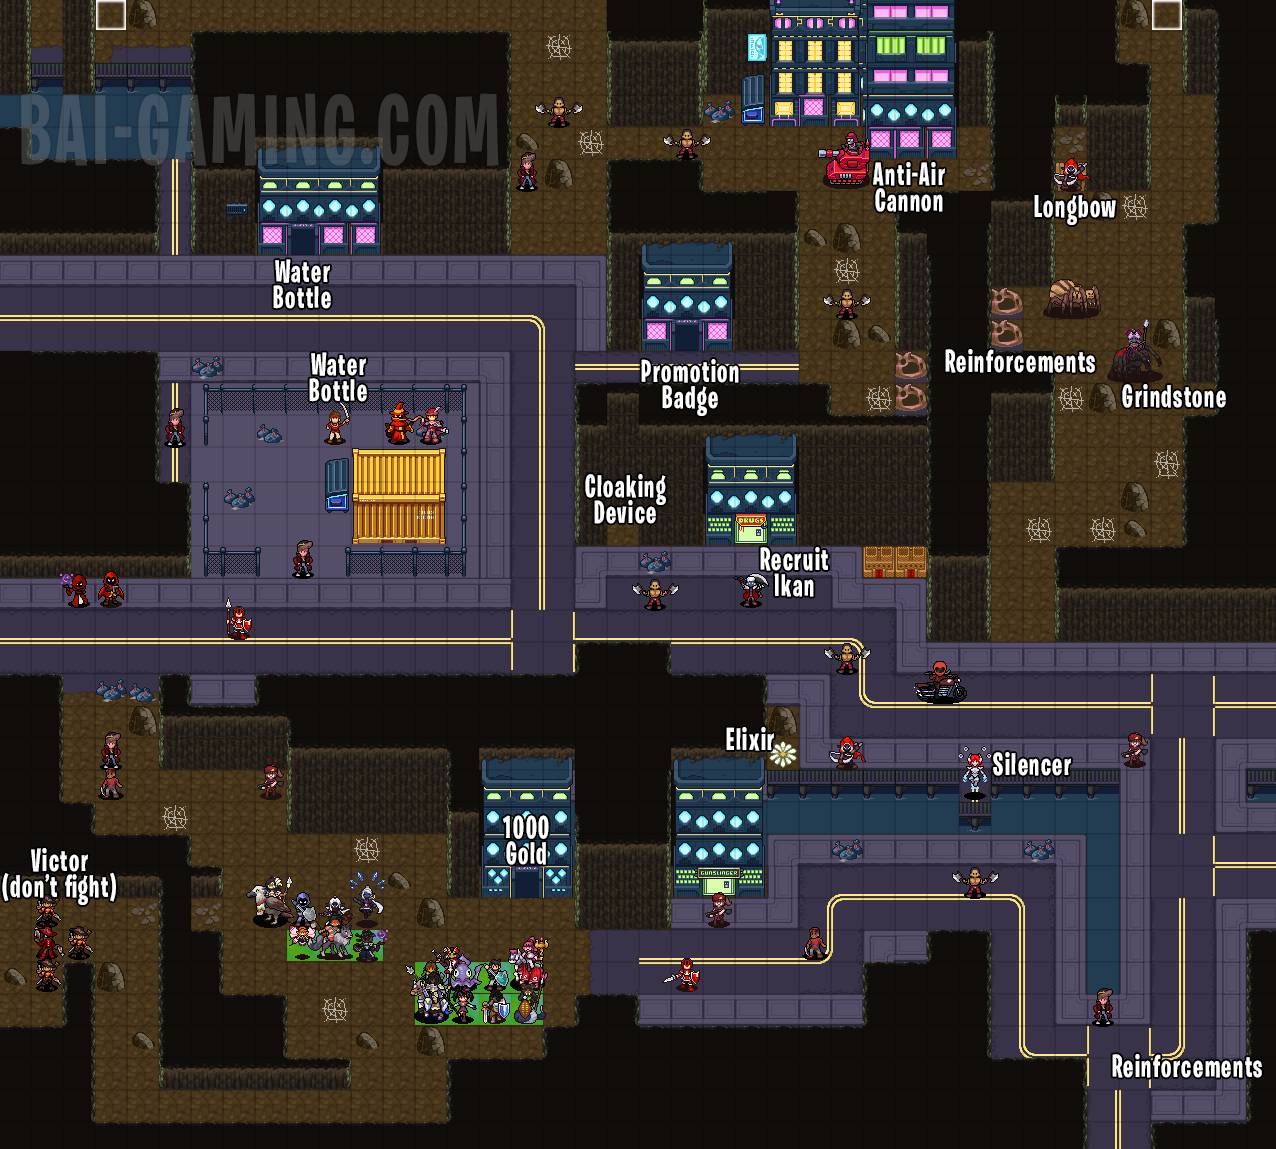
- New recruits: Anna (automatic), Erin (automatic), Ikan (talk to using Erin), Kinuani (Cleo x Kitoko third support conversation in the base right before this map)
- Houses: 1000 Gold, Water Bottle, Promotion Badge
- Secret: Cloaking Device (19, 16)
- Flower: Elixir
- Enemies: Silencer, Water Bottle, Grindstone, Longbow, Anti-Air Cannon
- South Shop: Killer Sword, Killer Spear, Killer Axe, Killer Bow, Stone Gauntlets, Killer Gauntlets, Void, Horrors, Swarm, Shotgun, Water Gun, K-Pistol
- North Shop: 5 Healing Herbs, 4 Grindstones, 1 Mend Staff, 3 Smoke Bombs, 5 Ales
Be careful recruiting Ikan. Even though he’s friends with Erin he will easily one shot her. Try to bait Ikan out with a tanky unit, then have Erin approach him.
Don’t forget that Anna joined as a unit too, not to be confused with Annabelle. I didn’t realize she was a separate unit…
Leave Victor and his mercenaries alone! He’s very powerful.
Alivar’s Emporium: Respite
Chapter 20 – The Sea That Was
- New recruits: Mako (automatic)
- Secrets: Pocket Sand (24, 25), Lightning Rod (24, 10)
- Chests: Promotion Badge, Defense Tonic, 1500 Gold
- Flower: Earth Boost Scroll
- Enemies: Stop Sign, Promotion Badge, Healing Herbs, Compound Bow, Rare Gems, Sweeping Crusher, Throwing Barbs
- Cursed Shop (old game patch): Ring of the Fast Runner, Casual Ring, Fire Emblem, Full Assault Badge, Bronze Rune, Armor of the Colossus
- Cursed Shop (new version): Armoured Boots, Wizard Roach, Belt of the Tipsy Berserker, Bumblebee Badge, Dark Fetish, Kingly Prosthetic Arm
Be sure to keep a unit on the building. Flying harpies will approach from the north. Otherwise the base isn’t hard too defend. You can be aggressive to get the treasures and defeat the mini-bosses. The two mini-bosses are far apart so split up and attack them. Don’t forget that the cliffs have stairs that look like 2 stones stacked.
Chapter 21 – Rebel with a Cause

- New recruits: Sheauga (automatic), Lilith (make sure she survives, you don’t need to talk to her, she’s recruited after the map)
- Secrets: Ouch Punch (19, 28), Shatterstar (13, 14), Scope Lens (20, 38)
- Chests: Heroic Orb, Sweeping Bow, Promotion Badge, Tidebreaker
- Flower: Colossus Scroll
- Enemies: 2 Promotion Badge, Doubloon Blaster, Dual Pulses
- Weapon Shop: Propulsion, Killer Sword, Crystalline Sword, Dark Axe, Raiding Hatchet, Tomahawk, Crystalline Axe, Woodborn Bow, Compound Bow, Silver Bow, Fire Bow, Bolt Gauntlets, Iron Gauntlets, Executioner Gauntlets, Sparkle, Respite, Ember, Chill, Life Drain, Sawed-Off Shotgun, Heavy Cannon, Heat-Seeking Cannon
- Item Shop: 5 Healing Herbs, 4 Grindstones, Far Heal Staff, Bounty Staff, 3 Smoke Bombs, 2 Water Bottles, 2 Oil Bottles, 2 Ales, 2 Bandages, 1 Promotion Badge
This map ends immediately after defeating the southeast boss. You might not want to end the map too quickly, try to get as many collectibles as you can first.
There’s a powerful weapon in a chest at the north corner called the Tidebreaker, but it’s up to you if you want to go for it. You can get another one later on as well as other legendary weapons so don’t worry.
22-1 and 22-2 are new sidequests added into the game with updates. Important Cargo is automatically unlocked and Goldenwoods requires triggering the secret event with Coco in Chapter 6-2 and Coco’s Survival in Chapter 16.
Chapter 22-1EX – Important Cargo
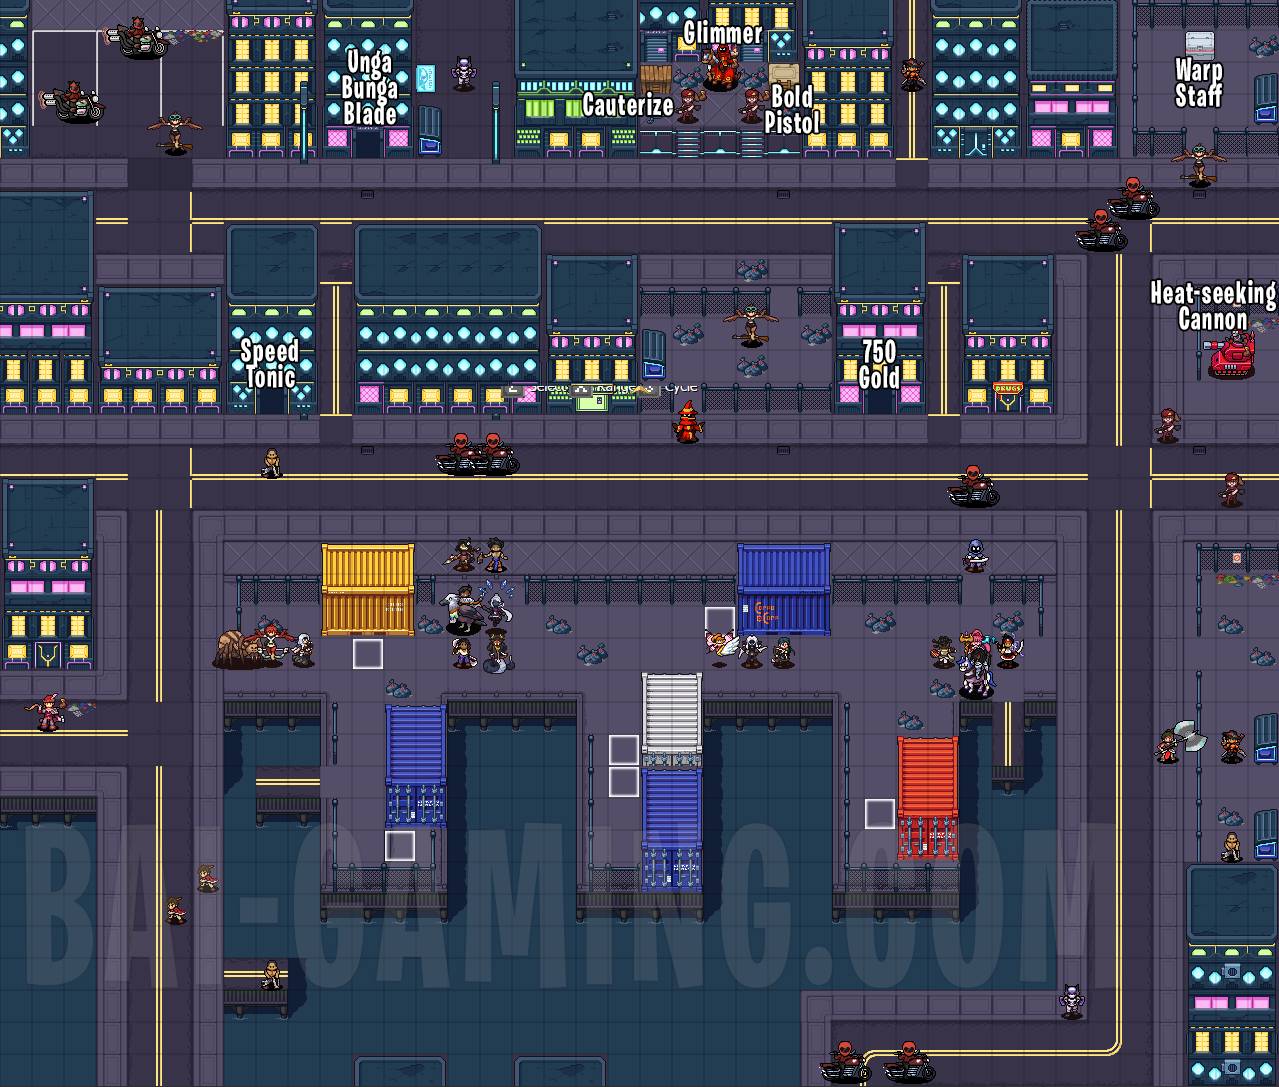
- Houses: Speed Tonic, Unga Bunga Blade, 750 Gold
- Chest: Warp Staff
- Weapon Shop: Evolution, Raiding Tomahawk, War Hammer, Dust Bow, Killer Bow, Silver Bow, Shotgun, Bolt Gauntlets, Iron Gauntlets, Verdict, Expunge, Swarm, Frost Pulse
- Items Shop: 5 Healing Herbs, 4 Grindstones, Restore Staff, 3 Bounty Staves, 3 Smoke Bombs, 2 Water Bottles, 2 Oil Bottles, 2 Ale, 2 Bandages, 1 Promotion Badge
- Enemies: Heat-seeking Cannon, Bold Pistol, Cauterize, Glimmer
Defend map or beat the boss. Enemy reinforcements from all corners every few turns. After the map you obtain the following rewards: Spare Tire, Oasis Tonic, 1000 Gold
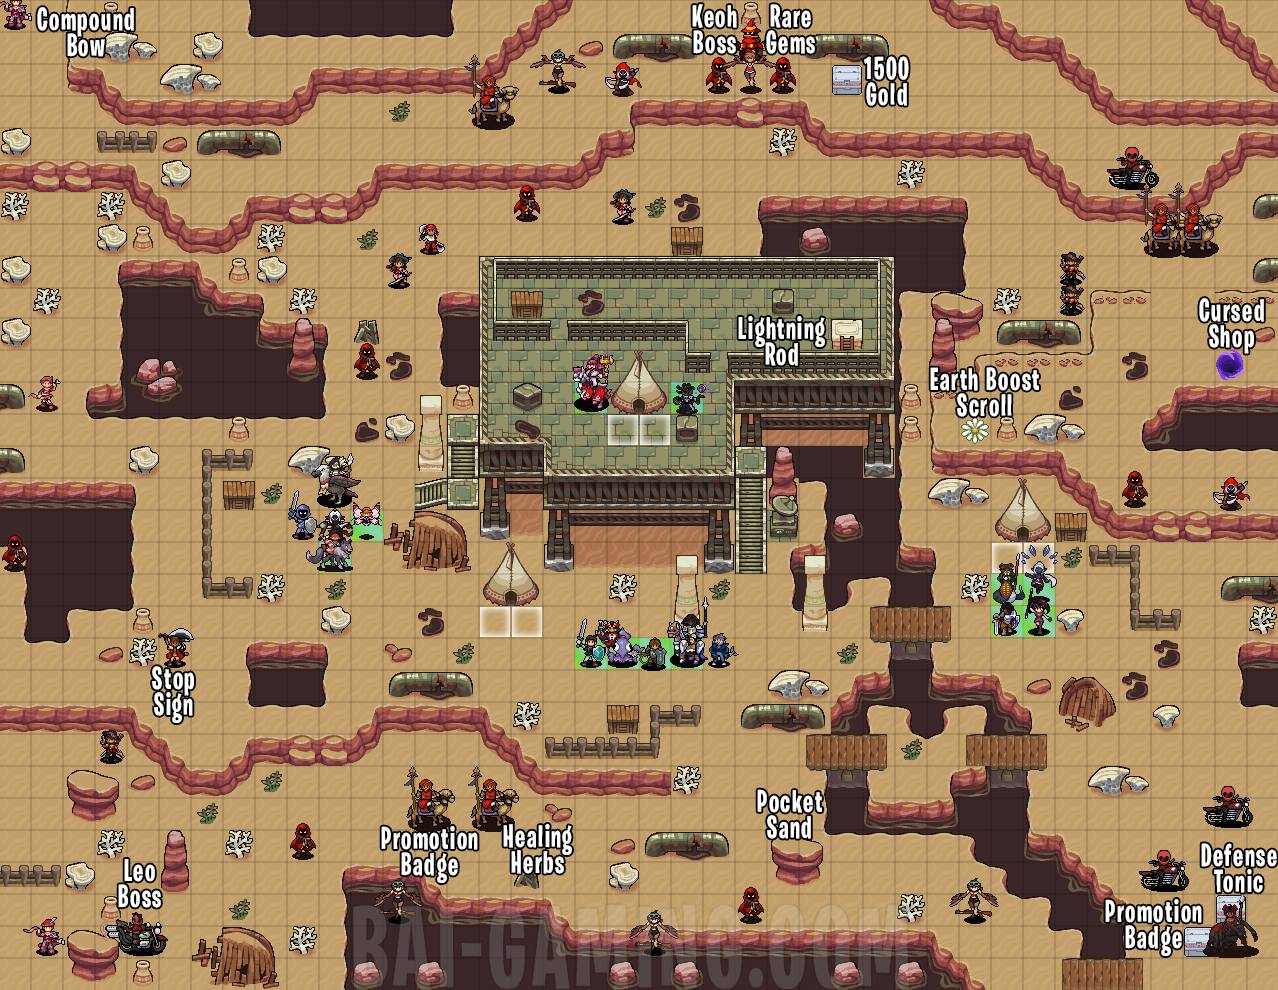
Chapter 22-2EX – Goldenwoods
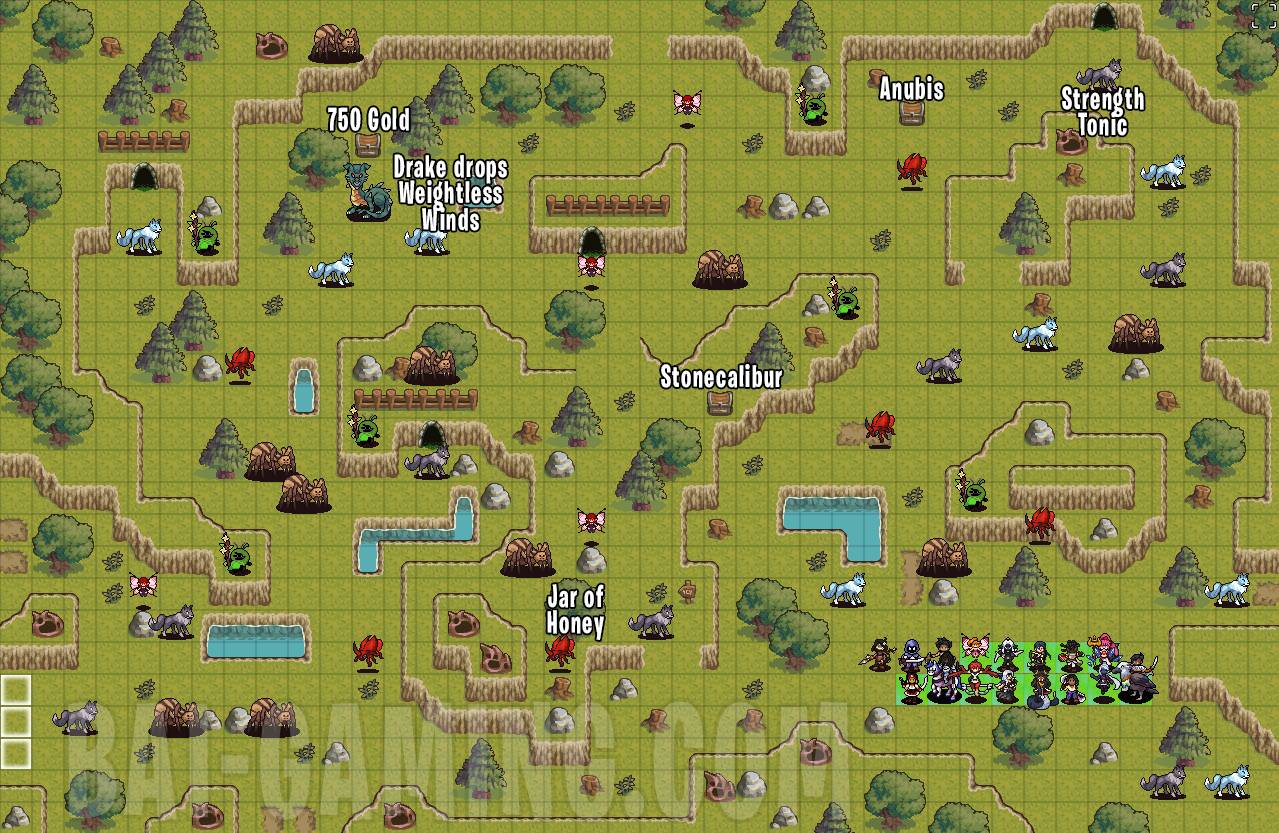
- Chests: Anubis, Stonecalibur, 750 Gold
- Enemies: Jar of Honey, Strength Tonic, Weightless Winds
Have any unit escape onto the white squares on the left. Caves have no items unfortunately.
Chapter 22 – Everlasting Symphony of Pain
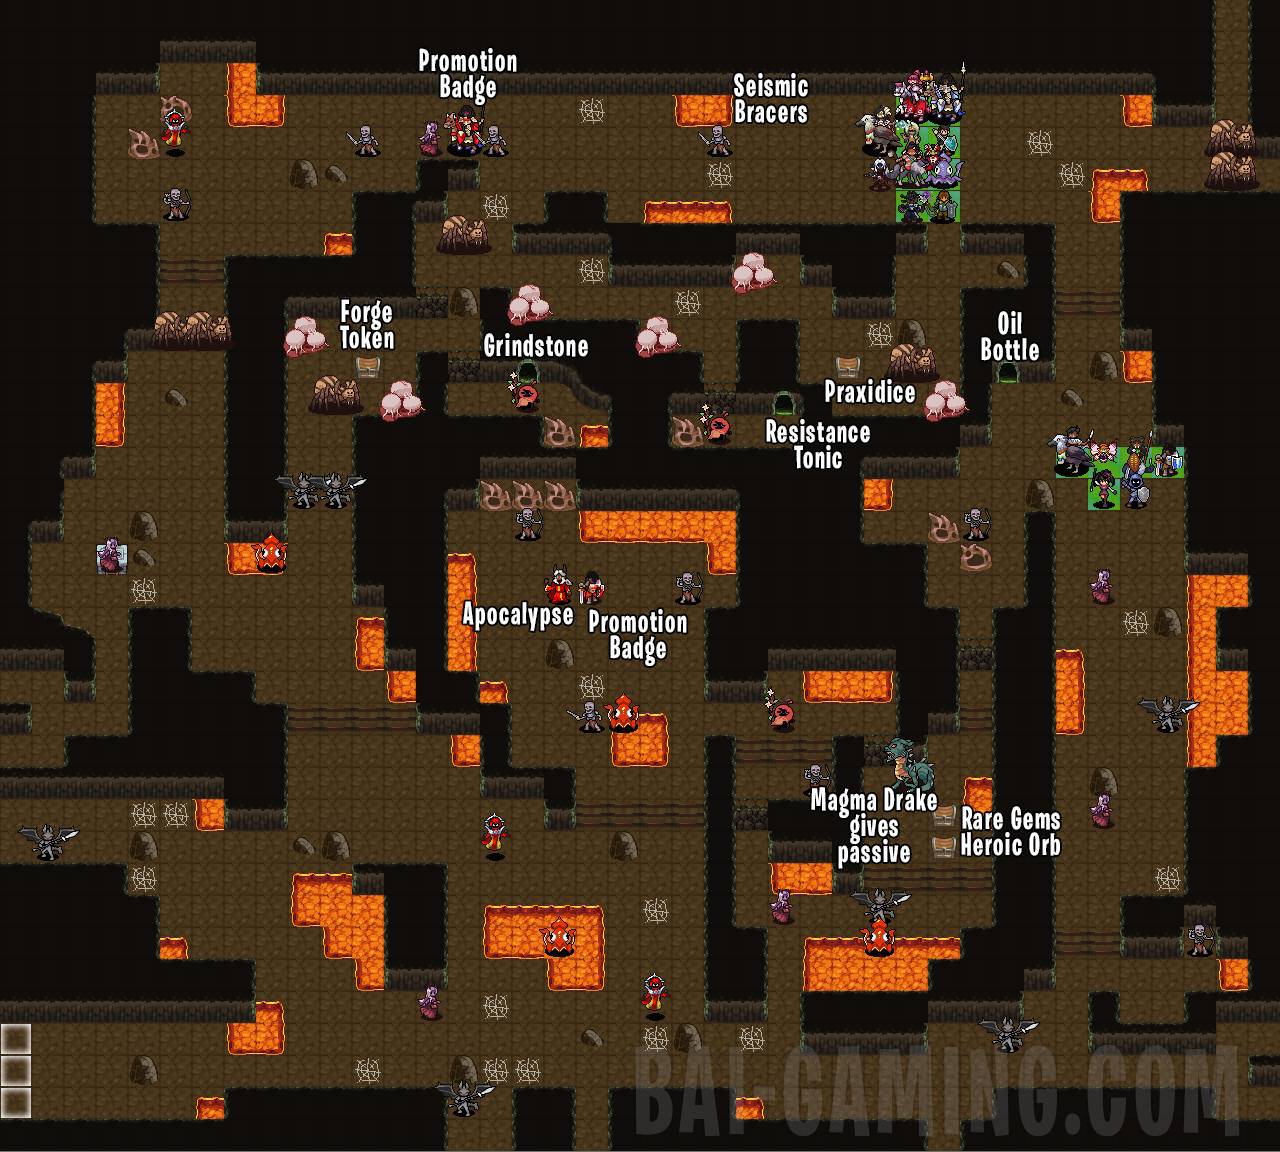
- Chests: Praxidice, Forge Token, Rare Gems, Heroic Orb
- Drake: Magma Drake drops passive
- Secret: Seismic Bracers (23, 3)
- Caves: Grindstone, Resistance Tonic, Oil Bottle
- Enemies: 2 Promotion Badge, Apocalypse
The game says the objectives are to either escape or defeat the boss. If you try to escape it won’t work and it makes you fight the boss anyways so plan accordingly.
Split your units up and make sure each group has an Armored unit who can break the breakable walls. This is the only map with flame squids, they’re basically 3 range siege cannons who deal physical damage but please keep elves away because Dainty Tentacles are effective against elves 😳.
Alivar’s Emporium: 3 Bandages, 5 Promotion Badges, 20 Grindstones, 3 Bandages, 3 Ales, 5 Smoke Bombs, 3 Web Grenades, 3 Preempt Power, 1 Rogue’s Rescue, 3 Bounty Contract, Bolt Axe, 3 Holy Gauntlets, 3 Short Sword, 3 Wooden Spear, 3 Light Axe, 3 Sharp Daggers, 3 Iron Bows, 3 Plasma, 3 Pocket Pistols, 3 Dazzle, 3 Bonetooth, 3 Fireball, 3 Boulder, 3 Blizzard, 3 Tornado, 3 Thunder, 3 Mend Staff
Chapter 23 – Stormblade
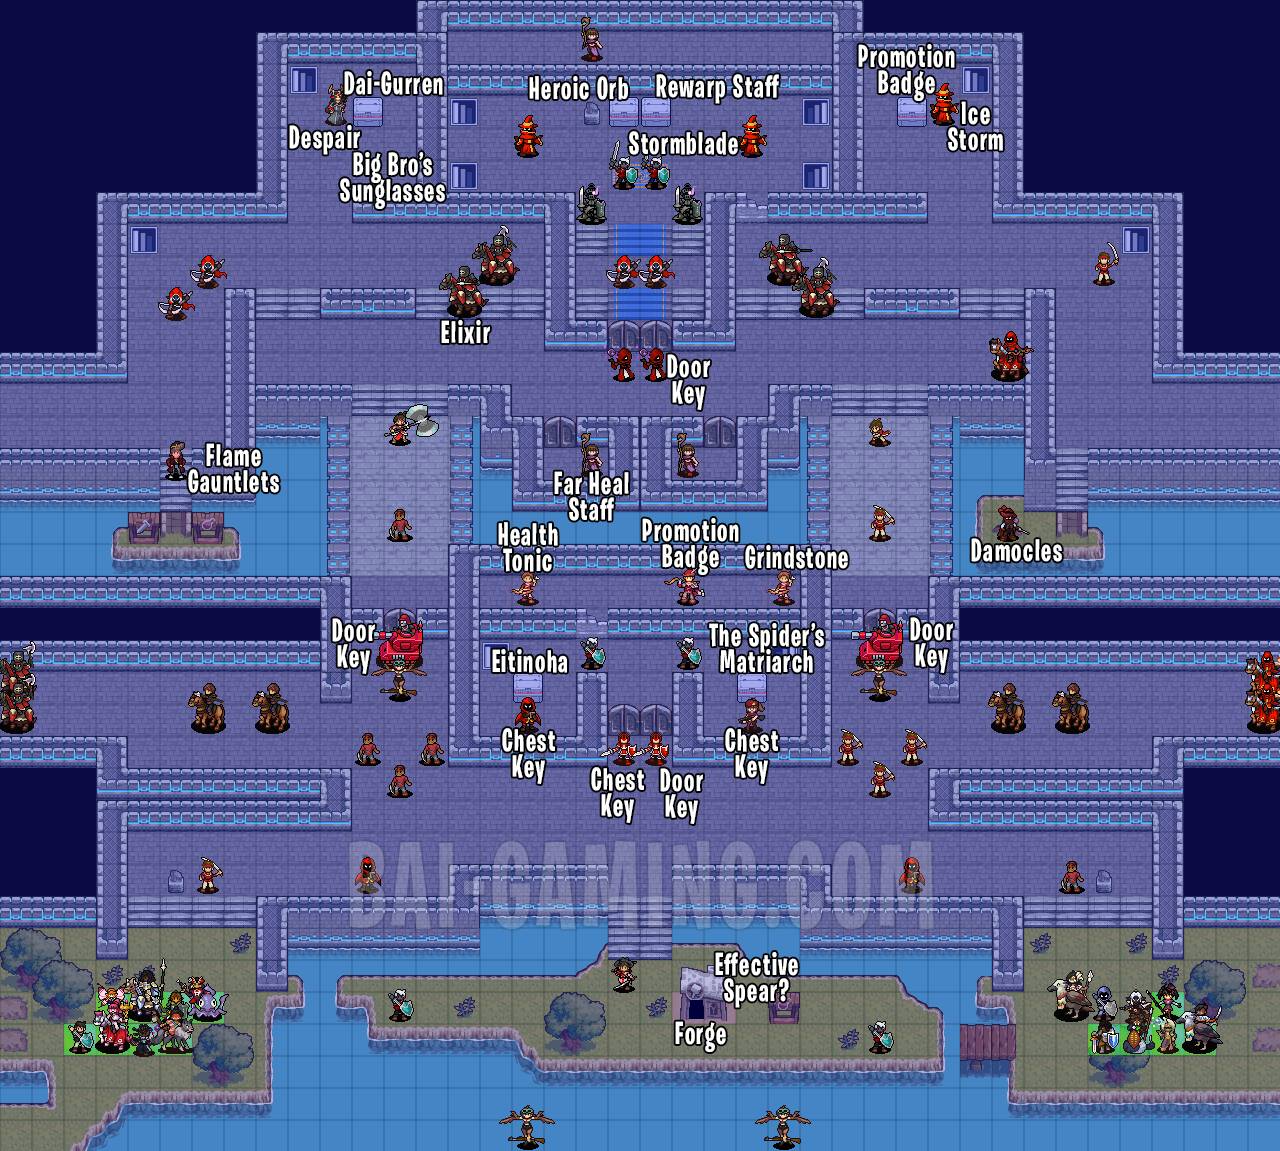
Make sure to bring all your Forge Tokens, this is the last map with a forge!
- Secrets: Effective Spear? (23, 31), Big Bro’s Sunglasses (12, 5)
- Chests: He-No (renamed as Eitinoha), The Spider’s Matriarch, Dai-Gurren, Heroic Orb, Rewarp Staff, Promotion Badge
- Enemies: Many Door Keys & Chest Keys, Health Tonic, Promotion Badge, Grindstone, Flame Gauntlets, Far Heal Staff, Damocles, Elixir, Despair, Ice Storm, Heroic Orb, Rewarp Staff, Stormblade
- South Item Shop: 4 Healing Herbs, 3 Grindstones, 3 Smoke Bombs, 2 Rogue’s Grasp, 2 Rogue’s Rescue, 3 Door Keys, 3 Chest Keys, 1 Forge Token
- Weapon Shop: Guardian Blade, Bold Spear, Poison Javelin, Bearded Axe, Brigand Axe, Silencing Dagger, Lunging Stars, Expunge, Flame Maelstrom, Despair, Prey, Culling, Heat-Seeking Cannon, Cauterize, Evolution
- Right Item Shop: 2 Healing Staff, 2 Mend Staff, Restore Staff, Fear Staff, Marking Staff, Bounty Staff
Work your way through the map. Many enemies have keys which makes opening the doors much easier. Be sure to obtain collectibles because we’re starting to see end-game weapons. Also make sure you’re preparing to get S rank proficiency for the characters you want to use in endgame. It’s not necessary but it helps.
This is the last map to have shops within the map, you have the emporium in the base as well but if you want to be safe make sure you get what you need from the shops.
The He-No weapon had its name changed to Eitinoha in new patches of the game.
Be aggressive and don’t get surrounded by the horseriders. The mage horseriders in particular can really gang up on a poorly placed unit. Too bad we can’t recruit Reka but we get his Stormblade.
There are no more secret items in the subsequent maps.
Chapter 24 – Scions of Light and Dark

- New recruits: Estelle and Michelle (do NOT defeat them, just destroy the 6 crystals around the map and they will be recruited)
- Chests: Hrunting, Recoil Shield, Gohone, Flail of Ages, Orbital Strike
- Flower: Heroic Orb
- Enemies: Chained Greaspear, 2 Promotion Badge, Door Key
Focus on destroying the 6 crystals if you want to recruit the two bosses. One crystal is a bit hard to see, it’s behind the horserider enemy above the Flail of Ages. The map ends immediately after destroying the final crystal so collect everything first.
Chapter 25 – Darkness of Brighthold

- Chests: Adekagagwaa, Starstrike, Inanna Staff, Mimic Chest drops Quick Feet Scroll
- Enemies: Watchman Rope, Promotion Badge, Quake, Chest Key, Gale Talons, Magic Tonic
Beat the southern and western bosses first, then the third boss will spawn on the northern throne.
Chapter 26 – Penned in Blood
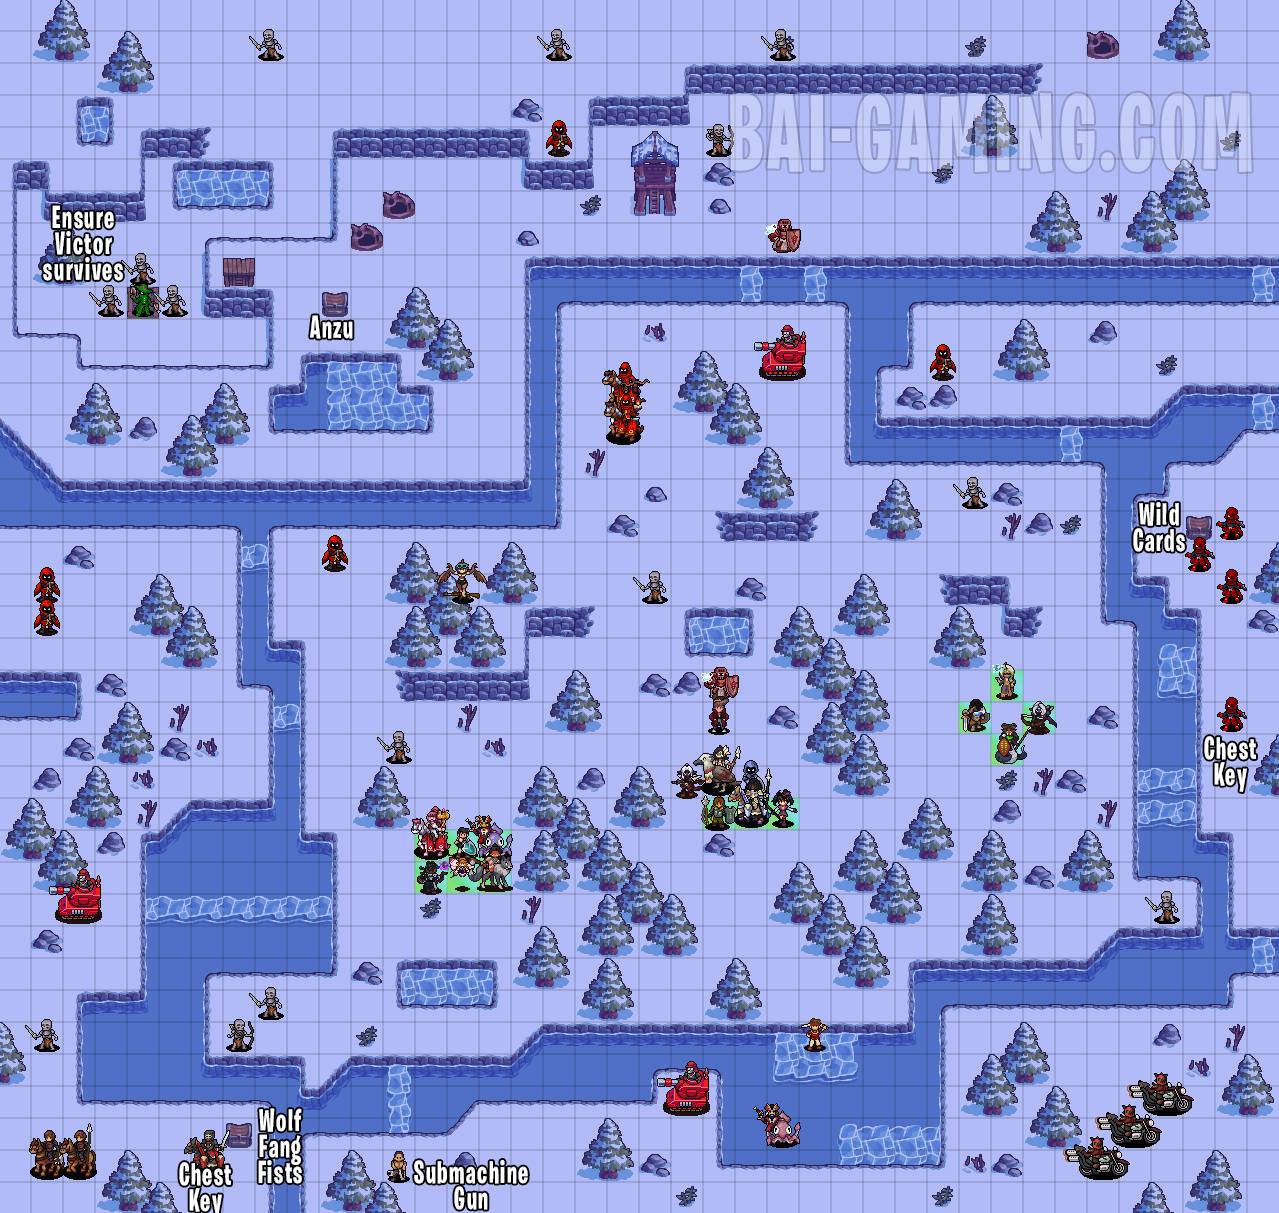
- New recruits: Victor (make sure he survives, you don’t need to talk to him)
- Chests: Wolf Fang Fists, Wild Cards, Anzu
- Enemies: Chest Key, Submachine Gun, Chest Key
Many enemies have Chest Keys so you don’t have to move your thief to all corners. Make sure Victor is alive and you’ll recruit him after the chapter. This is the first rout map in quite a while so just work your way through the map defeating all the enemies who are all spread out.
Chapter 27 – Pale Flower of Blight
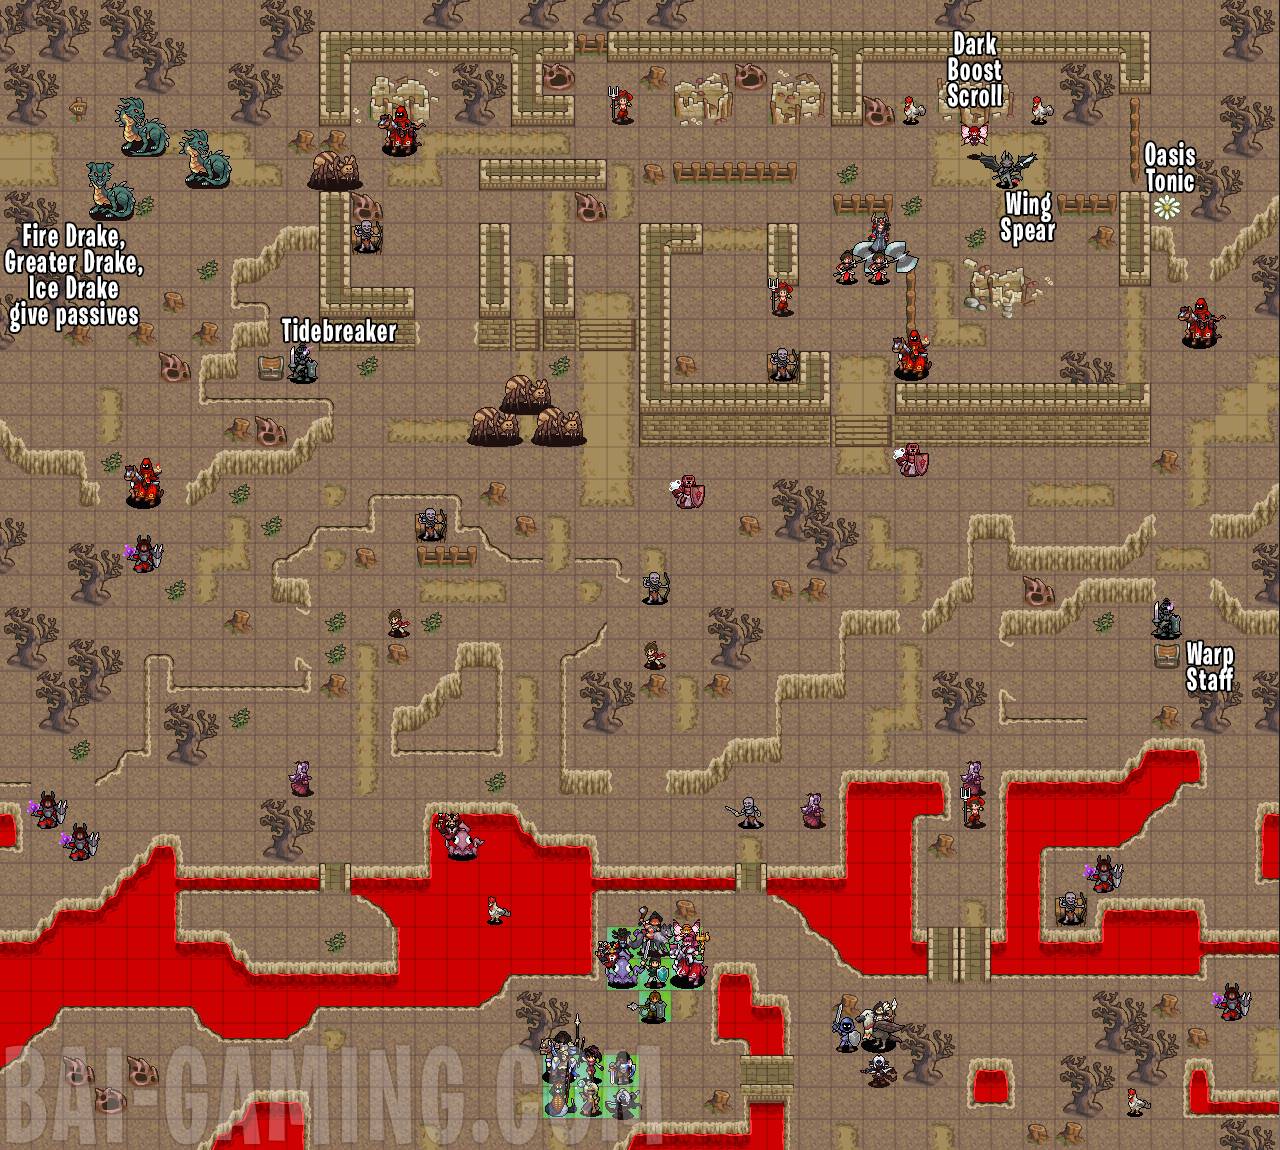
- Flower: Oasis Tonic
- Drakes: 3 Drakes in northwest corner who each drop a passive
- Chest: Warp Staff
- Enemies: Tidebreaker, Wing Spear, Dark Boost Scroll
Not too much to say, go for the Drakes in the northwest for their passives, collect the goodies, then defeat the boss.
Chapter 28 – Remnants of the Winds
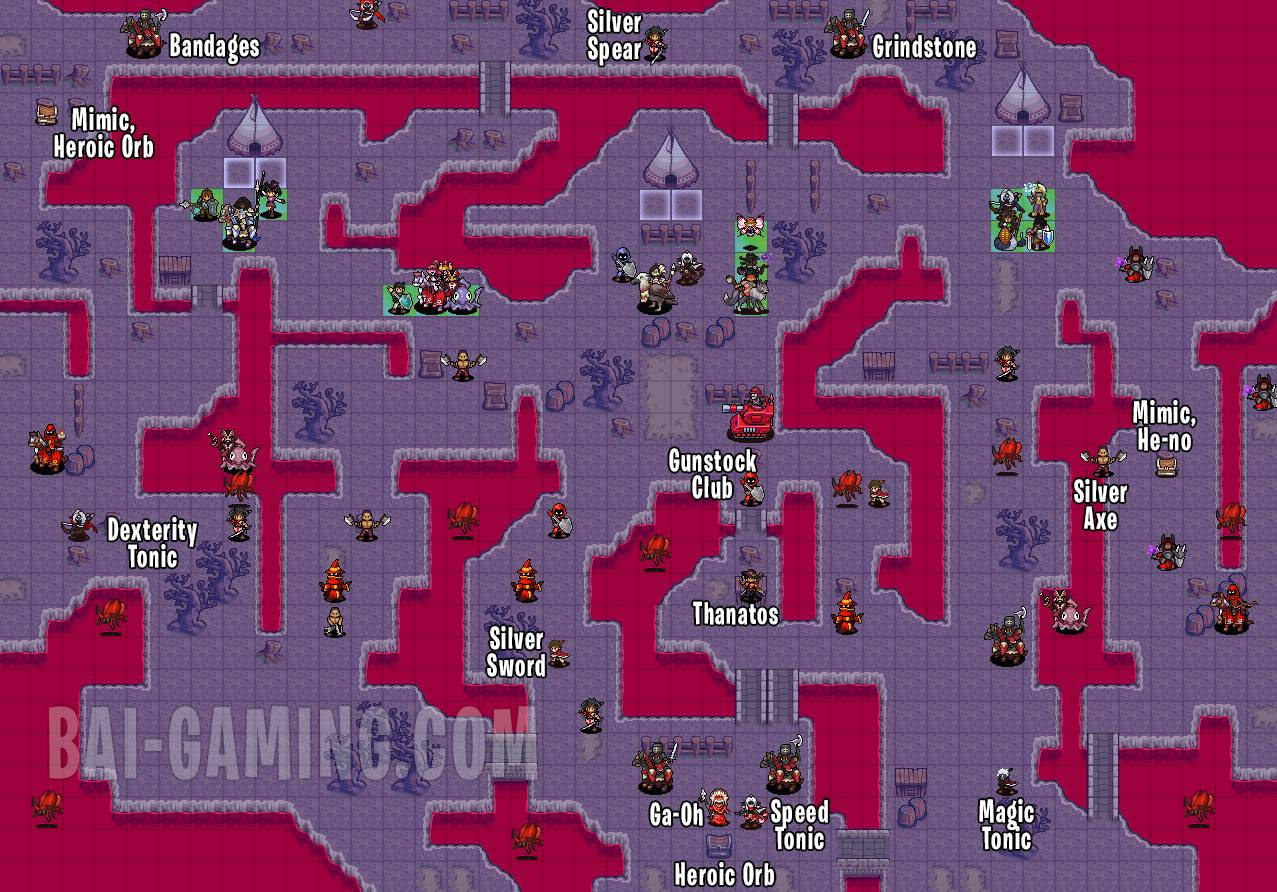
- Mimic Chests: Heroic Orb, He-no
- Flower: Quick Feet Scroll
- Enemies: Dexterity Tonic, Bandages, Silver Spear, Grindstone, Gunstock Club, Thanatos, Silver Sword, Ga-Oh, Speed Run, Heroic Orb, Silver Axe, Magic Tonic
You need to defeat the four bosses to win. The bosses will change based off of who you picked as Nayeli’s partner and their drop will be a varying kind of Tonic. The bosses and enemies may be in different locations as well depending on your version of the map.
A flower was added in the southwest part of the map in newer versions of the game providing a Quick Feet Scroll.
Chapter 29 – The End of All Time
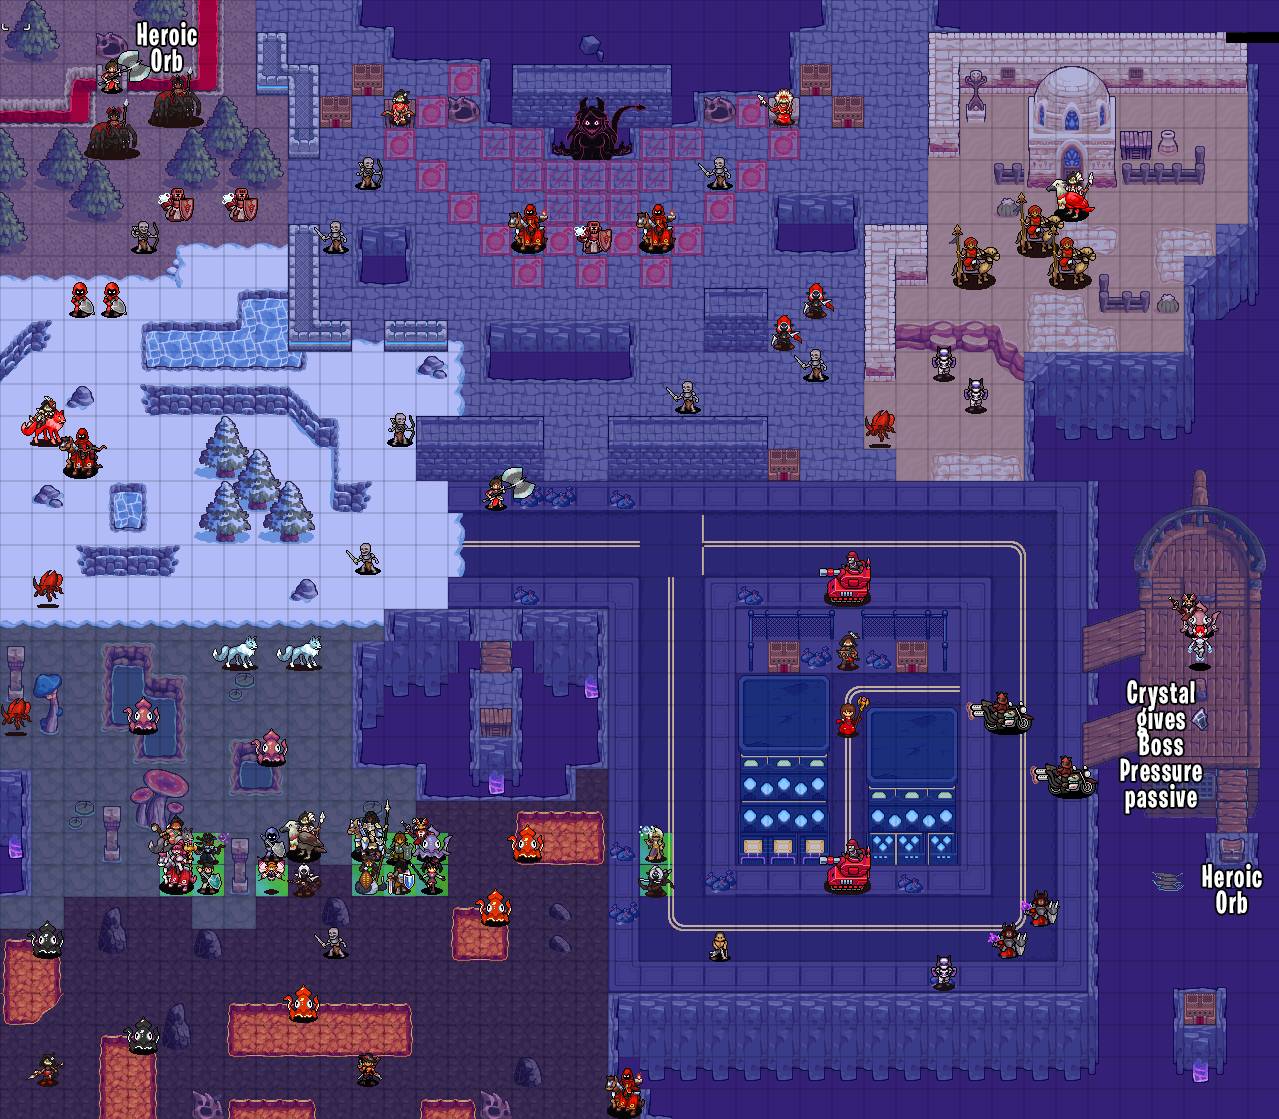
- Enemies: 2 Heroic Orb
You made it to the final map! Destroy the southeastern crystal on the ship because that gives the final boss the “Pressure” passive. Then make your way up and defeat the final boss.
Congratulations on beating the game! You can play post-game maps now or access the Cosmic Emporium which sells pretty basic weapons and staves.
Post-game
I won’t include any post-game maps or strategies but after completing the 10 Challenge maps and the 3 Backer maps you’ll automatically recruit Hope.
These guides take a significant amount of time and effort to make, and anything that can be given is extremely appreciated.
https://paypal.me/BAIZEGAMING
BTC: 33iDpHvVwwcMyxhrv83rL75TXpmgBd72Xv
Recent Posts