Home»Tech Guides»Automate numbering YouTube thumbnails for video series
You can easily automate numbering images/photoshop files using Photoshop Elements!
We often have clients, YouTubers with millions of subscribers who often need thumbnails done professionally, who just don’t have time to manually number thumbnails in Photoshop.
We’re here to show you that you can just automate scripting in Photoshop to automatically generate numbered thumbnails for whatever kind of series you’re making!
You program in a script easily, wait a few seconds for Photoshop to process the script, and you’re done!
Why would you want to number your thumbnails?
The thumbnail of a YouTube video could easily make or break a video; for example, a YouTube video that actually has amazing content and production value, but has a randomly-generated thumbnail that’s poorly chosen may not attract that many viewers.
On the other hand, a YouTube video that has a very catchy and attractive thumbnail (sometimes “clickbait” unfortunately!), but not so amazing content or production value can get millions of views.
Although it’s difficult to discern the “YouTube algorithm”, in general, a video that gets a lot of views will keep amassing a lot of views each year, and a video with just one view that never “blows up” might never blow up and will stay at views in the tens.
The exception is videos that went viral before custom thumbnails were implemented as a feature on YouTube, you’ll see a a few decade old videos on YouTube that have millions to tens of millions of views with the weirdest thumbnails.
Our business has been making video game playthroughs with commentary, strategy guides, etc for over five years, and it’s often the dozen or so of our top videos that provide the majority of our income, and we found that those videos actually had really catchy thumbnails.
The main takeaway is that a thumbnail can really help a struggling channel’s performance, and often “let’s players” want thumbnails that are numbered. A video game playthrough thumbnail would often have a picture of the video game with its characters, the title of the game, and a number to indicate which numbered video it is in the playlist.
Bigger YouTubers will put their own name/logo on the thumbnail as well, but often with smaller YouTubers they don’t put their own name/logo on it, with smaller channels the thumbnail tends to be more of an advertisement for the game itself.
Numbered thumbnails are certainly not exclusive to just video game playthroughs, often podcasts or any long-running series can make use of numbered thumbnails.
First, prepare your thumbnail with a number on it!
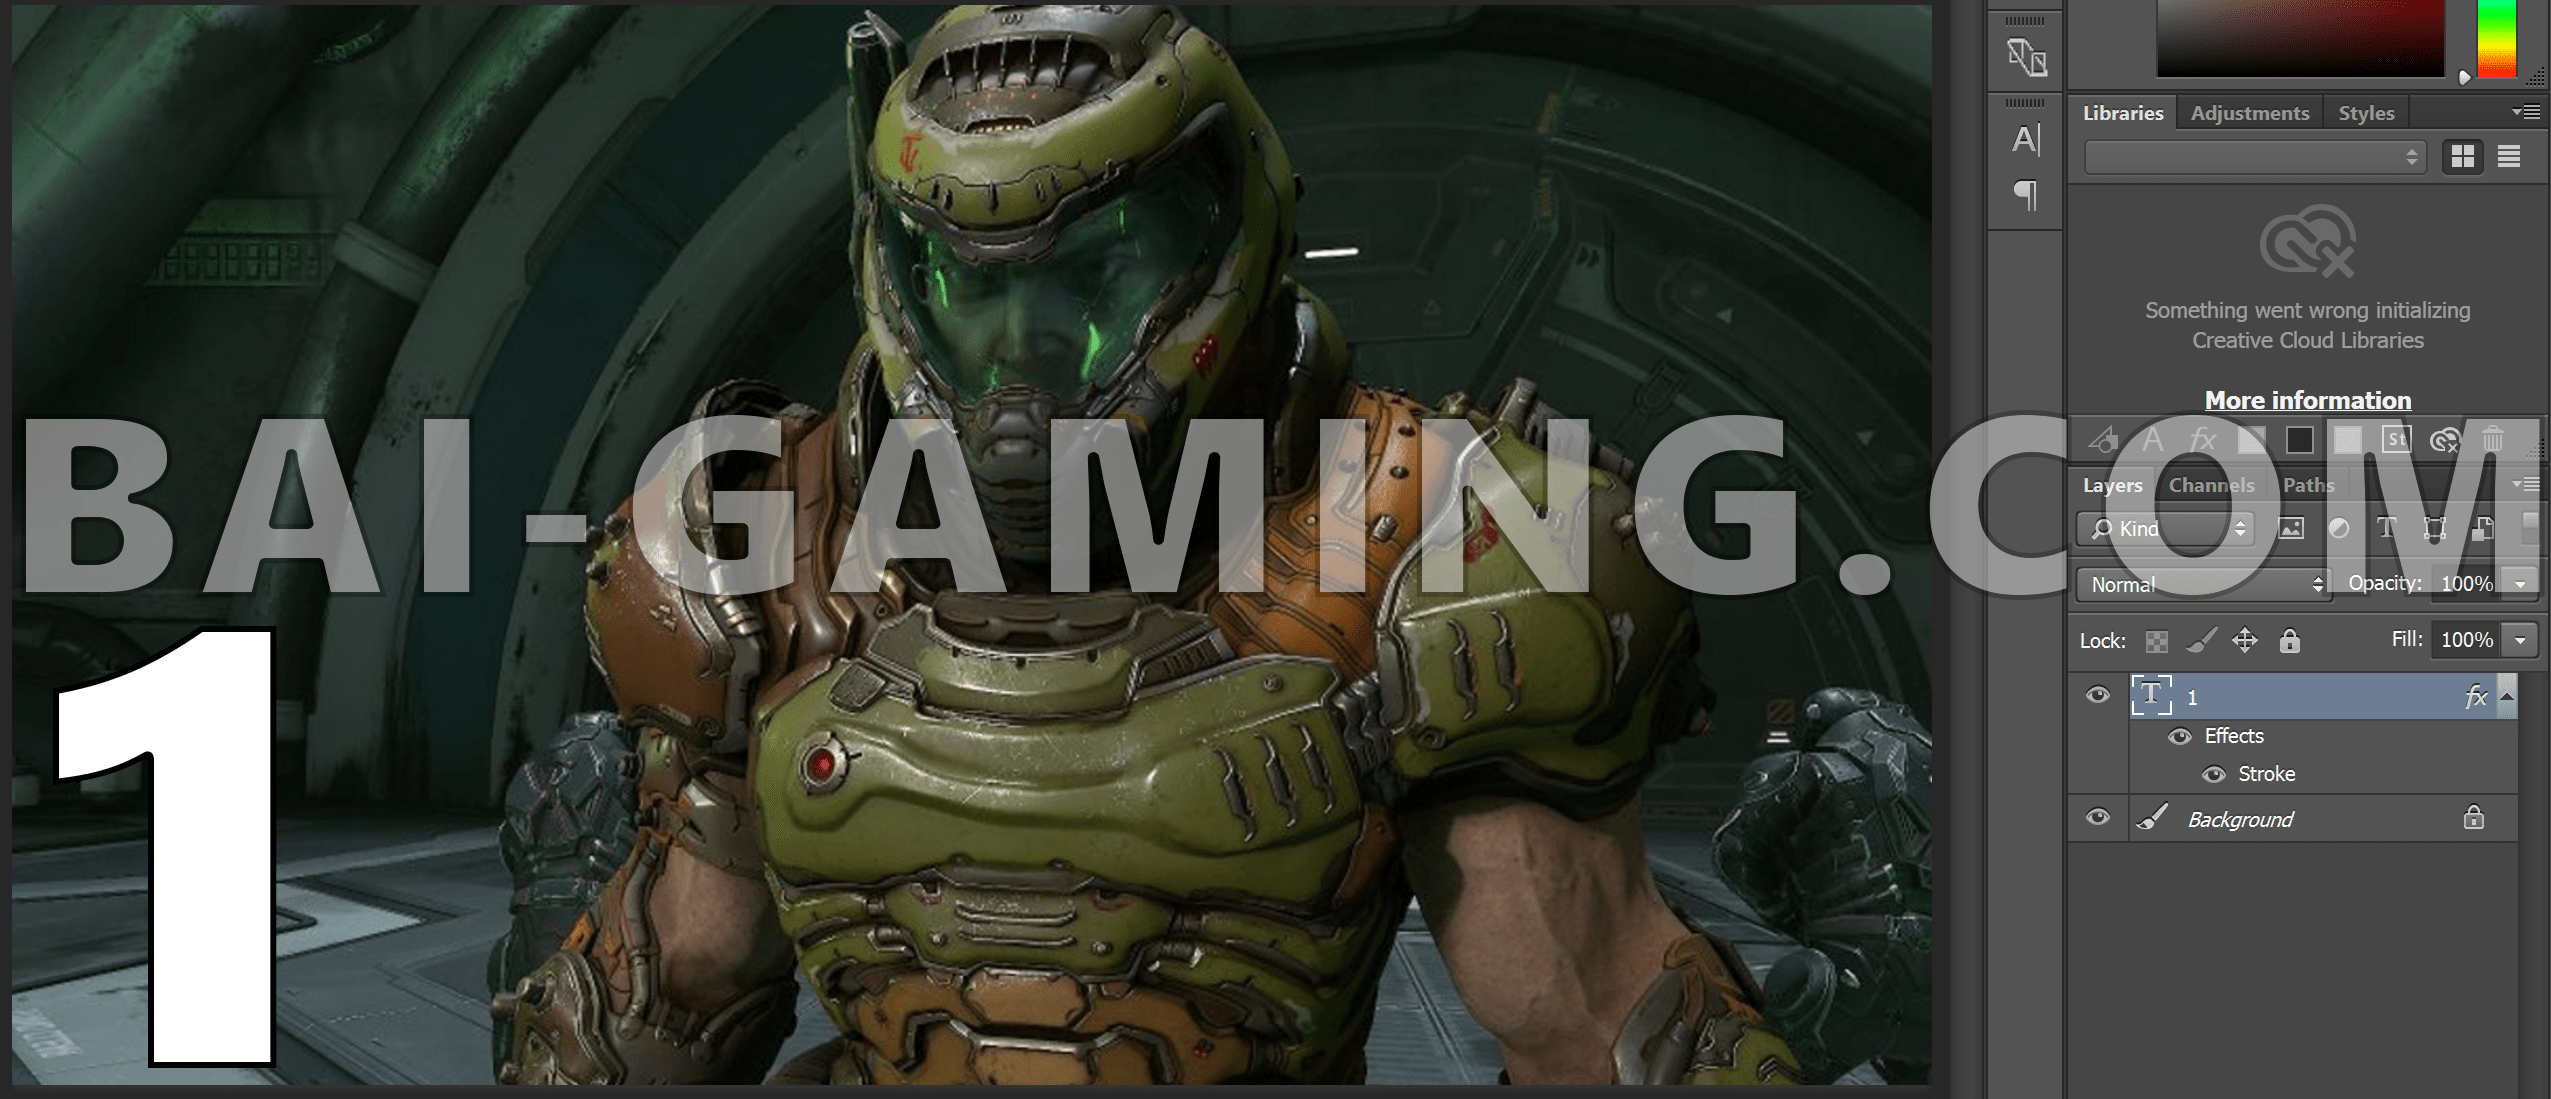
First thing’s first, open up Photoshop, make a background layer, and make a new layer containing text with a number. I’m going to use the video game Doom Eternal as a basic example. Ensure that there is high contrast between the number and the background!
Do NOT steal images!
Remember to not “steal” images; generally for let’s plays you can use anything contained in the video game and the publishers will be happy you’re promoting their game, and often if you get a press kit you are given images and logos to use.
In general, stay away from using fan-art (content on sites such as Deviantart, Tumblr, etc) unless you get permission from the artist! I’m not discouraging this, in fact, collaboration is really great and sometimes artists love it when a YouTuber uses their artwork and promotes them, but I’m emphasizing that you must get permission first!
But still images from a video game or movie are generally fine because they usually want you to promote their game.
Make sure you put the number where you want it, and be careful with your space, if you number your thumbnails above 10 make sure you’re not blocking anything you want with the second digit that will appear.
Make the number layer into a variable!
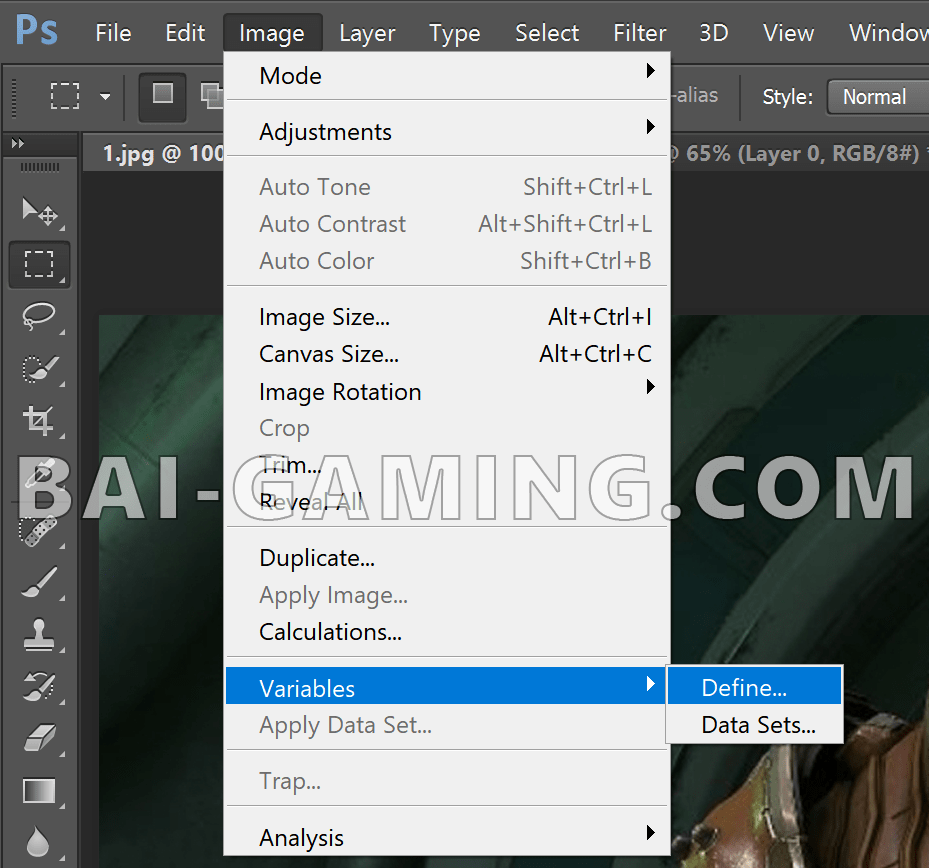
With the layer that has the number selected (do NOT rasterize your number layer), go to Images > Variables > Define.
Don’t highlight the background layer, you’ll get it greyed out if you do that, you need to have the layer with the number highlighted.
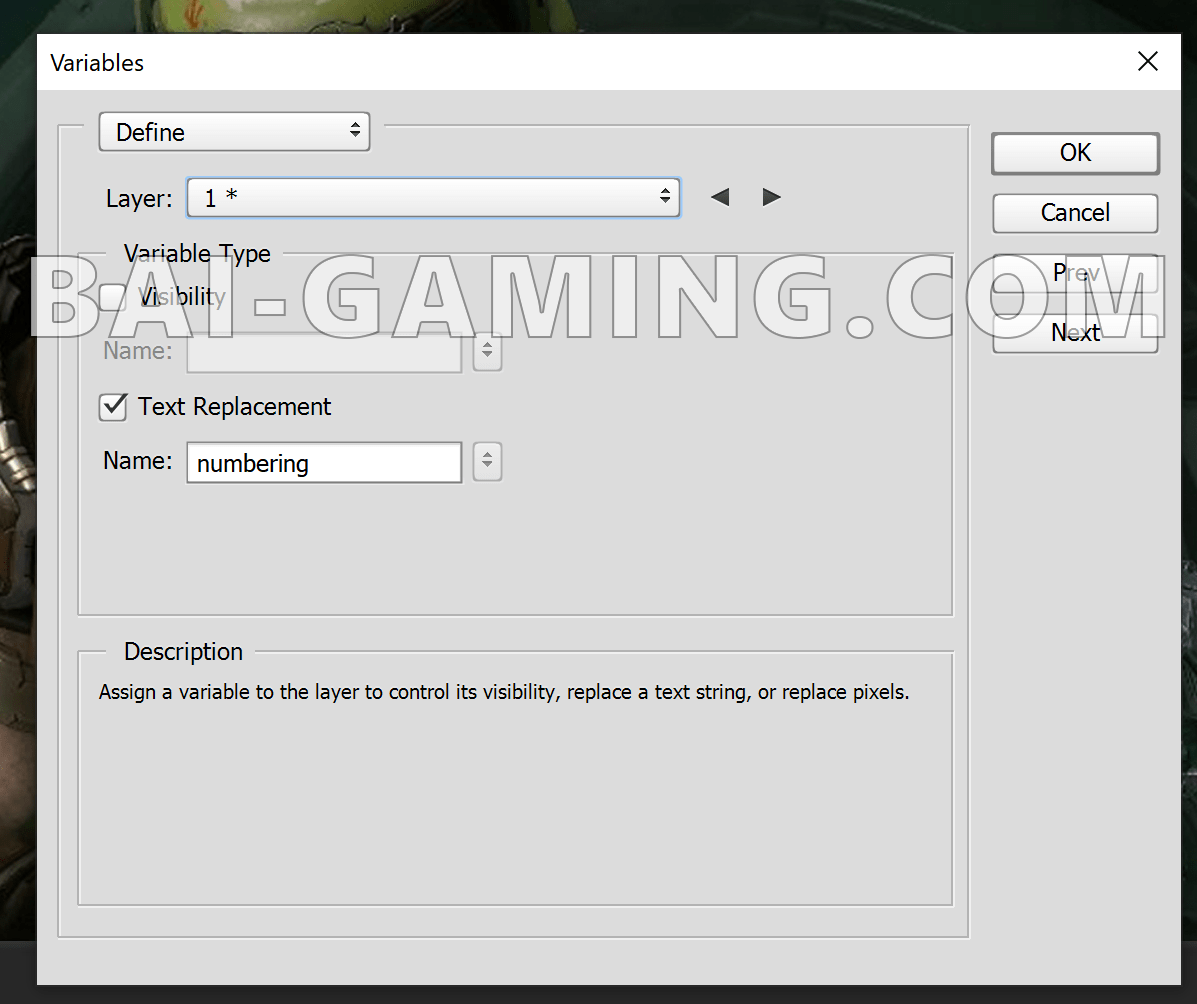
Choose text replacement, and give it a variable name, I just chose “numbering”, you can choose anything you’d like, but remember it for later. If you forget this name or misspell it later, mistakes will happen.
Make the “script” in .CSV or .TXT
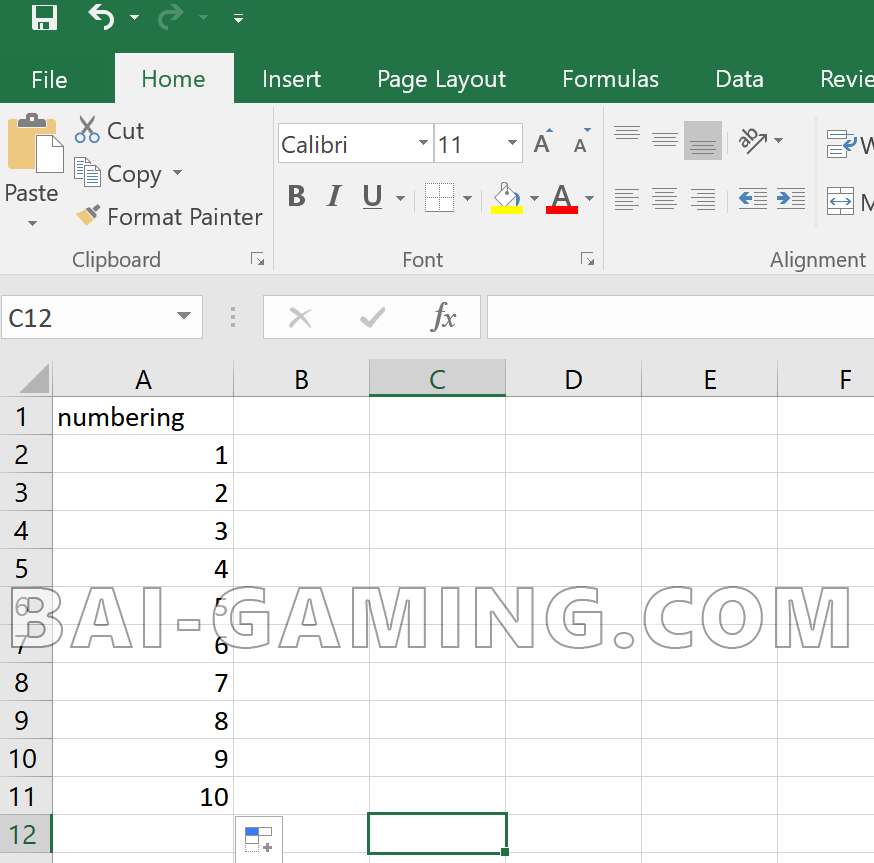
The next step is to make a .csv file with the numbers you want. I just use Microsoft Excel, but if you don’t have that just Google “free CSV editor” and you should be able to find something, please feel free to leave it in a comments if you do find a good free open-source CSV editor.
In the first cell, use the same name you just entered, I will put “numbering”, then add numbers below that.
If you want a lot of thumbnails, remember to just number the first few, 1, 2, 3, then just highlight them and drag it down to where-ever you’d like, don’t actually type in a hundred numbers!
If you don’t want to make too many thumbnails, you can use a .txt file as well and use Notepad and make a list of numbers manually, but I like Excel because you can automatically drag down the numbering. When finished, select Save As and save it as a .CSV file.
Returning to Photoshop, go to Image > Variables > Data Sets
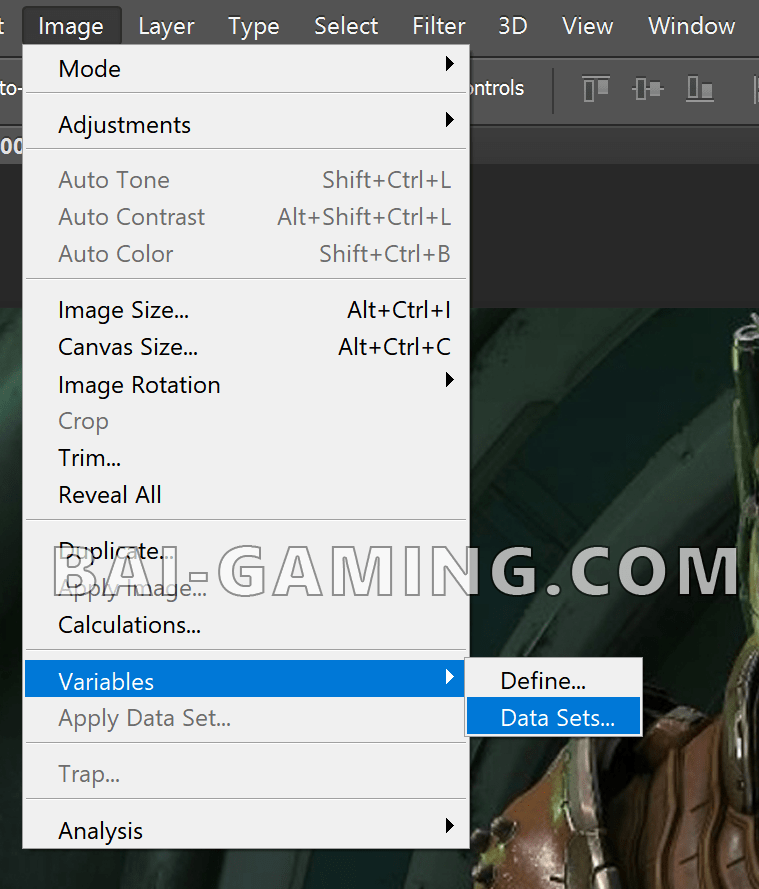
Select “Import Data Set” and select the .CSV file you just made.

If you drag down the data set you made, you’ll see you now have the numbers, each one of these will be your new thumbnails.

Next select File > Export > Data Sets as Files
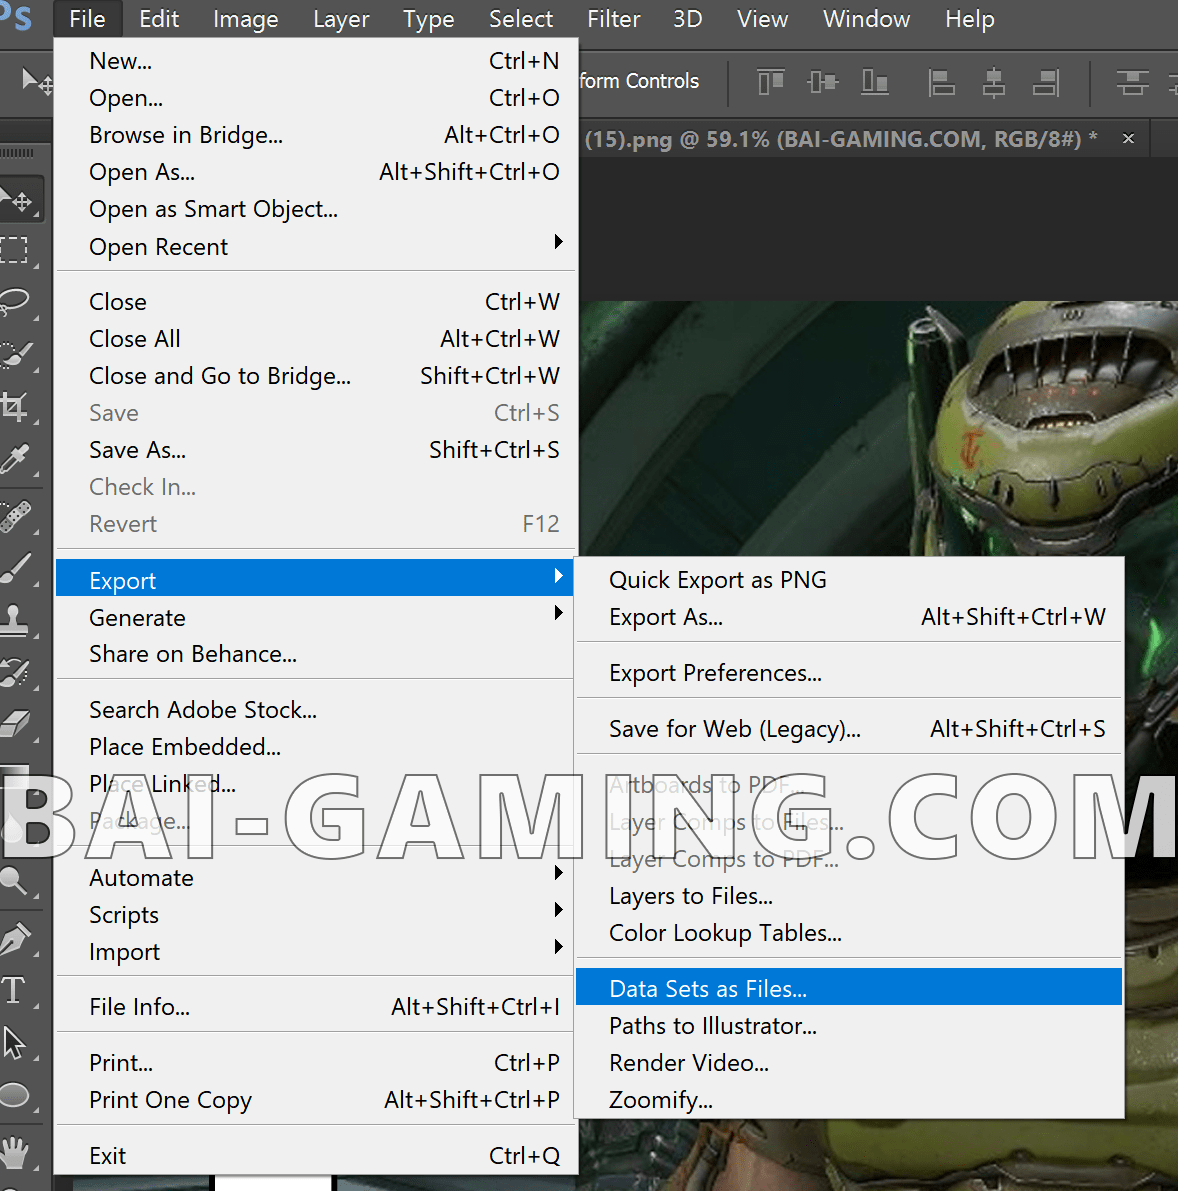
Select All Data Sets, choose a folder for the thumbnails, choose the file naming scheme you want or leave it as default, and leave the default .PSD file extension.

Click OK, and the folder you chose will be populated with .PSD files for the thumbnails. Don’t worry, we can convert these to .PNG or .JPG files automatically soon. (I cropped out the first thumbnail by mistake.)
You can open one of them and make sure that it’s actually numbering the thumbnails, I opened 5 and saw it had the number 1 replaced with 5 so we’re good to go! In this folder, don’t put any other .PSD files in it.

Turn the .PSD files into .JPG files!
Go to File > Scripts > Image Processor

Select the folder containing the .PSD files, and also select a folder to save your .JPG files. They have different extensions so you can save in the same folder without problems.
Make sure you don’t accidentally select anything under 4, you don’t want to apply a filter to all your beautiful thumbnails!

Congratulations, your thumbnails are all numbered!

If you have any other .PSD files present, they will be numbered too, see how I have “master.jpg” and “master_Data Set 1.jpg”? It’s because I left that master.PSD file there.
It’s no biggie, but if you have any other .PSD files they should be kept separate because using scripting and automation in Photoshop can overwrite and ruin precious PSD files by mistake.
Click here to return to our Tech Guides page.