Gales of Nayeli Demo Chapter Walkthrough (All Collectibles)
General Tips
- This is a spoiler-free guide! I will only mention the bare minimum of information required, such as characters you can recruit each chapter, how to best complete each map, names of characters in support conversations, etc. As long as you don’t purposely scroll to the last chapter you won’t find spoilers.
- The guide is based off of the easier difficulty. The collectibles in the villages and shop inventories will be the same regardless of difficulty. The main difference with harder difficulties is that there will likely be more enemies initially on the map, more enemy reinforcements, and sometimes the boss will move instead of being stationary. I’ll still provide gameplay tips that can still be applicable to higher difficulties. If you’re in a hurry, the maps will have all collectibles and recruitable characters labeled.
Chapter 1 – A Timely Arrival

- (This map’s enemy types and placements vary based on your protagonist’s starting class! This map is for the Adventurer class.)
- Automatically recruit: Avatar, Nayeli, Daisie
- Flower: Oasis Tonic
- Use Daisie (the fairy) to collect from flower icons, other characters right now cannot get rewards from flowers.
- Nayeli is the protagonist and you also have a playable avatar character (default name Ollie) that is a class of your choosing.
- Classes include Adventurer, Spellcaster, Strider or Rogue. You can also choose a boon, which increases two kinds of stats of your choice. I’ll describe what each class starts out with, but they will gain more passives and combat arts later on too. I recommend you try the first chapter with different classes for your protagonist and see which suits you best, it’s pretty fast to skip the intro of the game to check out each one.
- Adventurer is what we chose, has Short Sword, Close Shield & Healing Herbs. Has a powerful War Cry command that inflicts Fear on all enemies up to 3 range. Has Precise Slash combat art, a stronger and more precise attack. This class is very simple to use!
- Spellcaster has Ember, Gust, Magic Ring & Healing Herbs. A unique skill is Focus, allowing you to empower your next attack up to 3 times in a row and Air Slash (increase range of Gust).
- Strider has Wooden Bow, Watchman Rope & Healing Herbs. It has passives such as Sight Beacon increase accuracy by 15% for allies within 2 tiles, Talented Archer increases experience gain by 20%, and Deep Breathing to gain +5% Hit/Crit until combat art Relentless Arrows is used (which forces a follow-up attack). Comes with many other combat skills as well.
- Rogue has Daggers, Throw Knives, Avoid Ring, Smoke Bomb & Healing Herbs. Has a lot of passives to increase avoid, open chests and doors without keys, get an extra action every turn with -3 movement, Hide in Shadows to increase Critical and move through enemies, and a lot more as well as combat arts on top of that.
- If either Neyali or the player avatar die then it’s a game over. Depending on your class you chose for the avatar player unit, this chapter may be easier or harder. Failing certain story objectives (such as letting an important NPC die) may cause a game over as well. Save often!
- In general any characters that aren’t the protagonists can die without immediately causing a game over. They will be removed from the current map and will have a penalty applied to their stats (the Grievous Wound status condition) on the next map until a Bandage item is used.
- If a character dies a second time while having Grievous Wound then they are permanently dead.
- Nayeli is weak to attacks so be careful, two hits from these enemies is enough to destroy her.
- Her wind spear does powerful damage and has 1-2 range. Wind is powerful against the flying bug (beetle) enemy.
- Nayeli is a protagonist and is mandatory to use in the game, so it’s best to train her up.
- Pay attention to everyone’s Combat Arts as well. They vary character to character but be careful of the cost, they can deplete your weapon durability fast. Nayeli has a useful one where it cancels the enemy’s counterattack.
- Daisie is usually useful for healing. She has spells to attack with and has high resistance, making her alright to use against enemies who deal magic damage like the spirit wolf. She has Canto passive, meaning she can use her remaining movement after attacking/healing.
- I had a adventurer avatar class who had good defense and I used them to draw in attacks while Nayeli picked the enemies off.
- The adventurer avatar has a powerful Wild Cry ability that reduces nearby enemies’ stats a lot, then you can just counterattack them on the next turn. If you use Wild Cry and attack immediately on player phase, the enemies’ debuff is removed – I found it easier to use Wild Cry then let the debuffed enemies attack me on enemy phase.
- If you chose other classes for your protagonist you should still have an easy time, just exploit the enemy’s weakness. For a mage, use Ember on bugs and Wind on flying beetle enemies. For a strider (archer) use your bow on flying enemies.
- Try to learn the enemy classes – the early chapters has many monster enemy units who each have their own quirks.
- The blue spirit wolves use magic attacks (your defense will be the resistance stat for magic attacks so watch out). Use your fairy, Daisie, to take that wolf’s attack and to also deal damage to it.
- The regular grey (dire) wolves have fangs that ignore your defense stat so be careful.
- The dark fairy in the bottom right is powerful. All my characters had low resistance and unfortunately the enemy fairy has the tome Dispel that deals more damage to magic users, so you shouldn’t approach her with Daisie. I had to just gang up on the dark fairy at the end of the battle using the Avatar and Nayeli, and take the damage.
- The beetle is a flying bug to the east and it will not approach you until you enter its range, so save it for last because the other enemies will be rushing towards you.
Chapter 2 – Nagata’oh Valley
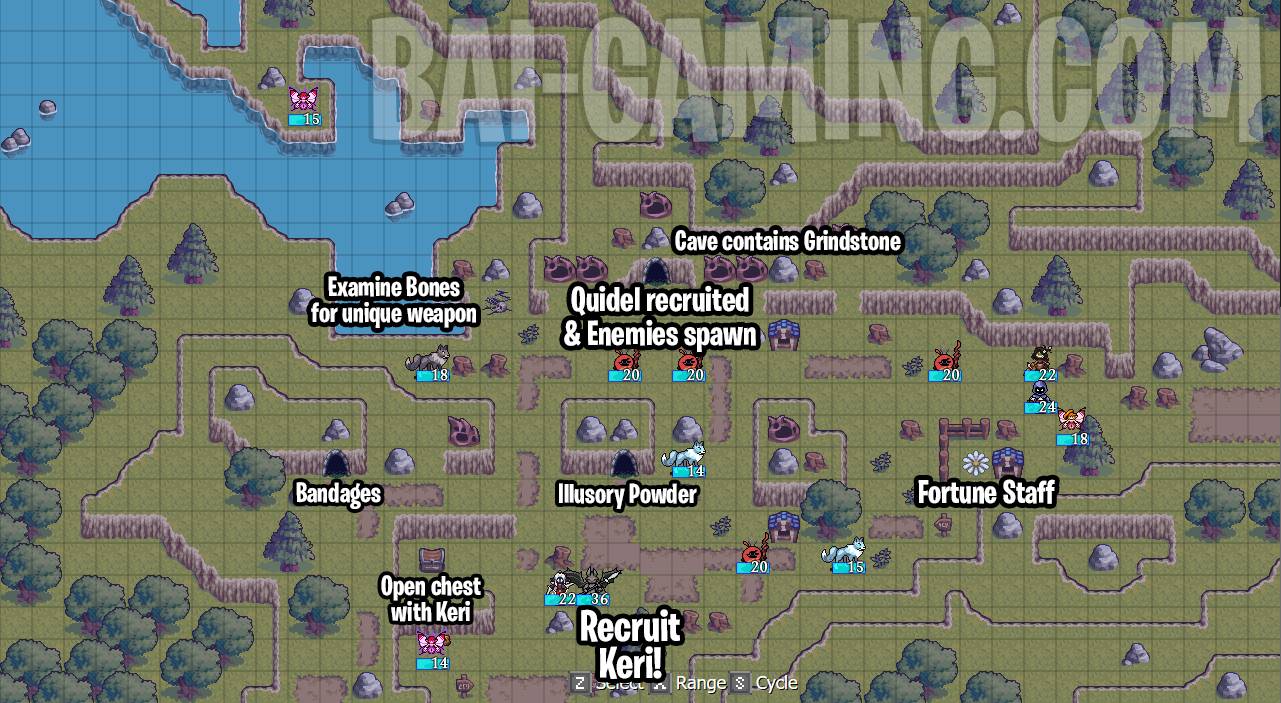
- Automatically recruit Quidel (Turn 3 he spawns on the northern cave)
- Recruit Keri using Nayeli (Mandatory before she dies!)
- Turn 13 (or so) has powerful wolves that spawn in the north, finish the map before this! (This happens soon after rescuing Keri, try to have units moving to the south by then.)
- Flower: Fortune Staff
- Caves: Grindstone, Illusory Powder, Bandages
- Bones: Examine the Bones in the northwest to make 1 weapon of your choosing. This can be a unique Lance, Sword, Axe, Dagger, or Bow. We went with a Fishbone Axe.
- You need to move Nayeli to Keri as soon as possible (has to be Nayeli). If a monster reaches Keri it will attack and kill her instantly, though sometimes you can get lucky and they’ll miss. Once you talk to Keri she is healed fully automatically.
- It looks like you have a lot of time at first, but the enemies can sneak up on her quickly (such as that fairy in the northwest and more wolves spawn to Keri’s west on harder difficulties).
- Anybody can visit the caves and bones, but only Daisie can examine the flower (for now).
- Blue houses are tutorials without item rewards but they do give experience for the first character to visit them (and they give gameplay tips). Anyone can visit the blue houses.
- If you’re mostly looking for collectibles, blue houses don’t give items or money, so it’s less of a priority.
- On Turn 3 Quidel joins automatically in the northern cave, use him to destroy the enemies that spawn nearby. You can change his weapon to his handaxe to always counterattack the ranged enemy units that attack him. He’s a very tanky unit that is good at taking hits. He can deal more damage to enemy units if his strength exceeds their strength stat and he can push ally units a square too.
- I used one of his skills, Searing Swing, to take out a Fire Stick critter nearby instantly (those ones deal magic damage and hurt Quidel the most).
- Quidel’s Searing Swing can deal more damage to bugs but don’t mix up the monster classes. “Critters” with sticks are spirits (not bugs). It’s the flying beetles that are actually bugs.
- This map is generally easier than the first map. Inspect the enemies carefully – the stronger bugs will have Fire Sticks that deal magic damage at 1-2 range and most of your characters have low resistance.
- The northwestern-most fairy who moves also has a spell that always deals critical damage unless your ally has another ally adjacent to them.
- After recruiting Keri, use her to open the nearby chest (no key required for her, she will open doors and chests no problem).
- She’s somewhat like a thief from Fire Emblem but she can be useful in combat.
- Her resistance is high making her an ideal mage killer (she has a passive where her resistance increases more in dark conditions, so check her stats each map because it varies map to map).
- She can deal more damage by having an ally next to her target as well as her skill where she can double her amount of hits if her target has <50% HP (Keri typically triples enemies so then you’d end up with 6 attacks, but watch your weapon durability). Read through her passives on her status screen.
- After recruiting Keri get all the collectibles from the caves, bones and flower. Powerful enemies spawn in from the north as you’re finishing the map, so get the northern collectibles out of the way quickly. You can try to take out a wolf or two if you want a challenge but otherwise have someone ready at the south to escape.
- When you’re finished, escape the map with Nayeli south of where Keri is.
Chapter 2 – Branch of Fate
After Chapter 2 there is a Branch of Fate. It’s not known exactly how this will affect the later events. The choices are to have Nayeli talk to either Quidel or Keri.
We chose to have Nayeli talk to Keri. This acts as the first support conversation between Nayeli and Keri.
Make sure to do the optional map because in this game optional maps have recruitable units (and rewards)!
Chapter 3EX – Farmland Defense
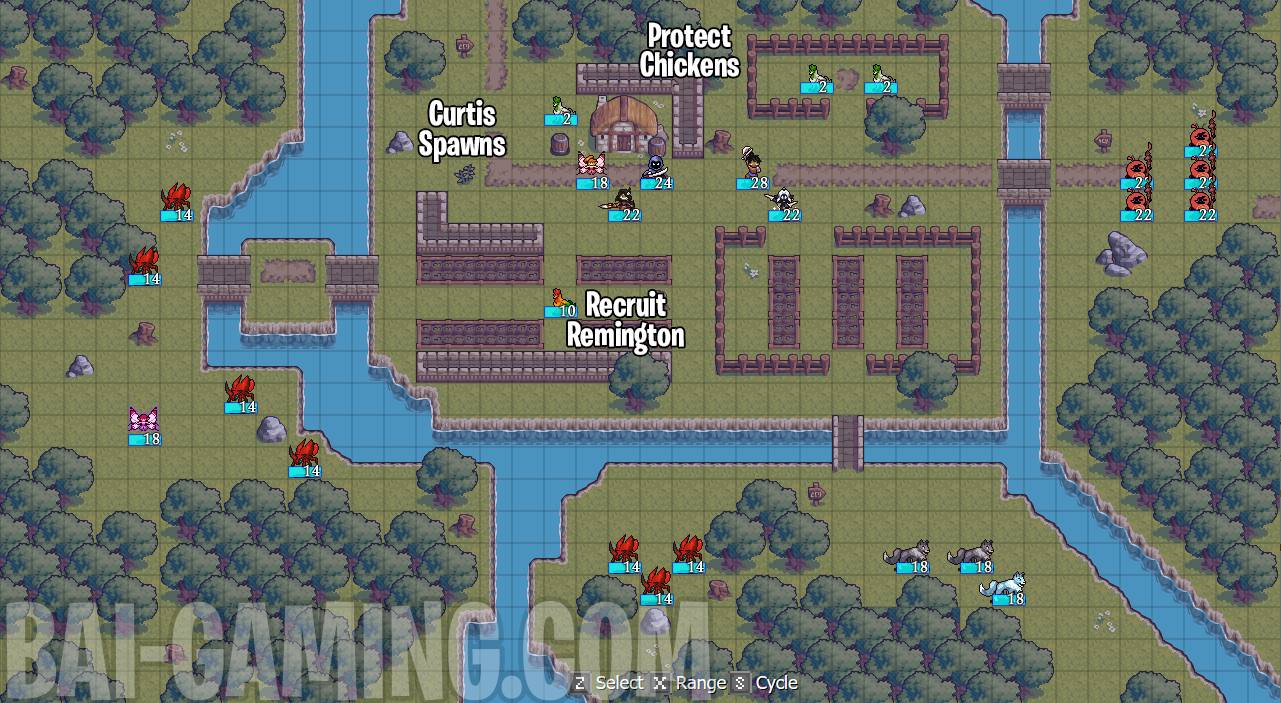
- Recruit Remington using Nayeli
- Turn 3 has Curtis automatically join (though make sure to answer a dialog correctly after the mission as well)
- You need to defend the 3 green chickens. If you save all the chickens I believe you get more goodies as a bonus.
- Curtis, a bow user, will spawn to the left of the house on turn 3.
- He’s your first bow user and he’s extremely useful for taking down flying enemies. He gains stat increases when he’s not around other ally units and you can place him on watchtowers on certain maps to attack at longer ranges.
- There are many flying bugs, so use Curtis’s bow or Nayeli’s Wind Spear for easy bonus damage. Fire attacks such as Quidel’s Searing Swing also does bonus damage to bugs. Don’t forget that critters are spirits and beetles are bugs (beetles are flying bugs).
- You’ll need to use Nayeli to recruit Remington, so talk to Remington and use Nayeli to take down the flying bugs in the west or southwest.
- I’m not sure how to use Remington, but if you use a Swordsman Avatar you can roar to reduce enemy stats and have Remington chip them down but Remington is very weak right now.
- Remington is strong to bugs and reptiles but he still has a bit of difficulty taking down the beetles who are bugs.
- Interestingly he can run across the rivers and he’s very mobile! I actually use him later as a unit to do all my shopping.
- Dealing with the wolves is the same as Chapter 1. The regular grey dire wolves will have fangs that ignore defense, and the blue spirit wolf deals magic damage. Try using the southern bridge as a chokepoint, but you have a lot of space if you need to retreat.
- I used Keri on the southern bridge, she has high resistance in this chapter, just have a healing item or Daisie close by for healing.
- On the right side there are more critters. They’re very easy to deal with but as before watch out for the stronger critters that have Fire Sticks equipped.
- I used Quidel on the right side with a handaxe, he’s tanky but the Fire Stick bugs will wear him down so have healing items.
- If you’re too slow some critters might use the upper bridge to sneak around you to attack the chickens, so watch out especially on higher difficulties.
- I use Quidel’s Searing Swing skill to instantly kill a critter on player phase, but it does reduce his durability a lot each time.
- I used Quidel on the right side with a handaxe, he’s tanky but the Fire Stick bugs will wear him down so have healing items.
- Alternatively you can send Quidel south, Searing Swing is fire and does extra damage to bugs (beetles). If you do so, then you could send Keri east and she can handle the Fire Stick critters easily due to her high resistance. There’s many ways to approach the map.
- The reward for protecting all the chickens was: Deft Sword, Sawn Off Shotgun, Far Heal Staff and Silencer Daggers (The reward might be reduced if some chickens are destroyed?)
- Make sure to choose “We need all the help we can get” to recruit Curtis after the battle. You need to pay gold, but you’ll have the required gold from completing the mission so you don’t need to save up in advance.
Chapter 3 – Trouble in Cherringham
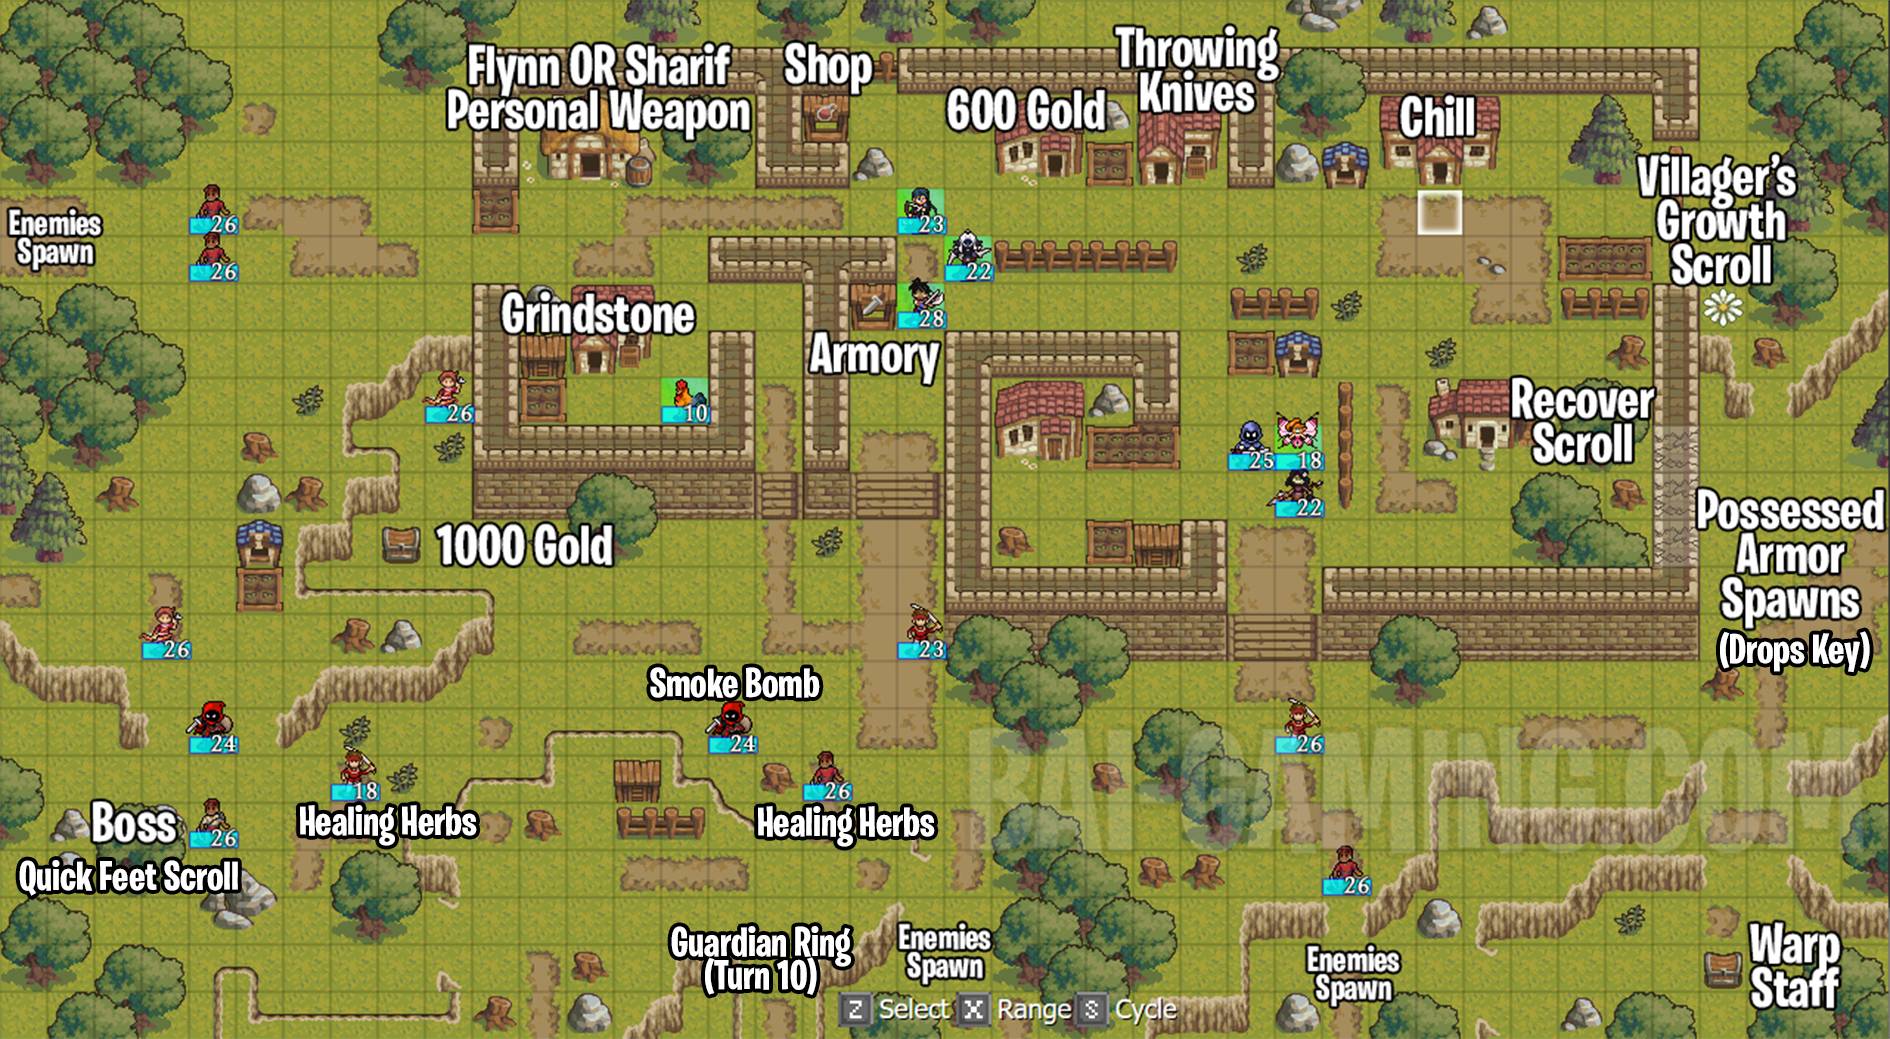
- Automatically recruit Miles and Annabelle, who spawn near the top-right house.
- On Turn 2 automatically recruit Flynn and Sharif, who spawn near the top-left house.
- Enemies will automatically spawn from the left, south, and southeast every few turns. On harder difficulties there will be more enemies spawns such as harpy enemies from the north and northeast (not marked).
- On Turn 6 a Possessed Armor spawns next to the Breakable Wall on the east side. Have magic units ready because he has high defense but low resistance.
- He drops a key for opening the nearby chest.
- Every few turns the boss will give all enemy units extra movement (you’ll see this because he yells for his gang to move faster).
- Red Houses: Grindstone, Recover Scroll, 600 Gold, Throwing Knifes, Chill
- Top-left Yellow House: Reward depends on character, be careful, only one choice per playthrough. Either Flynn or Sharif get their personal weapon. Flynn gets Saltbreaker (Effective against Demons & Seawalkers), Sharif gets Desert Greatspear (neither user nor enemy get a follow-up attack), and all other units get Sweeping Sword (neither user nor enemy can counterattack).
- I chose to have Flynn visit, I have a feeling the full game will have many demons and seawalkers, let’s see if this ages well…
- Flower: Villager’s Growth Scroll
- Chests: 1000 Gold, Warp Staff (Make sure to get the Warp Staff!)
- Enemies: Some enemies drop items (they have a pouch icon on the unit). 2 enemies with Healing Herbs, 1 enemy with Smoke Bomb, and 1 enemy that is a southern reinforcement on Turn 10 drops a Guardian Ring.
- Shop: Healing Herbs, Grindstone, Smoke Bomb, Healing Staff
- Armory: Short Sword, Wooden Swpear, Javelin, Light Axe, Hand Axe, Daggers, Wooden Bow, Sparkle, Ember, Gust
- There are many collectibles to obtain from the houses! In this game any unit can visit any house, the dialog may be different but the reward is usually the same. One immediate exception to this is the top-left house in this chapter, who you choose to visit there determines which unique weapon you get, so be careful!
- This is a defense map and you have a 14 turn limit (or it ends early whenever you defeat the boss). Try to advance outwards and intercept the enemy reinforcements as they spawn.
- Be prepared to have a magic user near the right side after turn 6 to deal with the Possessed Armor that spawns.
- Miles is a mage, but he can also Enchant an ally’s weapon.
- Enchantment turns that ally unit’s weapon into magical damage for one round of combat and is extremely useful. The enchantment also buffs the target’s magic attack stat too, so don’t worry about their attack scaling from their magic stat if their magic stat is low.
- He can use regular magic spells such as Ember and Chill. Fire deals extra damage to bugs, but there aren’t bugs in this chapter. Most non-mage enemy units have poor resistance, so spells are pretty powerful.
- Annabelle is another healer.
- It’s useful to use Annabelle to heal while Daisie gets the flower (the flower is a bit out of the way in this chapter).
- Annabelle can also use Guns to deal damage to enemies from 1-2 range, useful if you need a little extra damage to finish off an enemy.
- Flynn is a sword user. He’s a bit weak right now, so be careful. Since he’s a bit weaker I got his personal weapon from the house (give the squeaky tire the oil). He can collect from flowers as well. He has passives to get stronger when he has lower HP.
- Sharif is very powerful, use him to help clear the left portion of the map and to defeat the boss. He has passives to get stronger when he has full HP.
- In case you’re struggling with the enemy reinforcements you can rush Sharif west and south to get Sharif positioned close to the boss, that way you can end the map at any time you need to (on lower difficulty the boss is stationary). (On harder difficulties the boss moves so watch out.)
- I found the previous maps to be harder due to the monster units. The human units in this map are very straightforward to deal with, just keep track of the physical attackers and the mages and you’ll be fine.
- The two chests are very far apart, so I made Keri run to the left to open that chest. Then I had units on the right defeat the Possessed Armor who drops a key to use to open the nearby right chest.
- If you’re stressed about the collectibles and don’t know what to get, prioritize getting the Warp Staff from the right chest, it’s extremely useful! It’s always an up to 7 range warp regardless of the user’s magic stat but it can be repaired too, you can apparently repair it when it breaks too (it won’t disappear like broken weapons in other games).
- Buy items from both the shop and armory. I bought more healing items and grindstones. Gust is useful for a mage to deal with flying enemies. Get more regular weapons for your protagonist and Neyali.
- The prices between shops on the maps and shops from the base menu later on are the same, but the shops contained within the maps may have exclusive items not sold elsewhere so it’s good to check them.
- I wasn’t able to make good use of Remington for battle, so I used him to buy from shops while everyone else fought.
- Keep an eye out for leaves on the map, they can be useful. If a unit ends their turn on leaves, they will be able to get extra movement for their next turn. You can use it to your advantage if you need to traverse the map quickly.
- Just be aware of enemies ending their turns on leaves because they will have increased movement too. Regular enemy infantry had 7 movement because of the boss’s movement buff as well as from the leaves – you’d expect that kind of movement from a mounted unit or a flying unit, they can get into the whole castle really quickly.
- I defeated as many enemy units as I could for the free experience, then I defeated the boss right on Turn 14 because he drops a Quick Feet Scroll, a scroll that gives 1 extra permanent movement to a character.
These guides take a significant amount of time and effort to make, and anything that can be given is extremely appreciated.
https://paypal.me/BAIZEGAMING
BTC: 33iDpHvVwwcMyxhrv83rL75TXpmgBd72Xv
Recent Posts