Demon Gaze EXTRA – ALL Maps Screenshots and Exploration Tips
Exploration Tips
We will have no plot spoilers herein, we’ll only be listing dungeon names and some demon names.
- Make sure to always carry Comet with you, she has an ability to detect breakable walls (they’ll show as a gear icon while you explore). This is important because you’ll likely miss breakable walls that you need to break and go through to progress the main story. You can break the walls without carrying Comet but you’ll need to randomly guess which wall to kick. If you see our maps and see that a wall where there shouldn’t be, kick it to destroy it.
- When you get Chronos, carry her with you because she will make you immune to damage tiles. Late-game you don’t need to do this as much because you can tank through the damage.
- When you get Venus, you need to use her to open doors in Grimodar B2 – Endless Road and on her floor in the Blackcage.
- If you want less encounters, you’ll get the Gazer Fame skill on your Demon Gazer class character at a certain level. Use this skill outside of battle and it’ll last until you return to the Inn.
- The squares on the left side indicate the map location in the whole dungeon. For example, Red City consists of four maps, and the left-side square position indicates where the current map is in the whole dungeon.
- If you’re stressed out with the game and want a game save to download with maxed levels, all consumables and best equipment, please download our Demon Gaze EXTRA Game Save HERE (works on Nintendo Switch).
If you’d rather watch a video playlist of us going through the maps, see our YouTube playlist HERE.
Red City
Red City – Eternal Fire

Red City – Lake Infestation

Red City – Harbor District

Red City – Fire Dragon Foot

Slave Grave
Slave Grave – Unmarked Grave

Slave Grave – Cursed Cemetery

Slave Grave – King’s Court

You won’t get access to the King’s Court area of Slave Grave until near the endgame. You get to it from the right side teleport, using the King’s Road.
Star Curtain
Star Curtain – Sunbeam Forest

Star Curtain – Wandering Forest

Star Curtain – White Garden

Star Curtain – Starlight Forest

Star Curtain – Garden of Thorns

Star Curtain – Fairy Hideout

You won’t get access to the Fairy Hideout area of Star Curtain until mandatory plot events. You’ll only be allowed to take your protagonist Gazer into the area during the mandatory plot events, but if you come back again later in the game after completing those events you can take your entire team (it’s easy enough you don’t have to do this though).
Blue City
Blue City – Submerged City

Blue City – Shumer Lake

Grimodar Castle 1F
Grimodar Castle 1F – Castle Elevator

Remember this map well, you’ll need to return to the two elevators on this floor later on to access other areas of the game. You can’t use the elevators when you first get here but you will be able to as you progress the story and return.
Grimodar Castle 1F – Barracks

Grimodar Castle 1F – War Room

Grimodar Castle 1F – Huge Warehouse

You will fight a Skeleton Lord in the Huge Warehouse area. Defeating it allows you access to more of Grimodar Castle when you talk to a Shark Party member by the gates.
Grimodar Castle 2F
Grimodar Castle 2F – Power Room

Grimodar Castle 2F – Worship Room

The Worship Room has the Shark Lord Party. You’ll be returning here often so remember this map.
Grimodar Castle 2F – Guard Tower

Grimodar Castle 2F – Treasury

The Treasury map has invisible teleports across many of the squares. You can use the route we filled out to avoid getting teleported away.
From the room use the portion of the map we filled out. So from where the teleports start you go west, south, north, east, south, east, north, etc. until you get to the end. (The teleportation room is where I have many unfilled squares on the map.)
Clock Tower
We have omitted these maps, it’s very linear straight hallways, just fight all of the enemies quickly and don’t make detours.
You need to go up the tower to 8F, then jump off at X:13, Y12 (make sure to do this, don’t jump off the wrong square) and climb up the other side of the tower killing the rest of the enemies.
Grimodar Castle B1 Dungeon
You’ll need a Door Key to progress in this area. It’s in the Workshop area, so see the Workshop map below for more detail.
Grimodar Castle B1 Dungeon – Admin Building

Grimodar Castle B1 Dungeon – VIP Prison

With this map you’ll need to activate the colored levers in certain orders according to puzzles, but they’ll always remain open afterwards even when you go back to the inn so no worries. To open all doors in this map, activate the levers in the follow orders for each door:
Blue, Red, White
White, Red, Blue
Red, Blue, White
Grimodar Castle B1 Dungeon – Workshop

The Door Key needed to progress on other maps is in the Workshop map above, at X13, Y10.
Grimodar Castle B1 Dungeon – Prison Room

Grimodar Castle B1 Dungeon – Maximum Security

Grimodar Castle B2 Endless Road (Upper Floor)
The Endless Road can be kind of tricky, make sure to explore all routes to get all of the mythril for the golem. Some of these maps have underground areas as well below, including submerged and fire areas.
You can’t access King’s Road from here, you get to King’s Road from the elevator in Grimodar Castle 1F.
Grimodar Castle B2 Endless Road – Dark Mine

Grimodar Castle B2 Endless Road – Tunnel Elevator

Grimodar Castle B2 Endless Road – Light Mine

Grimodar Castle B2 Endless Road – Large Cavity

The Large Cavity is a weird map at first, at the end of the western road there’s a golem who can toss you to the eastern paths, either close, far, or farthest. You unlock him throwing you farther distances by finding mythril balls in the mines and feeding them to him.
If you’re stuck, check the routes you’ve unlocked for mythril balls. You may need to hurt or buy it from miners in the areas and there’s also a golem miniboss that has 3 mythril balls. You’ll need to unlock all circles as well as usual!
- 1 mythril ball in Hellfire Area West (X18,Y17 attack miners)
- 1 mythril ball in Dark Mine (X18,Y17 buy or steal from miners)
- 1 in Flooded Mine (X03,Y18)
- Return to Golem in Large Cavity, feed him 3 Mythril Balls and go to Farther Area
- 3 mythril balls in F Spirit Cave (X07,Y18 golem miniboss)
- 1 mythril ball in W Spirit Cave (X09,Y10)
- 1 mythril ball in Flooded Mine West (X18,Y03 miners give it to you if you choose “Keep the Secret”)
- Return to Golem in Large Cavity, feed him 5 Mythril Balls and go to Farthest Area
Grimodar Castle B2 Endless Road (Lower Floor)
Grimodar Castle B2 Endless Road – W Spirit Cave

Grimodar Castle B2 Endless Road – Flooded Mine

Grimodar Castle B2 Endless Road – King Road

Grimodar Castle B2 Endless Road – Hellfire Area

Grimodar Castle B2 Endless Road – F Spirit Cave

Grimodar Castle 3F
This is unlocked from the elevator on Grimodar 1F after visiting the Clock Tower for the second time and it’s pretty much the endgame.
Grimodar Castle 3F – Spring Palace

Grimodar Castle 3F – Fall Palace

Grimodar Castle 4F
Grimodar Castle 4F – Summer Eden

Grimodar Castle 4F – Winter Eden

3F Winter Eden is the map with the final boss. To get to it you’ll need to complete plot events which includes exploring all of the 3F and 4F areas, but when you’re finished you need to head to 3F Spring Palace, then go north and you’ll get to this map, and the final boss will be to the south.
Black Cage
To unlock all the areas you need to get the Demon Keys from the main plot. To fully explore these areas you need to fight the final boss in Winter Eden, otherwise you will not be able to progress, so although you can start it during the main story you need to be in postgame to finish the entire dungeon.
It’s a long dungeon so I’d recommend doing it all in one go.
Black Cage – Comet’s Cell

Black Cage – Mar’s Cell

Black Cage – Chronos’ Cell

Black Cage – Hermes’ Cell

Black Cage – Neptune’s Cell

Black Cage – Jupiter’s Cell

Black Cage – Venus’ Cell

Use Venus to unlock doors in this area. If you don’t have her, you can always go to the previous floor’s circle and change the Demon Keys you have equipped.
Black Cage – Astro’s Cell

Black Cage – Uranus’ Cell

Black Cage – Pluto’s Cell

Black Cage – Luna’s Cell

This is the same as the Clock Tower, make sure to kill the enemies quickly and get to the circle in the northeastern corner.
Black Cage – Terra’s Cell

Unfortunately this is a teleporting maze, try to explore all possible routes to get through.
Black Cage – Sol’s Cell

Black Cage – Aries’ Cell
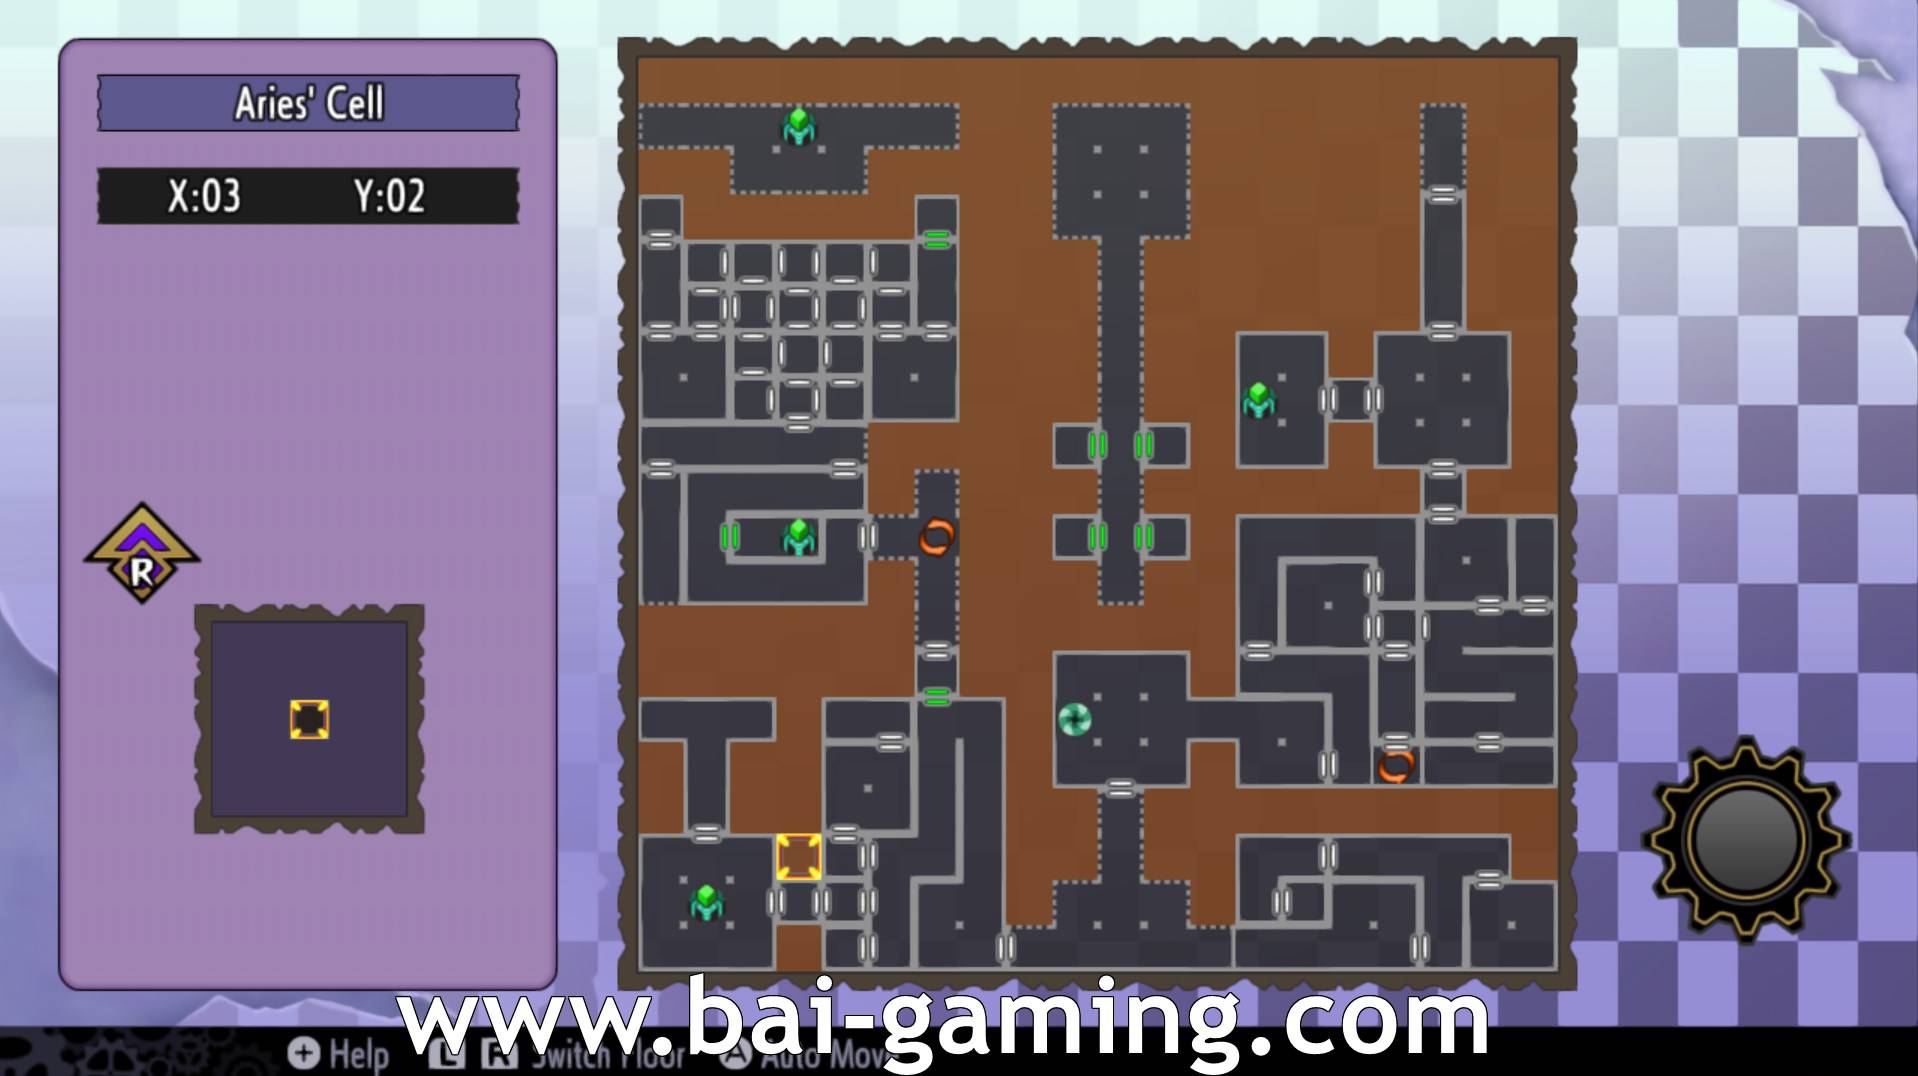
The boss is north of the hallway. To get to it, there’s an unmarked teleporter in the north-eastern most square on the map. To unlock the four doors find all the levers from exploring.
There’s a lot of squares that will randomly teleport you but this floor doesn’t have too many of them so you can just memorize where it does it, it’s not confusing at all.
God’s Eden
To unlock this, complete the Black Cage and then return to the Inn and talk to Fran. Then go to where the final boss was in Winter Eden and you will teleport here.

These guides take a significant amount of time and effort to make, and anything that can be given is extremely appreciated.
https://paypal.me/BAIZEGAMING
BTC: 33iDpHvVwwcMyxhrv83rL75TXpmgBd72Xv


